Background
After a first round that resulted in a tie (apologies, didn't keep enough records to post it here) on Akial Interference against a savvy Military Orders opponent, I found myself matched up against the glorious SneakySnake.
For a quick recap of the first round, the summary is essentially this -- it's really hard to hack a Knight of Justice behind a tinbot, and Akial Interference is a fairly random mission that can hinge a lot on which classifieds are drawn.
My opponent took an early lead on classifieds by scoring HVT: Espionage twice on the first turn while I failed my WIP rolls to do the same, and I gradually dug my way out of that to eke out a tie. But I that required cycling through the majority of my classified deck, since I kept pulling cards that were incredibly inefficient to do and just filtering for a different card.
In the event, most of the cards I did were done by my Knight of Justice hacker, who did a bang up job all game, but my opponent did a ton of cards on my unconscious Beasthunter's body and we came out even. Great game. Most ties are.
Prelude
I'd finally met at the Krug in August and, in addition to being a great guy, he's a dedicated Military Orders player who was certainly looking to trial the recent Military Orders updates. We agreed to play on a Saturday morning.
I'd played against Sneaky a couple of years ago and am aware of his love of running double Trinitarian snipers, so I was fully prepared to face those, but wasn't really sure what else I'd be seeing. Whatever he was playing, I was sure that it would be a tense and entertaining game.
Area of Interest is a mission that's not really favored for the first or second player. There's a slight second player advantage in that major scoring happens at the end of the game, with other scoring done at end of round, but that's balanced out by the first player having the choice of which area will be a "special" scoring area that's scored every round, whereas the others are only scored at the end of game.
Sneaky won the LT roll and elected to go first. Taking a quick glance at the board, it wasn't immediately obvious whether one side or the other had an advantage for placing or securing the scoring areas, and I took a side of the board that I felt offered slightly better vantage points for diagonal shots across the board.
The Lists
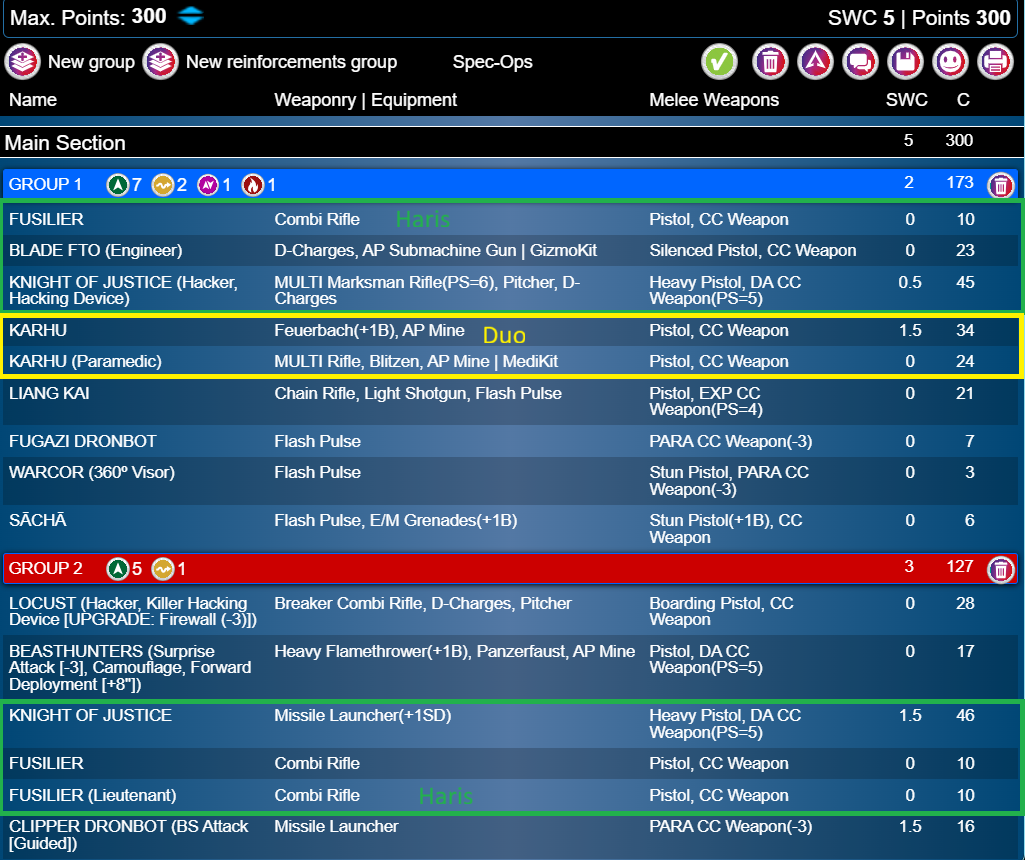
I ran the same list that I'd run in the first round of the tournament and which had worked well. The changes to the Knight of Justice profiles in MO filtered down to Svalarheima and, while Knights of Justice don't have any useful keywords in Svalarheima and are 0-1 per fireteam as wildcards, the hacker and missile launcher (with +1SD for a B1+2 EXP ARO) both look quite good.
Importantly, they also add cheap bulk and strong visorless shooting in Svalarheima, which is something it often struggles with. At BTS9, they're not easy to hack, but also not nearly so critical to a list as a Jotum. So losing one to hacking isn't particularly damaging to a game plan. Especially since Blades are (Fusilier) in Sval and it's thus very easy to provide +1SD and a useful engineer for the hacker along with a tacaware order.
The list also includes a Karhu duo, which I basically never leave home without. And the newly changed Locust with a backup pitcher as well as Liang Kai. Liang Kai over Shona as a solo piece is something I'm still going back and forth on. I really appreciate the FD+4" and impetuous order of Liang Kai, but I'm not really sure on him at times. Shona's 6-2 move is really useful, especially when jumping, and the fact that she can claim cover until triggering Frenzy is ace.
Opponent List
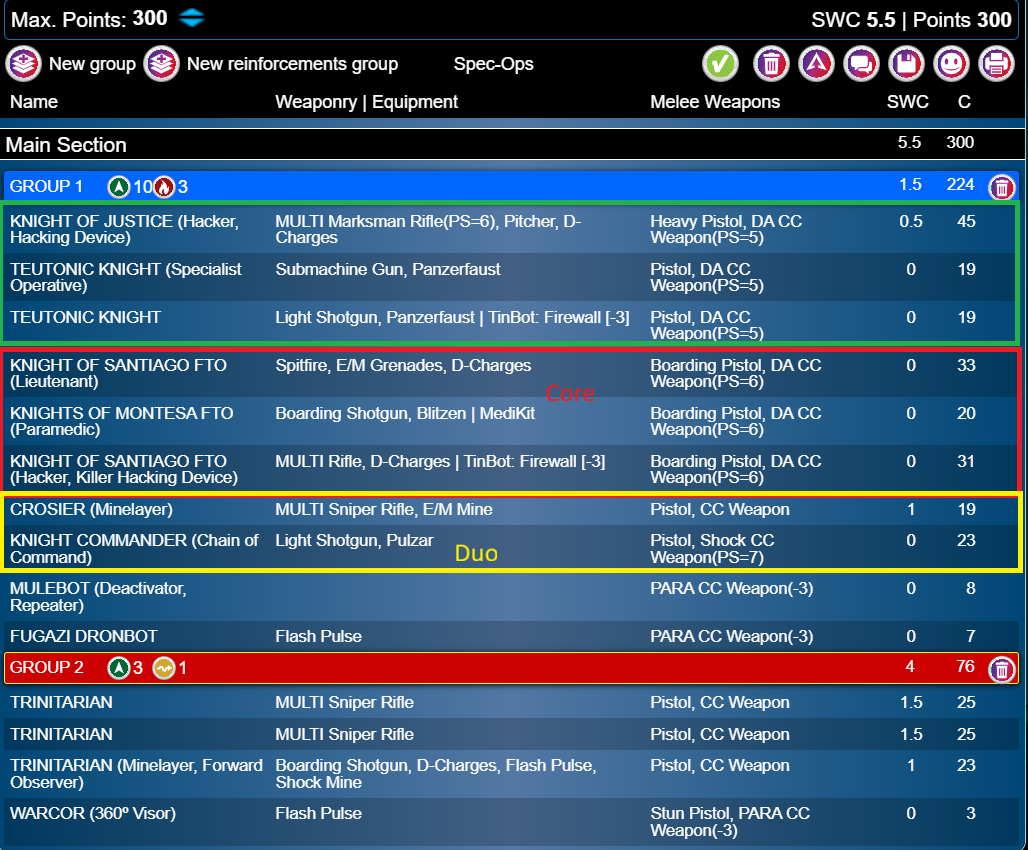
As expected, SneakySnake ran a list with a double Trinitarian sniper. I didn't know this for sure when he deployed, but there were either three or four models in hidden deployment once he finished his deployment, and it was relatively obvious knowing his preferences what two of them would be. A deployable repeater that was placed using Minelayer made one of the other hidden units obvious, although clearly the specifics of where the HD unit was were unknown.
Running a three member link with two Teutons and a Knight of Justice hacker was a clear aggressive choice, and I expected that link to do most of the work in the game. The link with the Montesa and two Santiagos is great for defense with a B1+2 Blitzen on the Montesa and means both of his heavy links are sitting behind the best tinbots PanO has to offer.
The Crosier sniper was deployed alongside a prone Crosier paramedic (now known to be a holomasked Knight Commander). Crosier duos are new in MO as of the recent update, and are really nice to allow the faction to bring a decent bottom end without compromising on the heavy knight links that comprise the main strength of the sectorial.
Classifieds
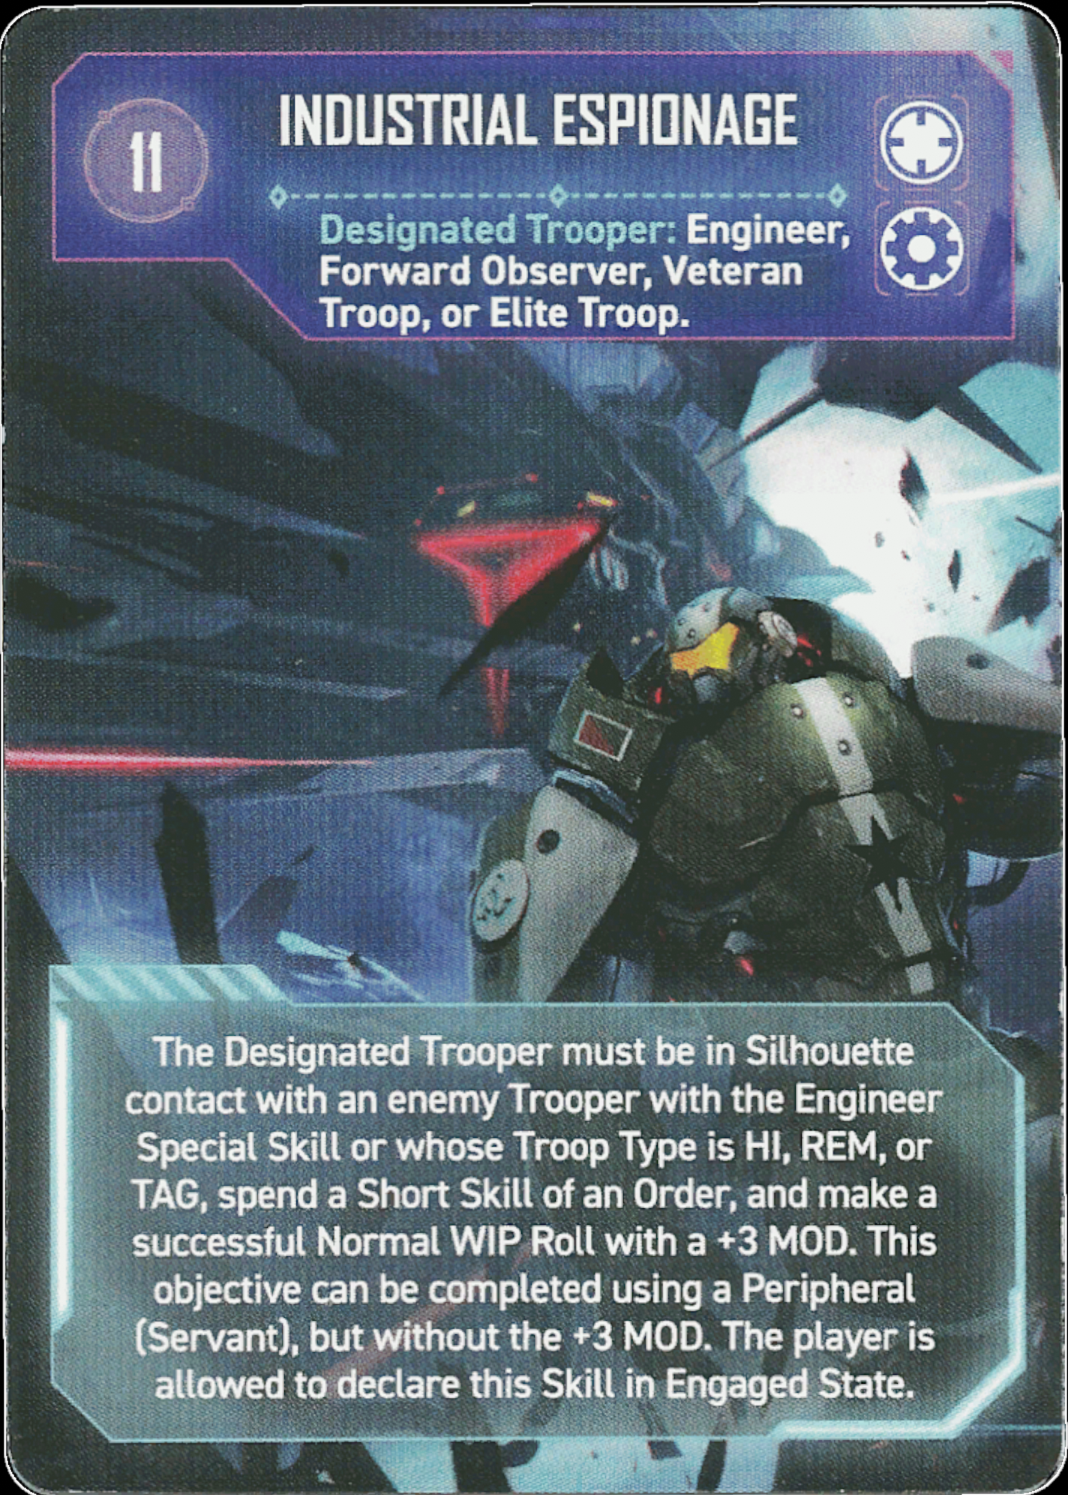
I selected Industrial Espionage as my classified for the mission. While it's a difficult classified to complete, it can be done by a lot of troopers in my list and Military Orders felt likely to present at least one good target to complete this objective. My other classified was HVT: Espionage, which is by no means an easy one to complete. Especially on a radial deployment map like this one and where I had a clearly defined role for my Locust already in pushing the center console.
Deployment
We deployed the areas of interest as part of deployment, and I realized while doing so that I hadn't examined the board properly. I hadn't played this scenario before (shame on me for not practicing), and the new ITS scenarios require a bit of a different look at the board. One not only has to judge where to place one's own troops, but also where three templates can be placed.
Sneaky had two great, relatively protected places to place zones. And, as the player going first, he got to place the first and third. He wisely placed them in good positions that were accessible and defensible from his DZ, and I placed mine in about the only spot that I could do so and also defend it.
As an aside, this is something I hope CB cleans up a bit in wording -- I've heard some debate as to how different metas play this. Some play it where the template can be placed underneath scatter terrain but not buildings, and others (IGL included) play that the area must be completely open. I feel that the second way is a more natural way of reading the rules, but it's evidently sparked some discussion.
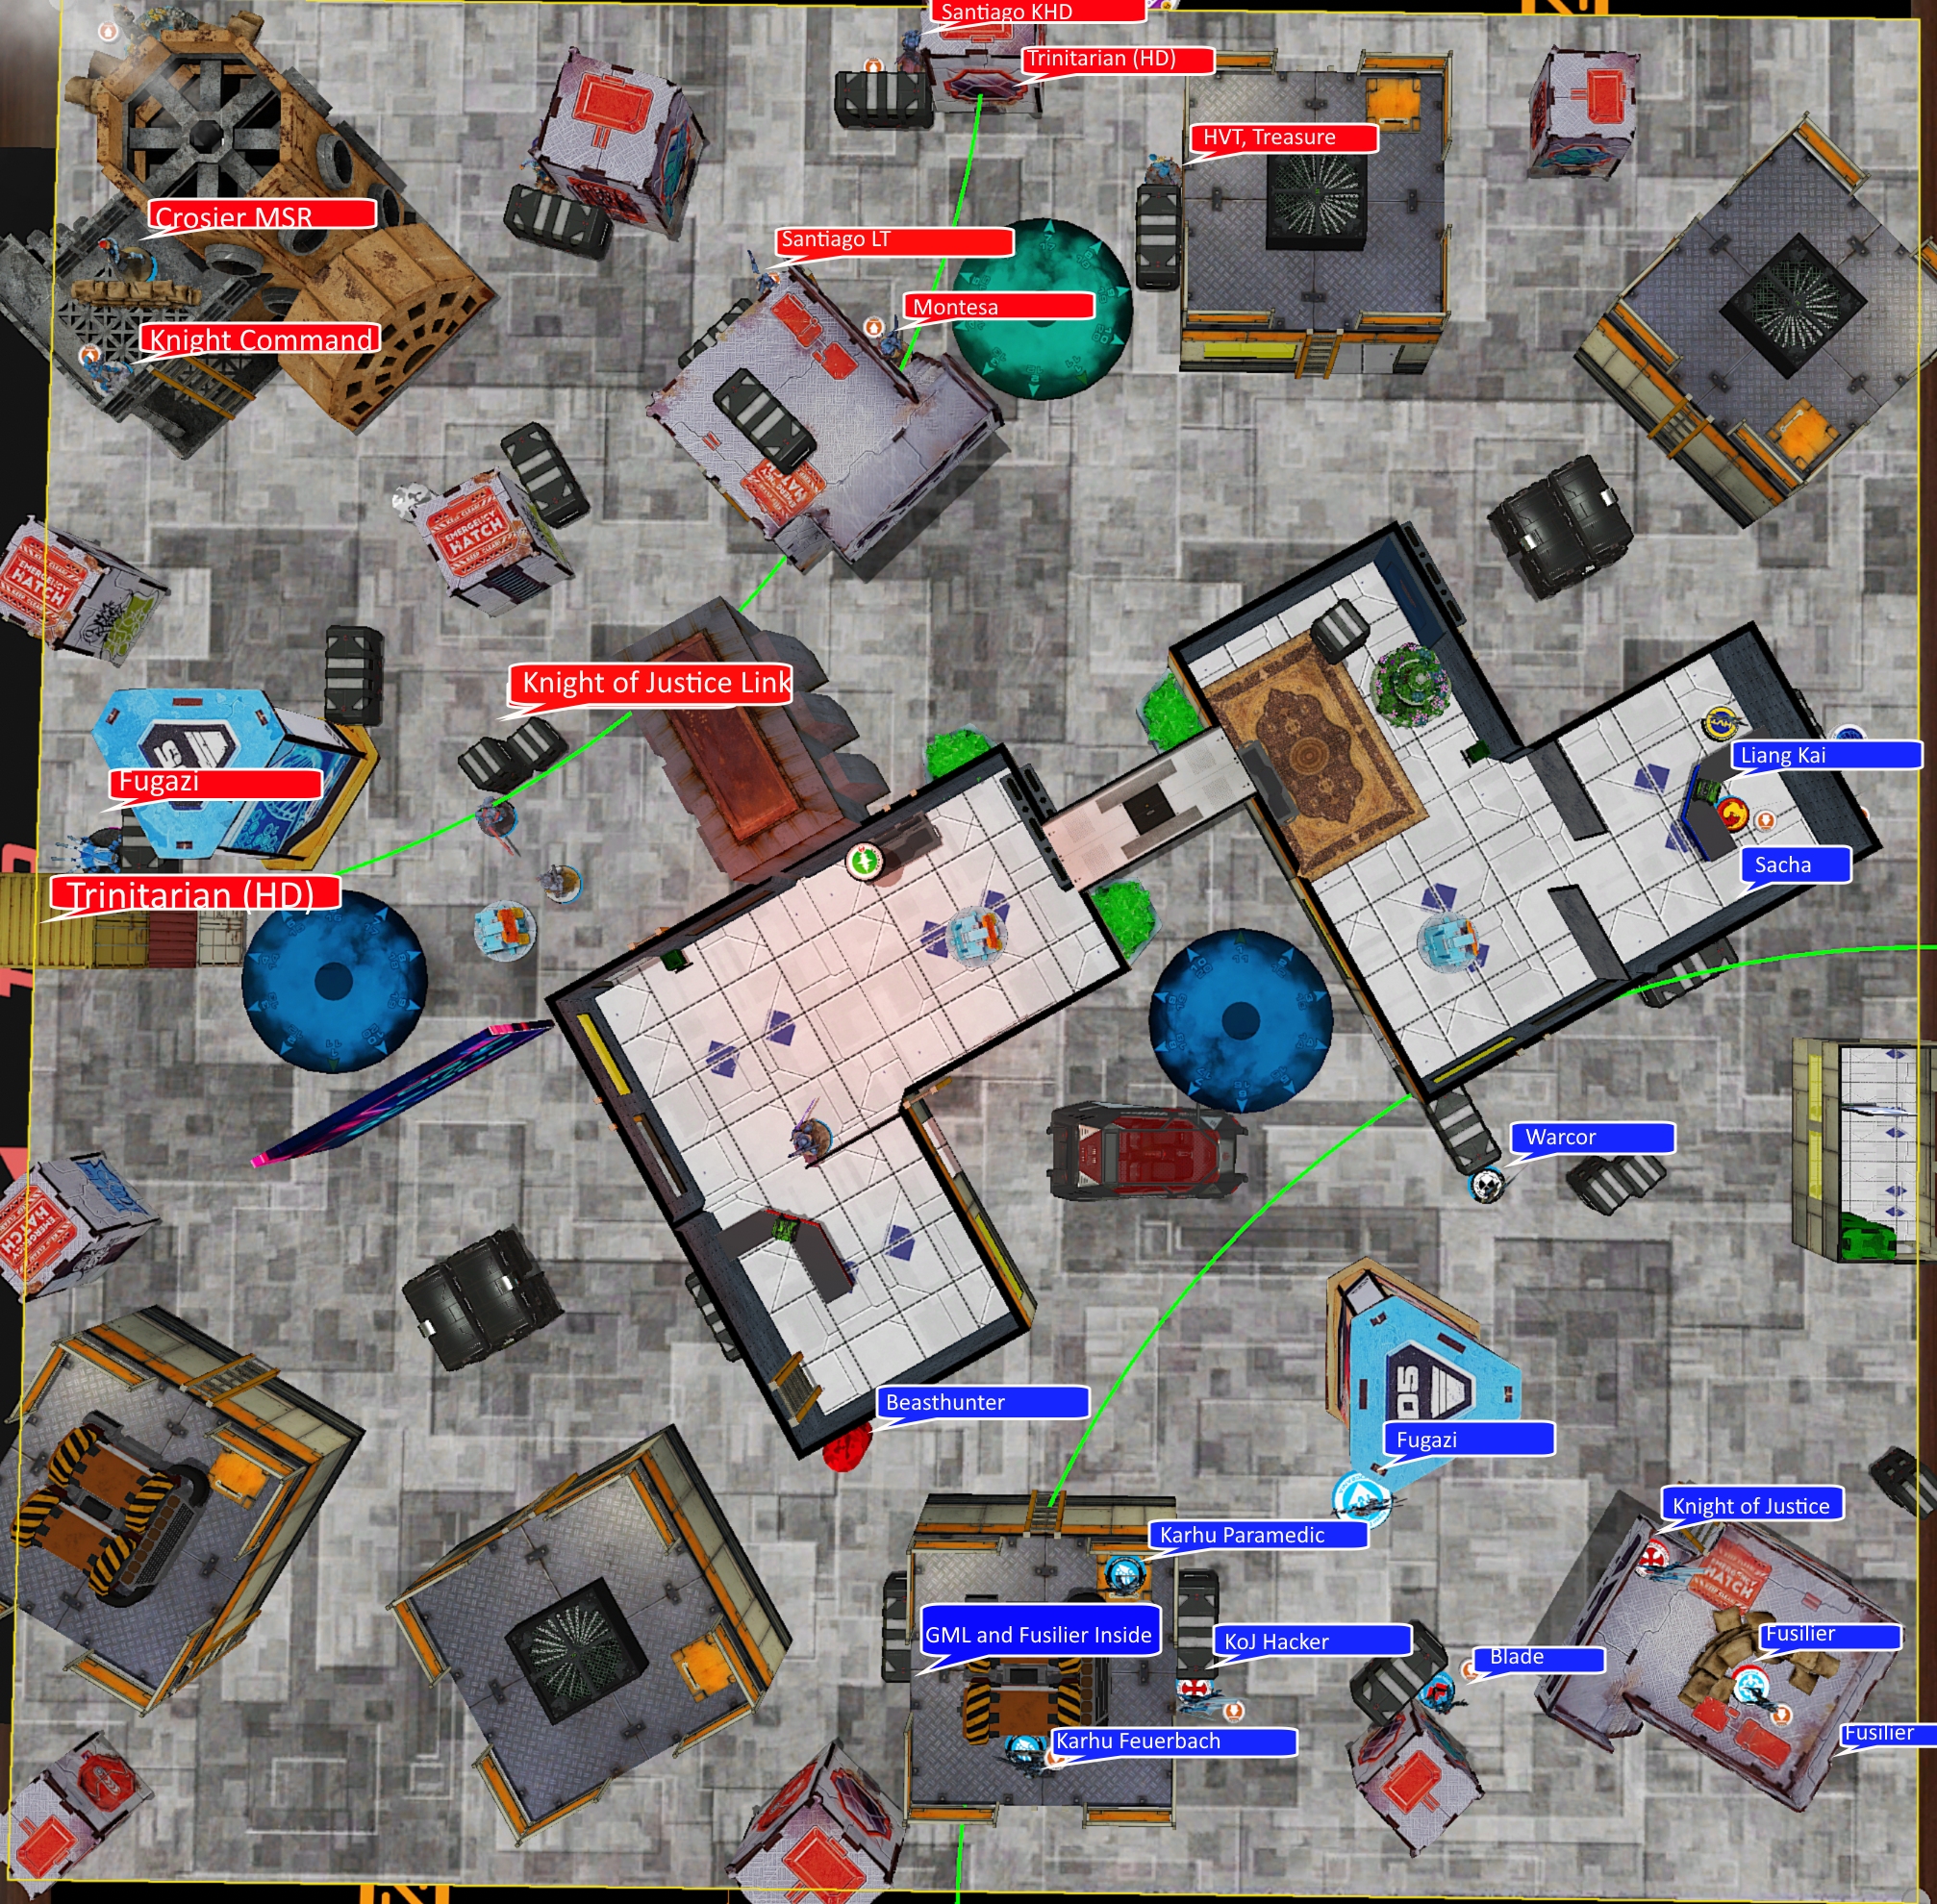
Sneaky chose a zone just outside his DZ to be the special zone, and deployed his Santiago link to occupy it easily. His Knight of Justice/Teuton link went on the other side of his DZ, positioned aggressively to move through the central building and attack in good range for his MULTI Marksman. He placed his Crosier sniper on a tall building watching most of his half of the board, and spread around a couple of other AROs in various places to watch the central console through windows.
I deployed my Knight of Justice missile launcher and link on a building near the corner of my DZ, watching down the main corridor through the center of the map. My Karhus went on the other accessible rooftop, not wanting to be easily vulnerable to an attack, and my Knight of Justice hacker went down to watch the central corridor from a different angle and cover the back of my Fugazi and Warcor.
The guided missile bot and one of my Fusiliers got spread around to round out the link, and my Locust was hidden deployed inside the building to make a run at the console when a chance arose.
Looking at the map, I noted a building where I expected a Trinitarian sniper to be. And said it out loud. Then deployed in a way that would hurt me in my first turn anyway. Brain was apparently not fully working that morning.
Turn One (Military Orders)
I docked Sneaky two orders from his main combat group, and he spent an order occupying the special area with his Santiago before setting out with his Knight of Justice link. They moved through the building and detoured slightly to push the button in that building before popping out of the side door.
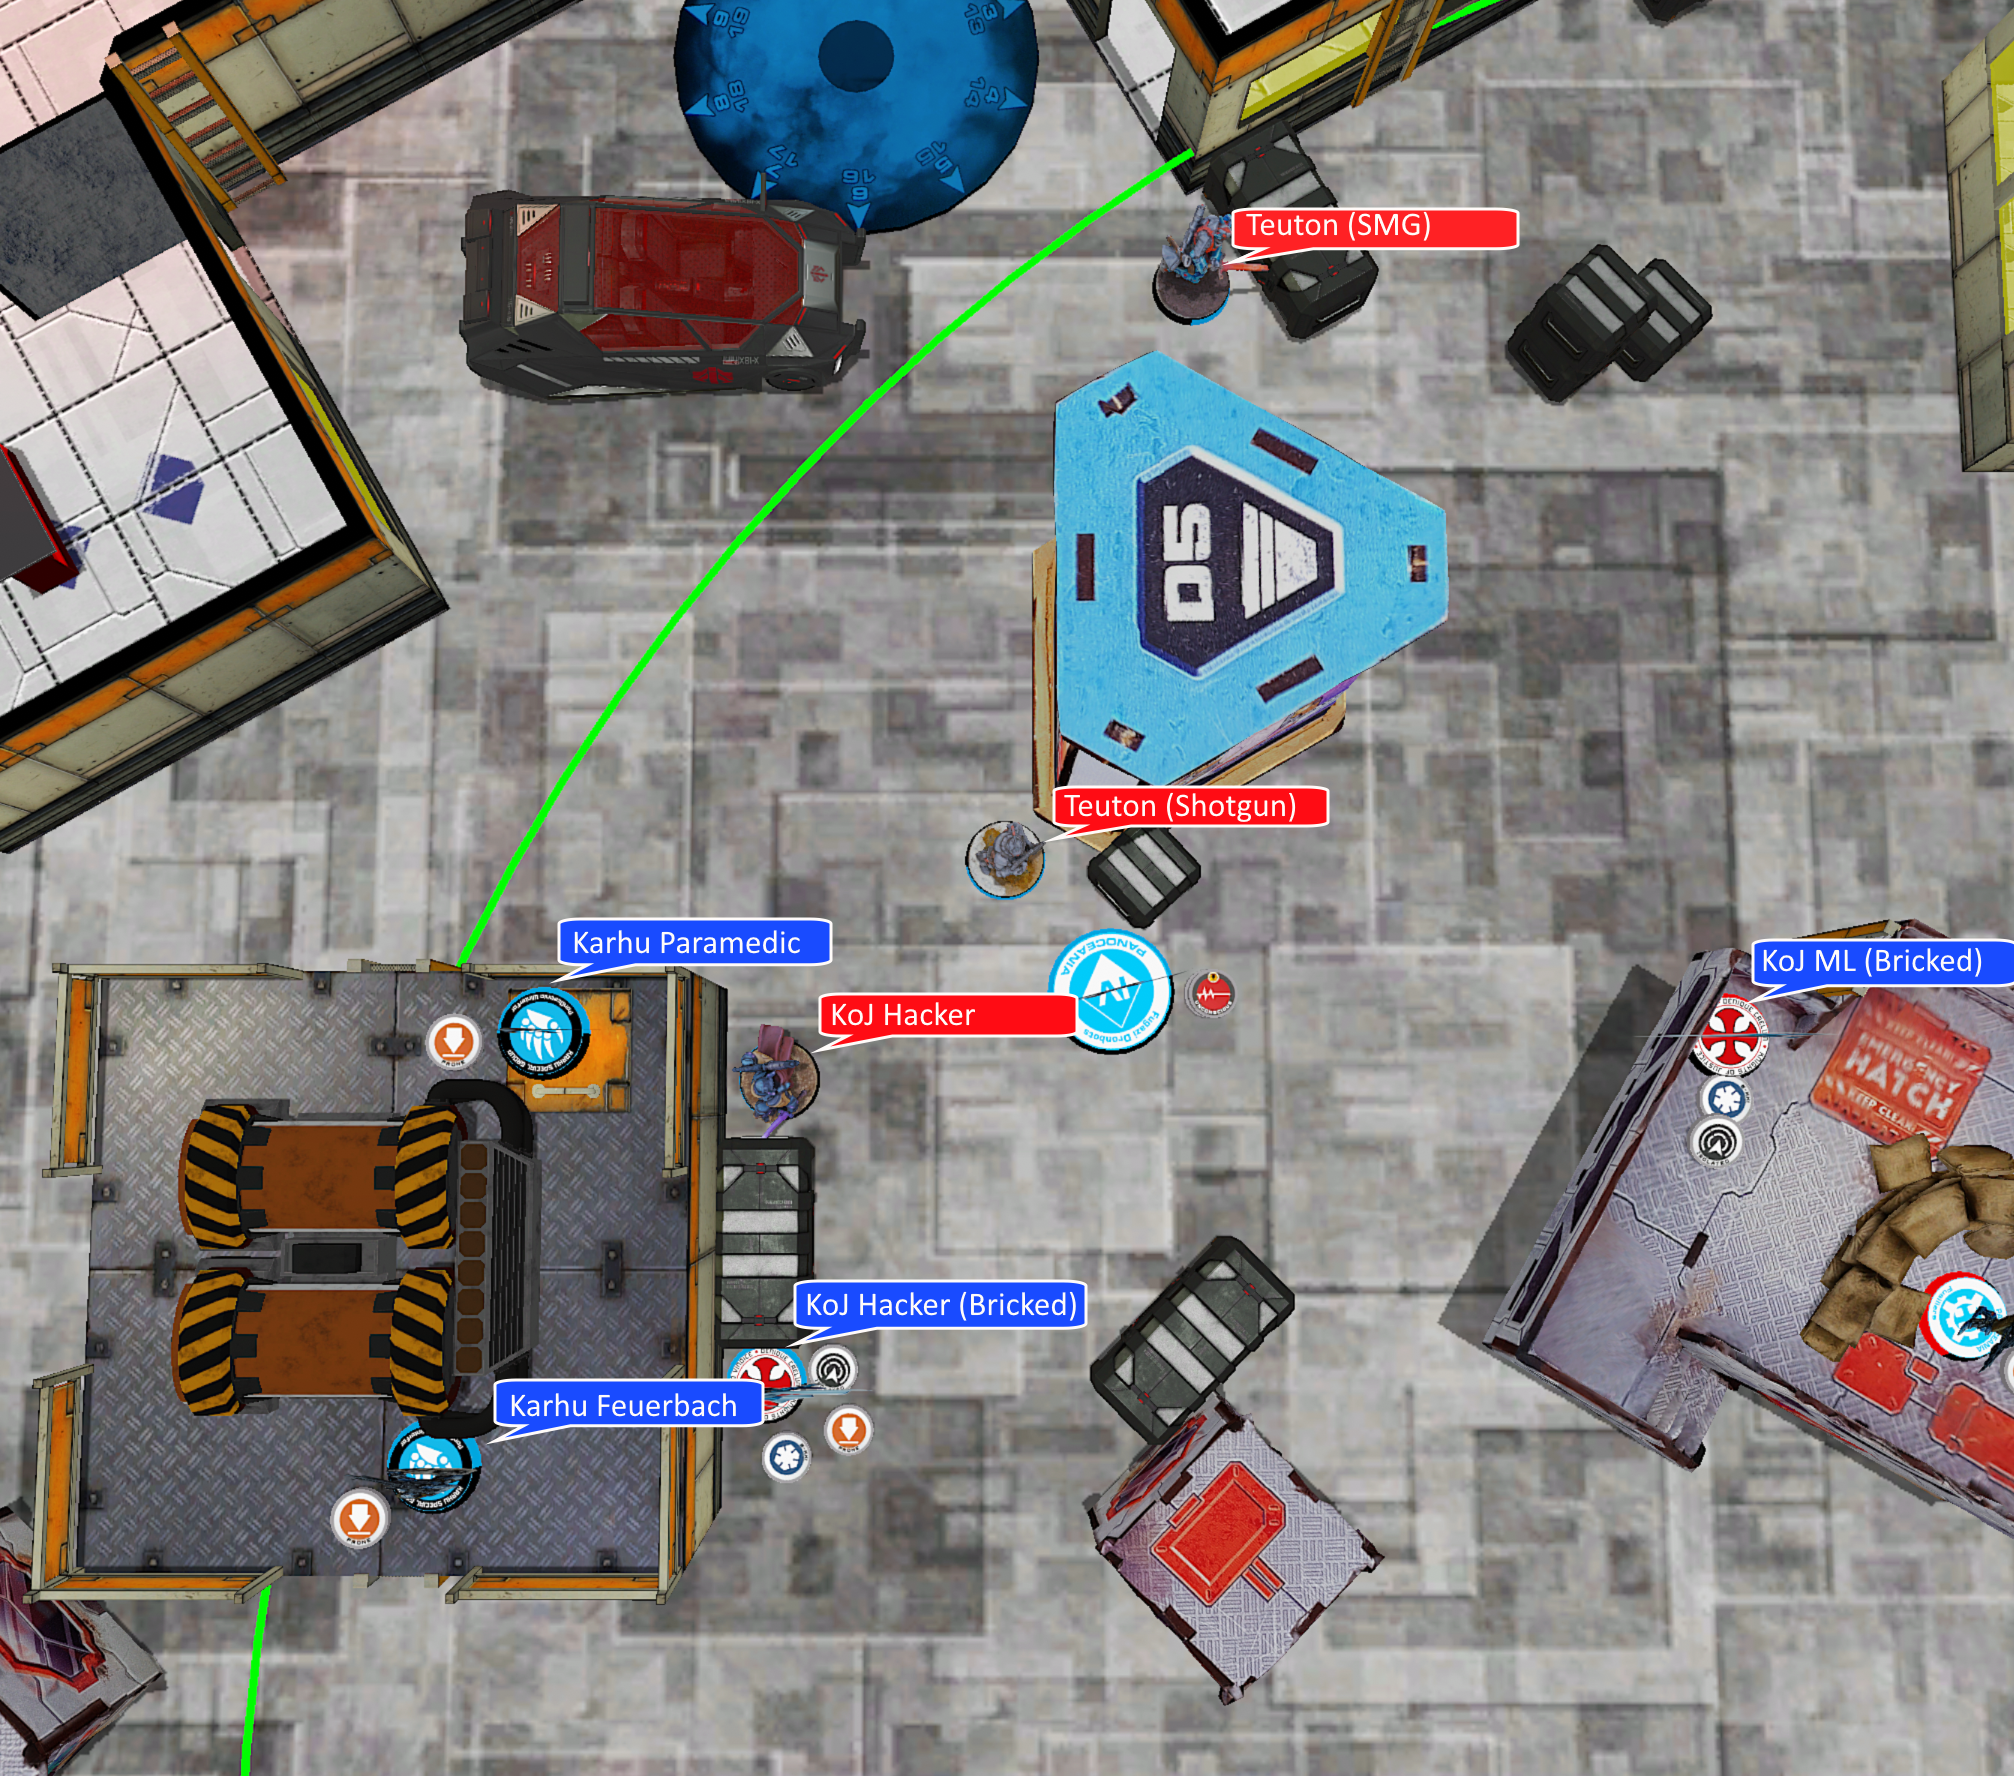
He shot down my Warcor pretty easily, then bounced off the Fugazi for an order before deciding that he was nigh-invulnerable to its Flash Pulse with his Knight of Justice. Which, with BTS9 plus cover, he functionally was. He then shot a pitcher near my Knight of Justice hacker and another covering the other Knight of Justice and withdrew towards his deployment zone, hacking me as he went. It took a few orders, but he isolated and it and isolated the Knight of Justice with the missile launcher, then passed turn.
Action shot of pitchers going down.
It was a pretty effective first turn, and I'd need to spend most of my first turn just clearing his well positioned repeaters and resetting my position. But he didn't get far enough to reload his pitchers, so it was at least a one-time deal and not much on my side of the board was actually proper dead.
Turn One (Svalarheima)
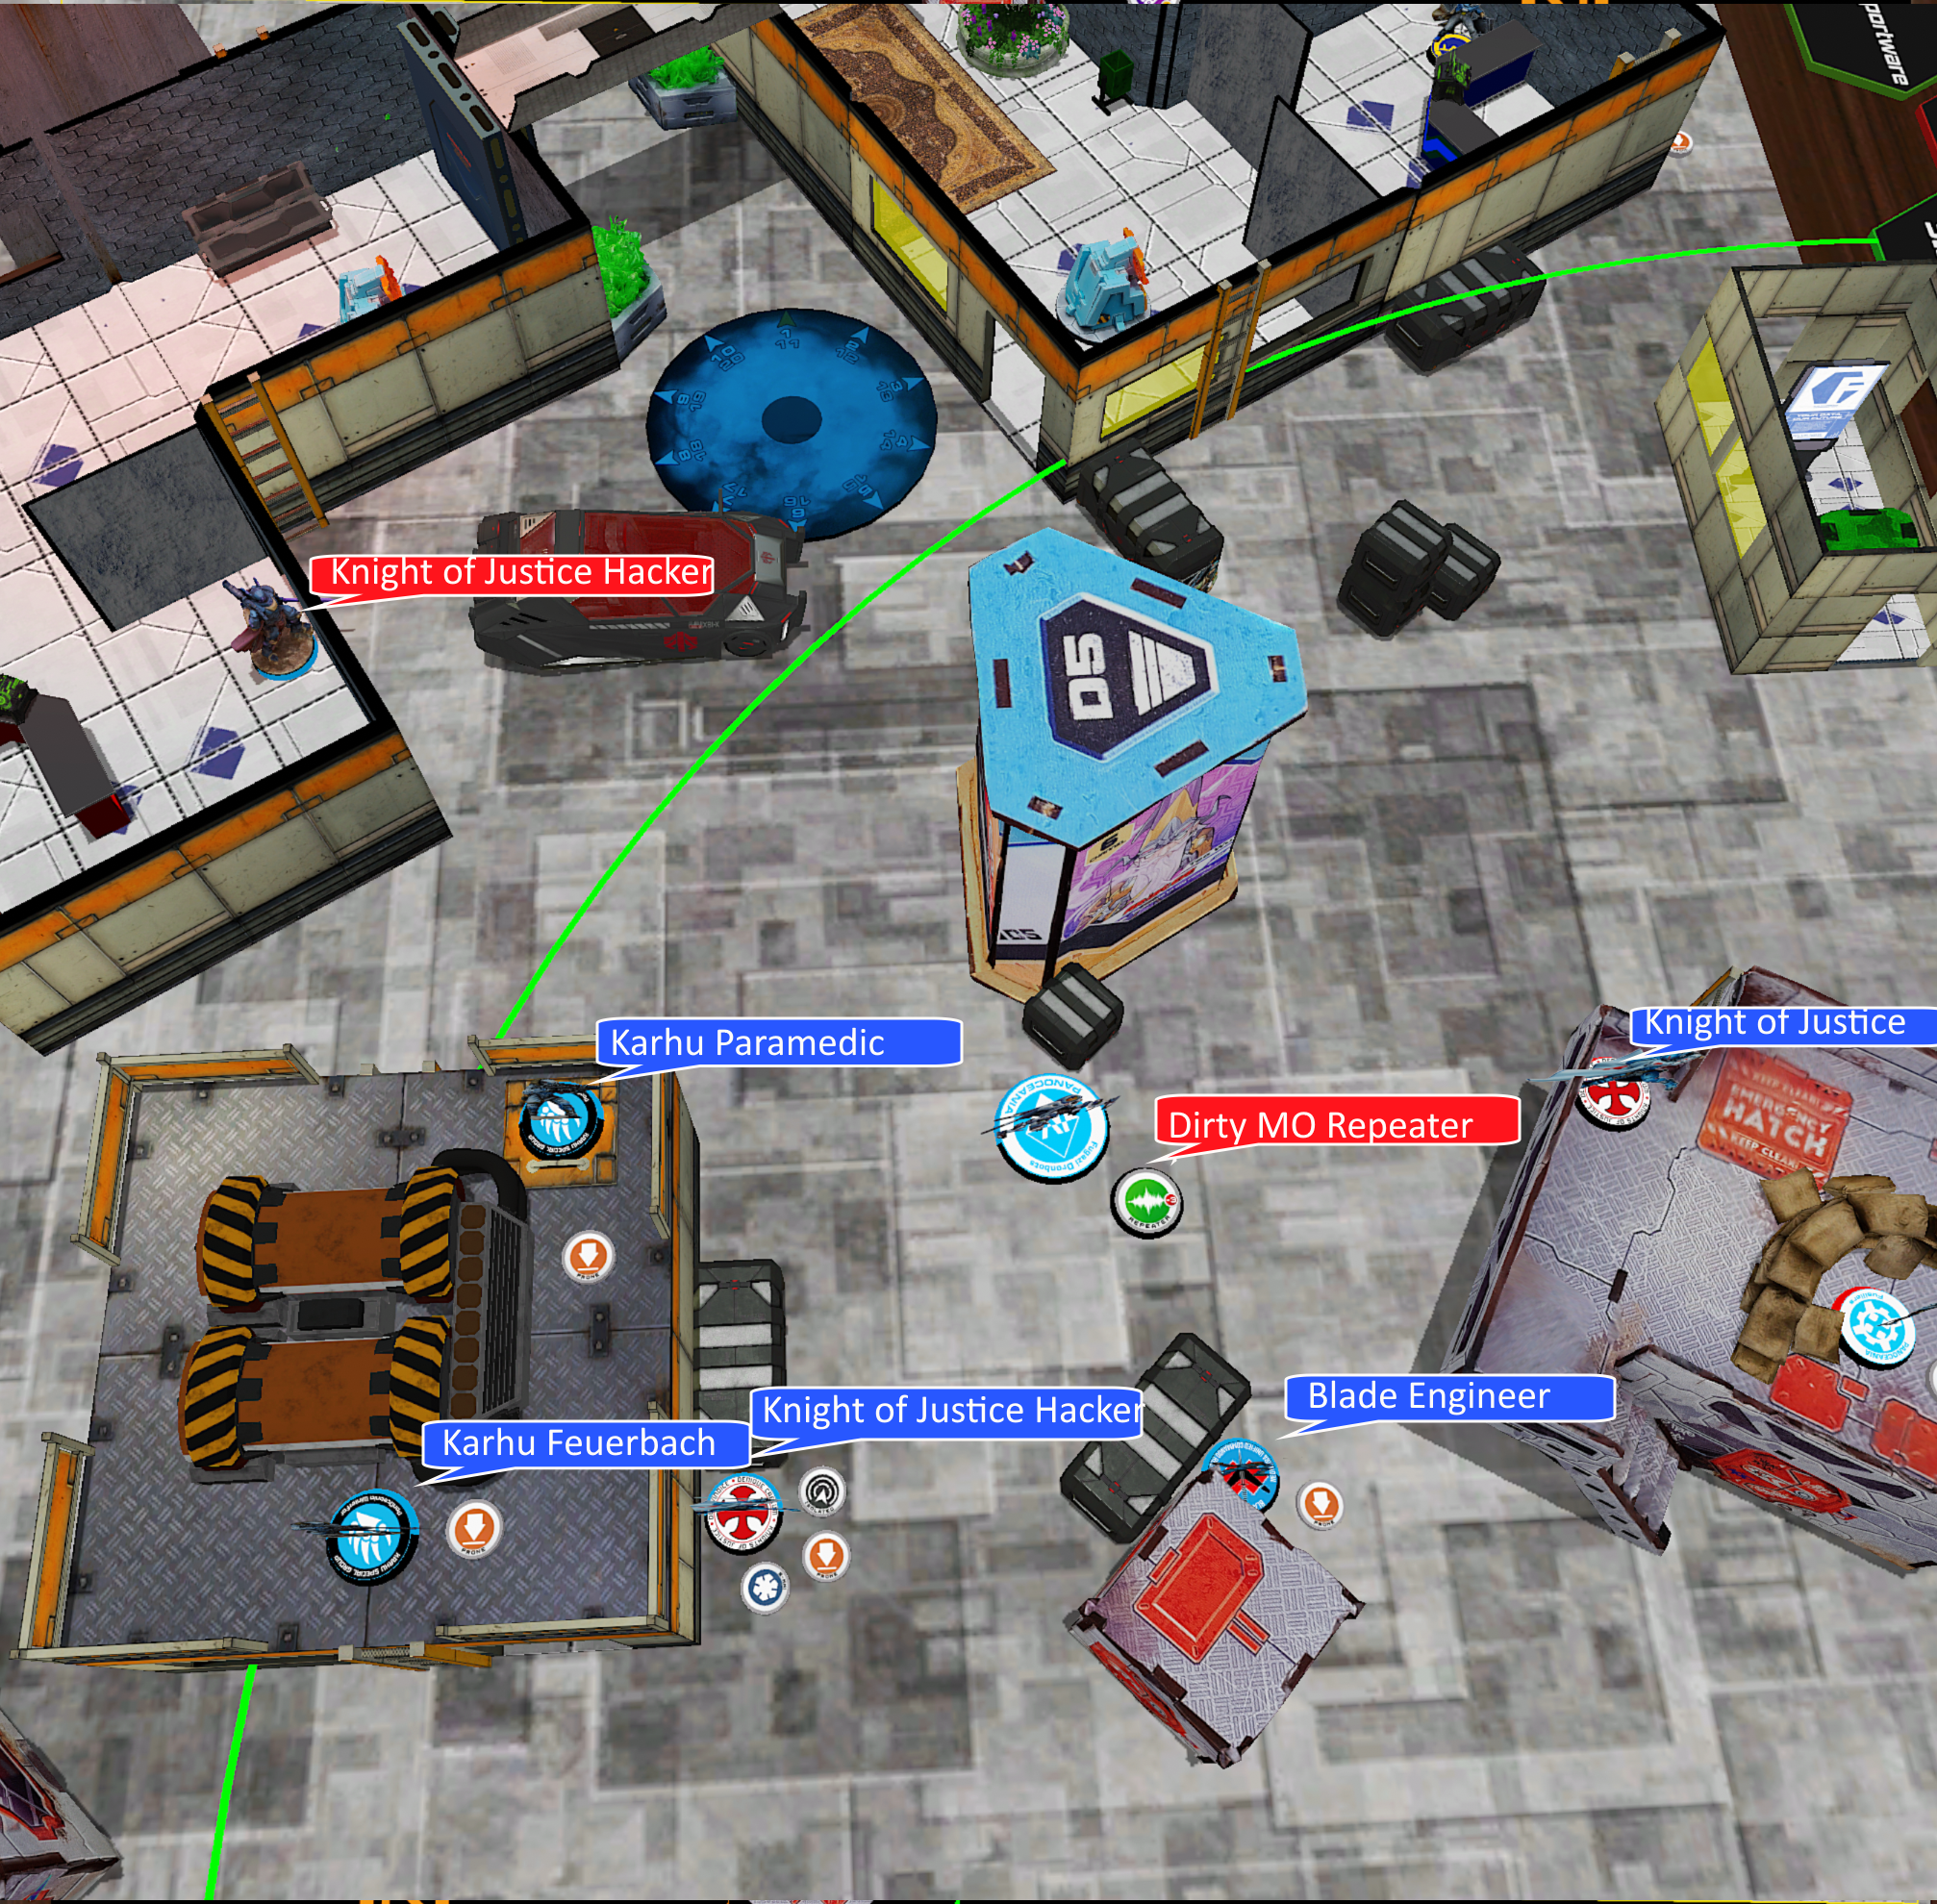
I immediately began by making mistakes. Liang Kai used his impetuous order to advance, with an eye on attacking his Santiago link from the back where he wasn't watching and claiming that zone. I then spent the tactical awareness order on the Blade and split burst to kill both repeaters.
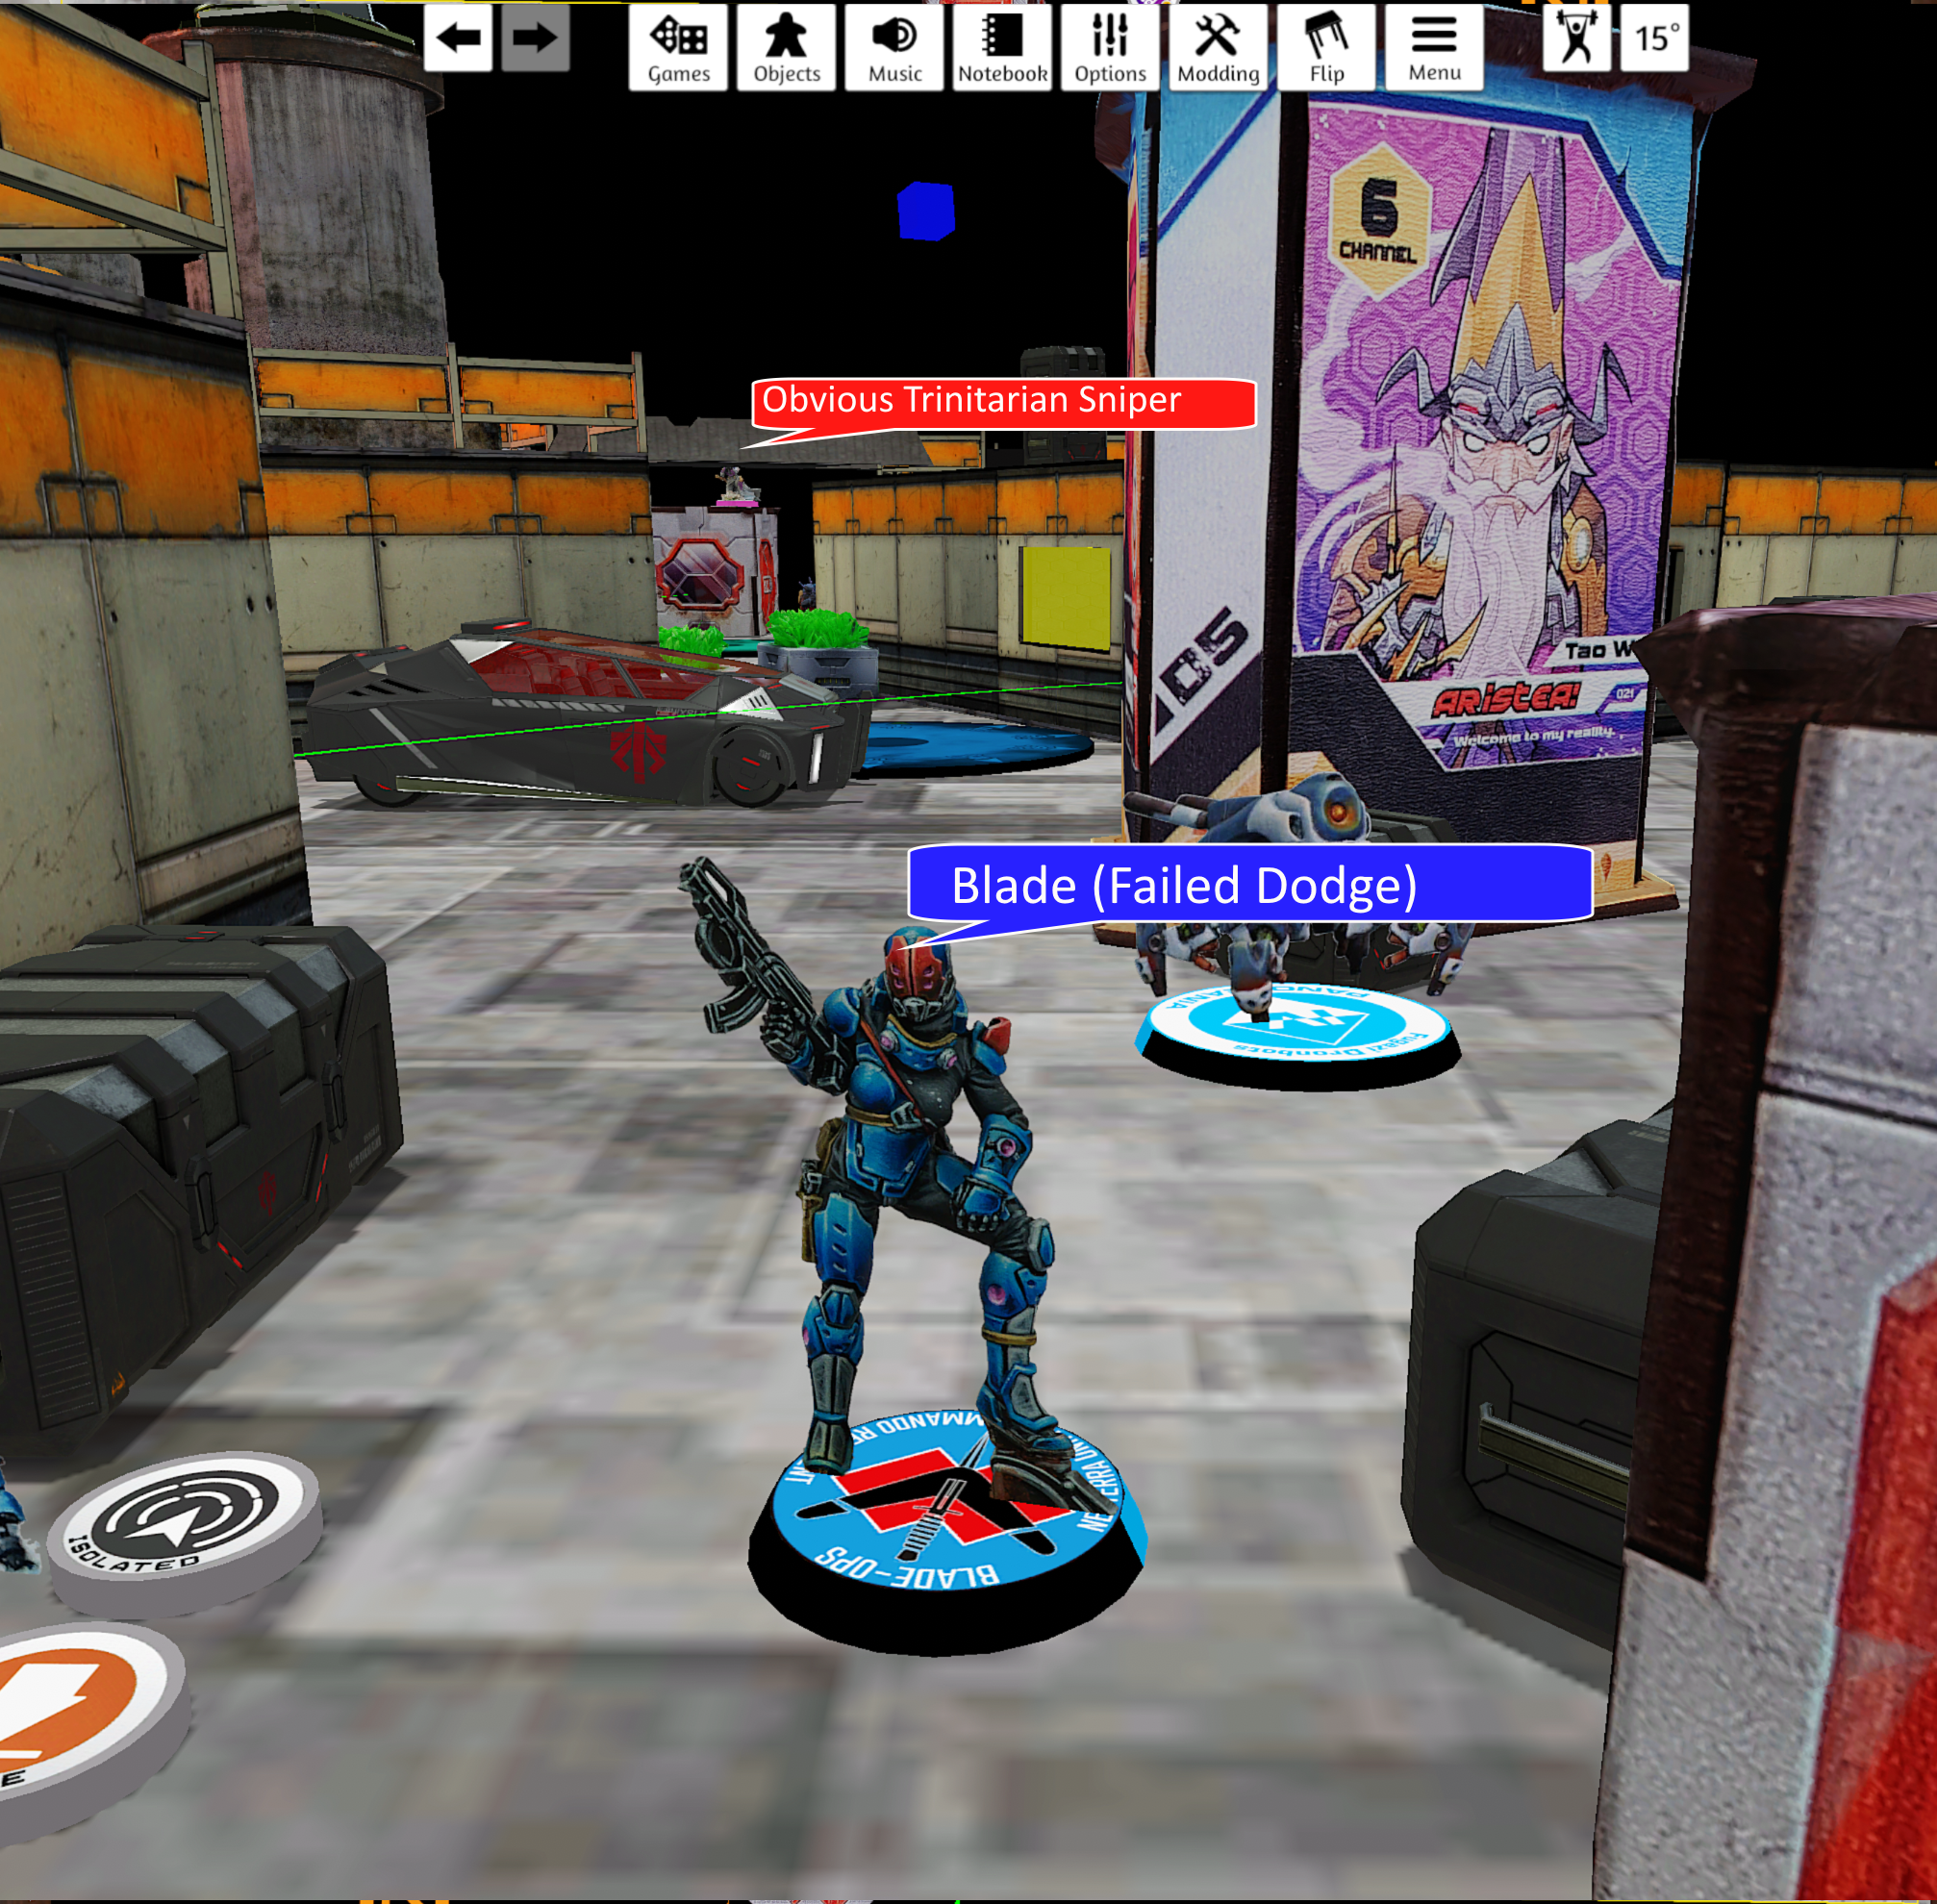
The Knight of Justice was bricked. No problem, I had my Blade nearby. So I spent an order and moved to engineer the hacker. In the process I walked into line of fire of the box that I'd noted as a good Trinitarian position during deployment, and... there was indeed a Trinitarian there. I dodged, but ate a DA round and died. Well, that was stupid. C'est la vie.
Uh oh...
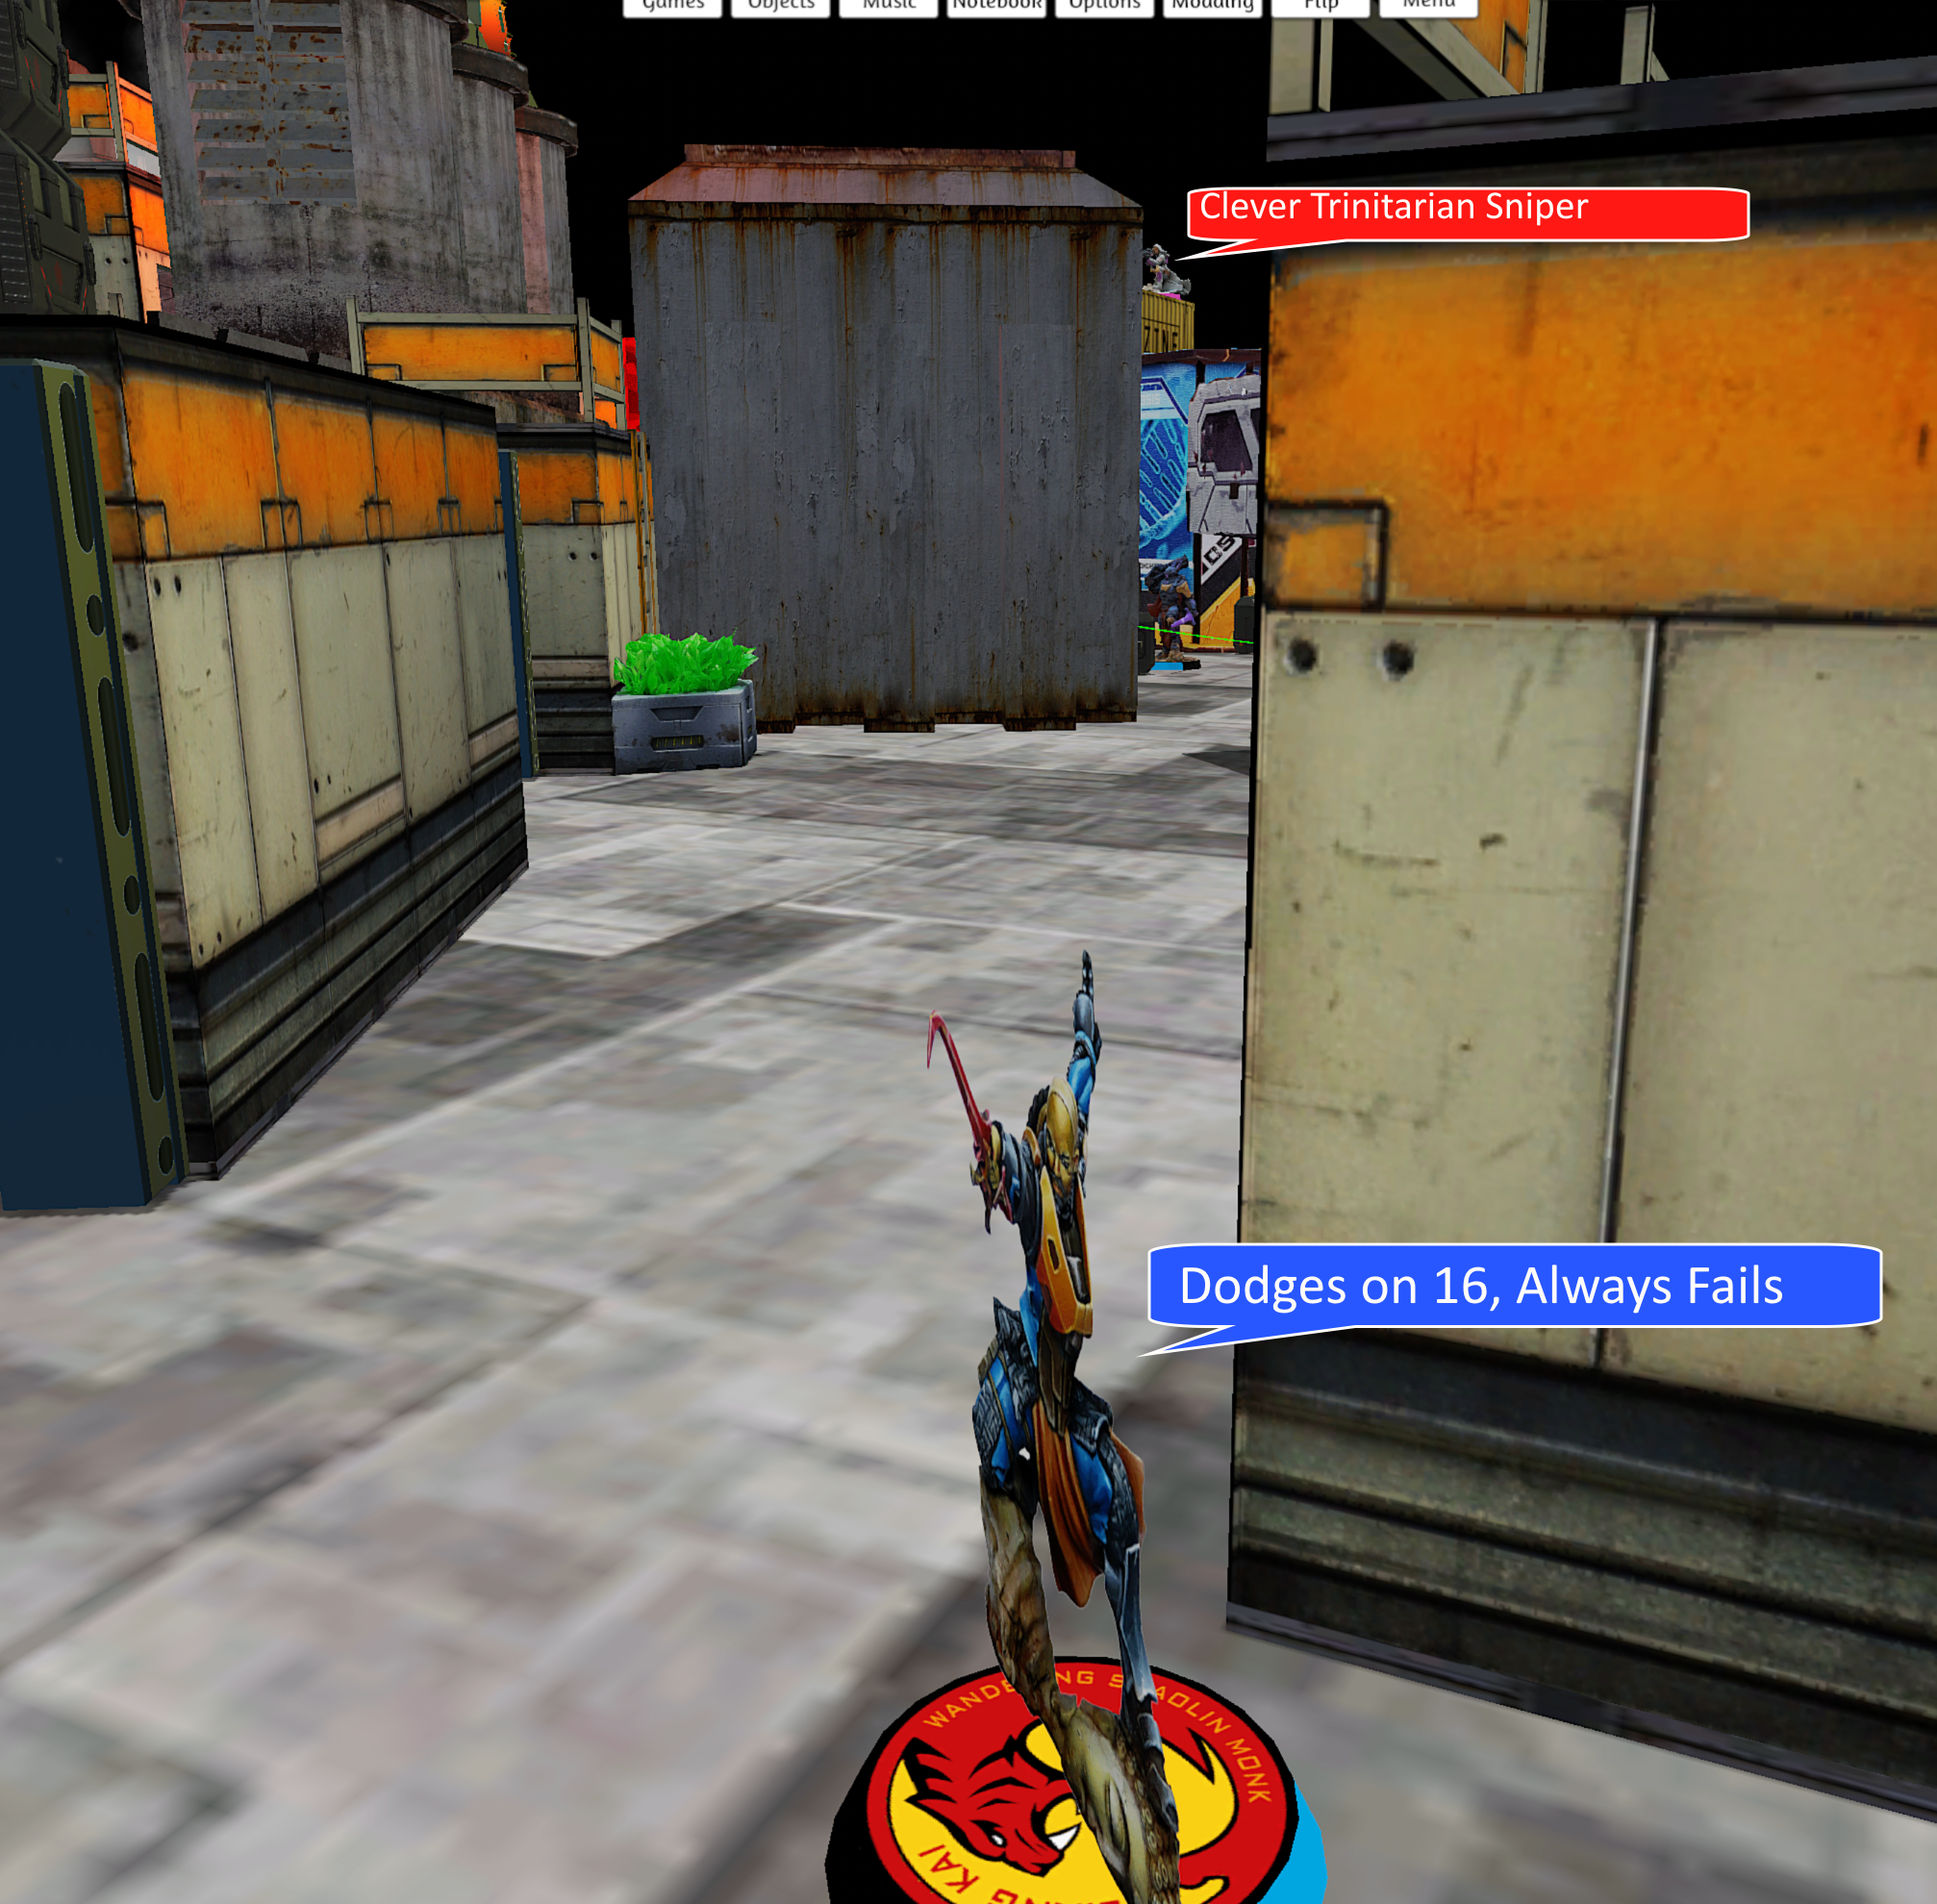
I turned my attention to Liang Kai and advanced up the board a bit. His Montesa was positioned in such a way that I had to Cautious Move for an order to get past its line of fire and that took some gracious cooperation from Sneaky to determine a spot that would be absolutely unseen but, on the next order, his other Trinitarian sniper revealed. He shot, and I dodged, but I ate a shock round and died. Really well positioned snipers by him. The odds of a Trinitarian killing a dodging Blade are okay if not stellar, and even worse against Liang Kai, but that's Infinity. You play to your outs, and Sneaky did that very well.
The Hope
And the Despair
With his Trinitarians revealed and Liang Kai and the Blade dead, I resorted to doing what damage I could. Karhu are excellent at that, and my Karhu feuerbach killed both Trinitarians, his Santiago spitfire that was scoring, and the Crosier sniper in short order. Sometimes I feel bad for leaning so hard on the power of the linked Karhu, but it's an incredible shooter and I was fortunate that the Trinitarian sniper at longer range was lower than me, so I was on B4 10s or better for all the fights (either zero range and cover, or good range and mim-6), whereas Sneaky was on 9s or worse when shooting back.
I spent my Group Two orders moving my Beasthunter up to flamethrower down the repeater on the roof above the console, hoping to clear the way for my Locust to push the button on the next turn.
Sneaky scored the console and went up 1-0.
Turn Two (Military Orders)
With all of his SWC guns dead and no more pitchers, Sneaky decided to repeat his success from last turn and go into my deployment zone. He spent a couple of command tokens to consolidate his combat groups down into one and went for it after spending an order to shuffle his Montesa into position to score the special zone at the end of the turn.
He advanced quickly through the building, not needing to interact with the console this time, and popped out of the door looking for a fight. But it took a few orders to get there and, as a result, he wasn't able to inflict an enormous amount of damage. He knocked out the Fugazi with ease and shot my Knight of Justice hacker to unconscious, then moved up to within hacking range and immobilized my Knight of Justice with missile launcher, then positioned his link to pin me back in my DZ in such a way that my Karhu couldn't shoot anything without being in +6 range for his Teuton's shotgun.
Which, great as Karhu are, isn't really a fight I want to take. B4 on 10s against B2 on 13s is too dicey for me unless absolutely necessary. He spent the time to Coup de Grace my Warcor, which was a pretty good hint that he had Predator as a classified objective. Not that I could do a whole lot about that, then passed turn.
Turn Two (Svalarheima)
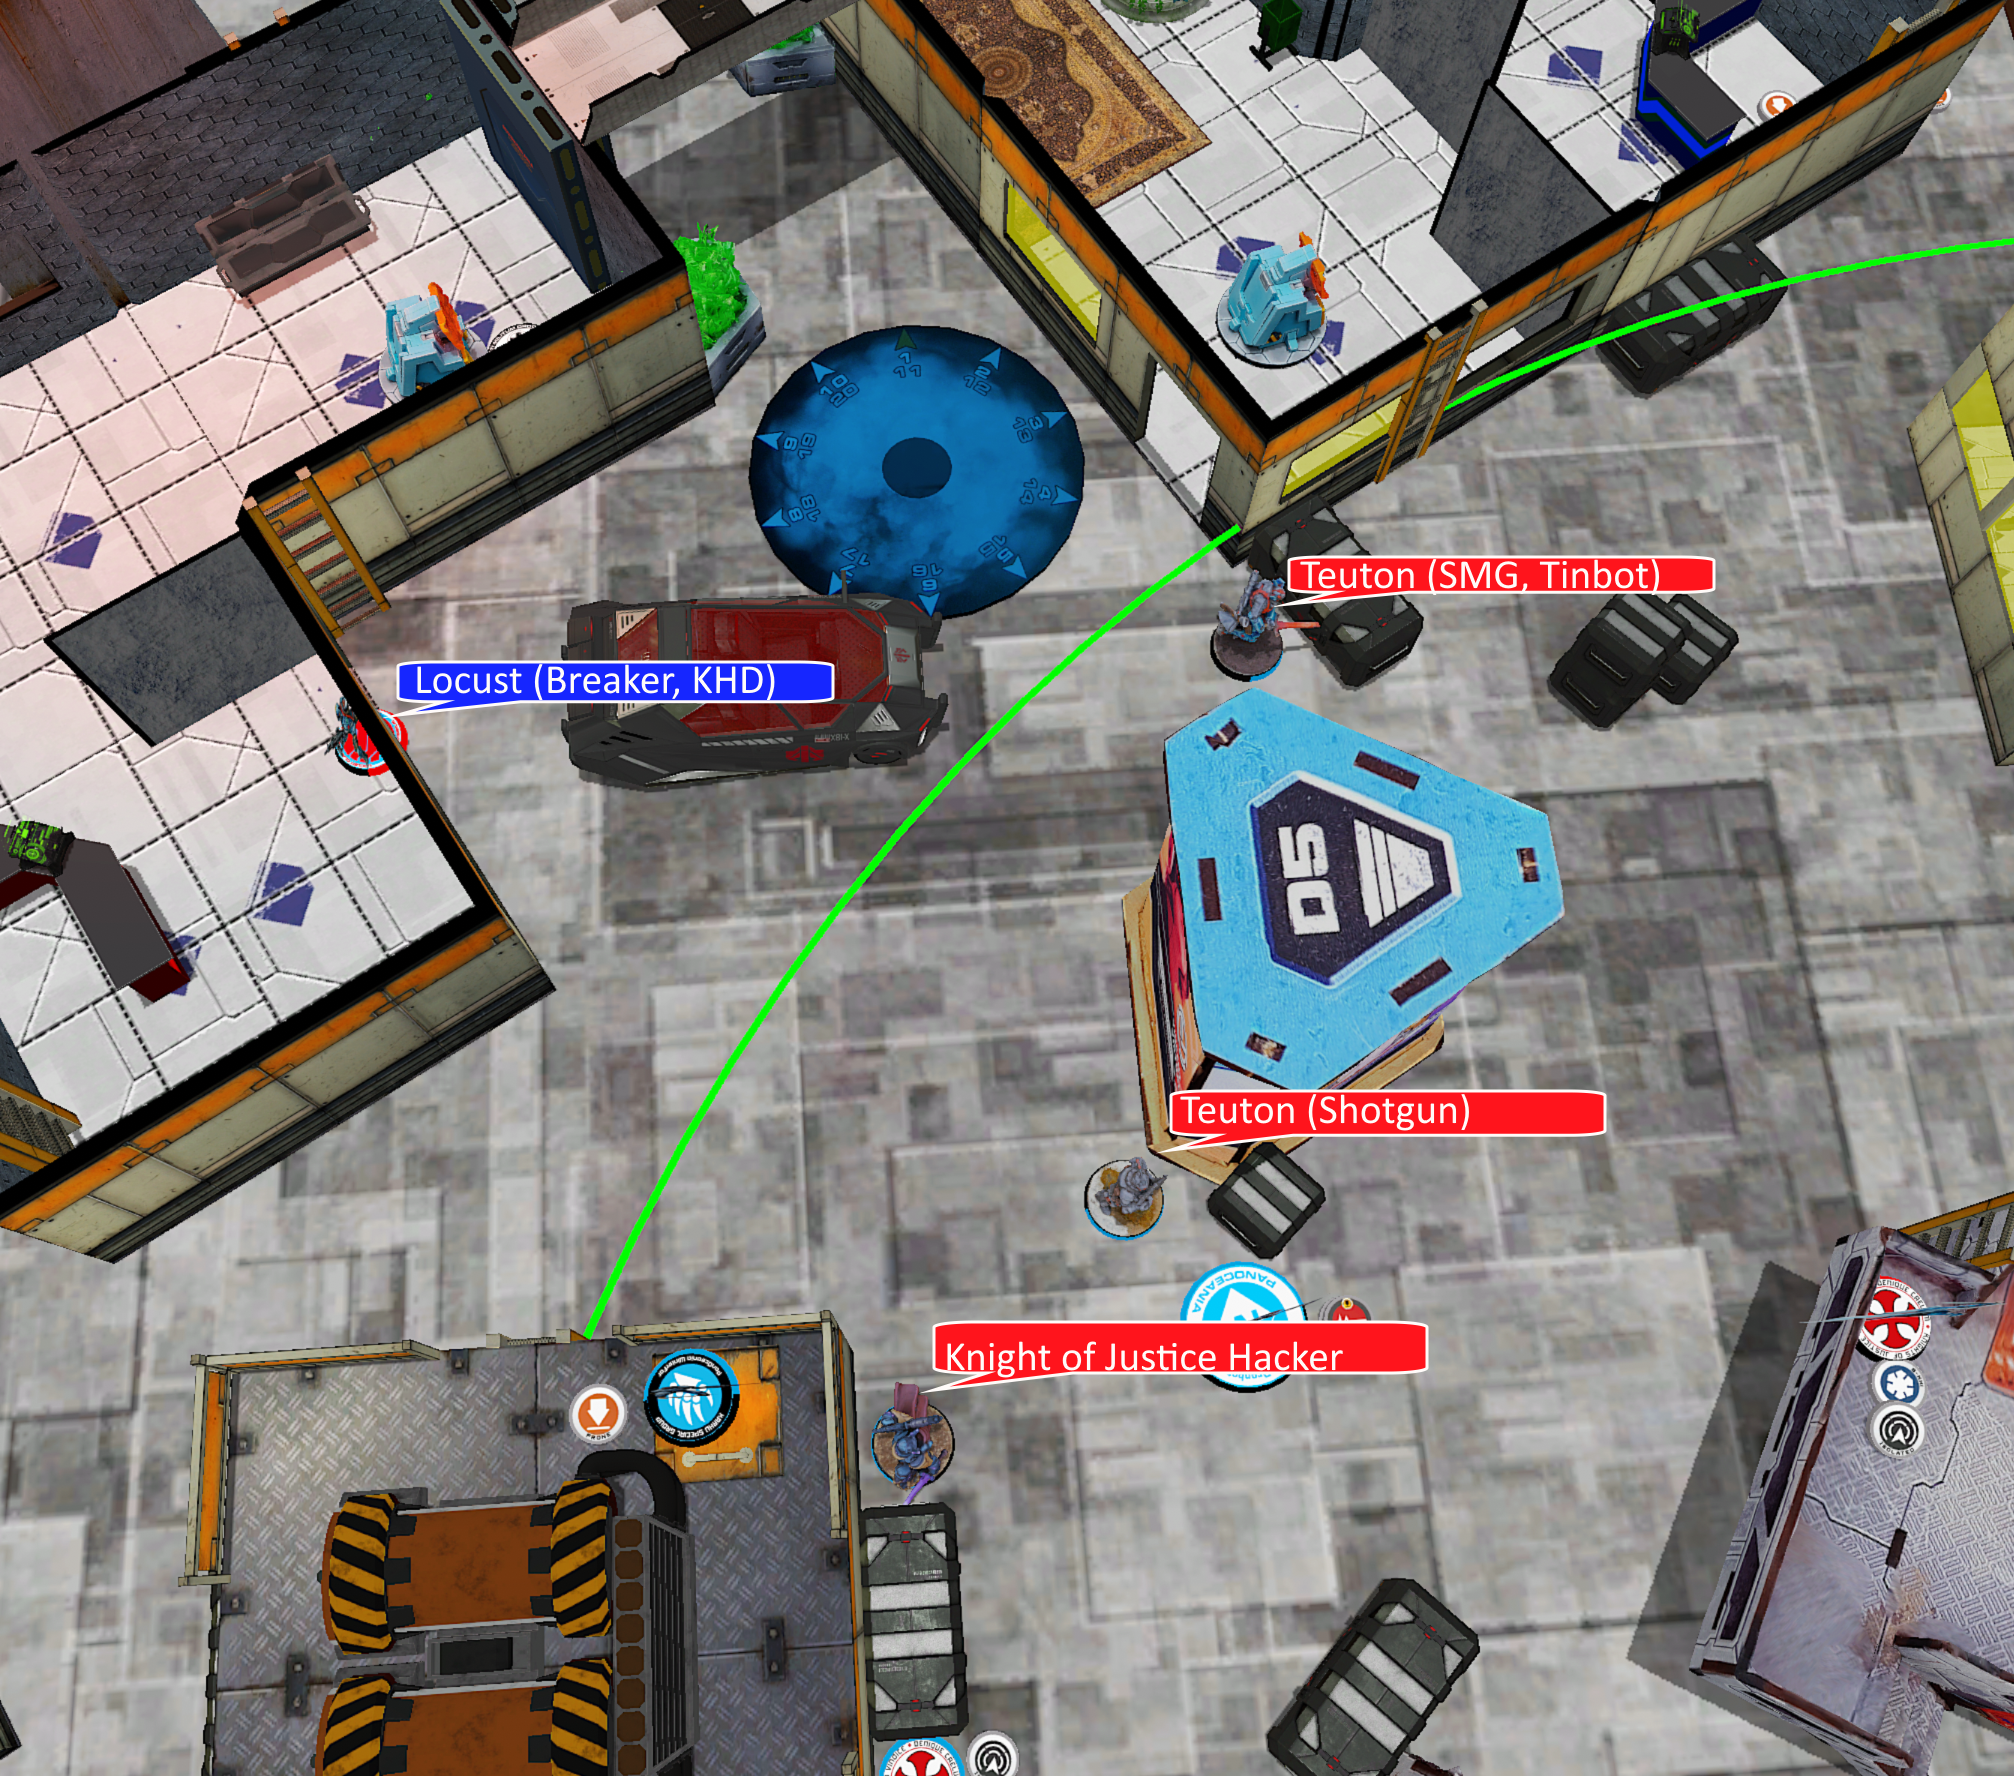
I started my turn by revealing my Locust from hidden deployment and poking around the corner to shoot his Teuton tinbot in the back. I inflicted a wound and he Gutsed back to claim limited cover, but one more order on the Locust finished the job, then it went into Cybermask.
Locust Goes to Work
With the Karhu freed up, I stood up and shot the Teuton specialist in the back with a feuerbach and killed it in a single order, then spent some time debating what to do with the Knight of Justice. I could peek over the rooftop with the paramedic and shoot my MULTI rifle downwards on 16s against his heavy pistol on 11s, but I didn't love those odds. Looking at the dice calculator, I probably should have loved those odds. It hugely favors the Karhu, but I didn't want to take the risk yet.
So I moved a Fusilier from Group Two to peek around the corner and shot the Knight of Justice in the back with a combi on 15s. I was rewarded with a crit and two hits, and his Knight of Justice promptly dropped unconscious. Well, that was lucky. I spent an order to move the Fusilier back to its previous position and shot the Knight of Justice on the ground, but it made its saves.
At this point there was a brief segue. We discussed whether the mission ends in Retreat and, while we thought initially that it did not and I moved to shoot down his Montesa with my Karhu feuerbach, a check of the mission revealed that it did indeed end in retreat. And I judged that he'd be in retreat if I shot the Montesa, so I positioned my Karhu apart, breaking the link, and figured I'd shoot it next turn while claiming the central zone with my paramedic.
I didn't love this, since it meant Sneaky would go up 3-0 and I'd need a lot to go right on my turn to win, but there wasn't really anything to do about it other than hope that things went right on my third turn.
Turn Three (Military Orders)
Sneaky counted points and admitted that, yes, he would've been in retreat had I killed that Montesa, since his third Trinitarian was still off the board, but wasn't yet. Whew. Still had a chance.
He revealed that Trinitarian and dropped a VitaPack near his Knight of Justice, then beelined his Trinitarian towards the speedball. I ended up Resetting my Knight of Justice missile launcher on a 1 during one of the orders where the Trinitarian was moving, and he picked up the Knight of Justice, dying to a pistol shot in the process.
The Knight of Justice finished his classified by killing my unconscious Knight of Justice hacker, then he moved his Warcor into the nearby area and Jumped his (now revealed) Knight Commander to overwatch the central console through a window. AROs set up and classified done, all he had to do was ride out the last turn.
Turn Three (Svalarheima)
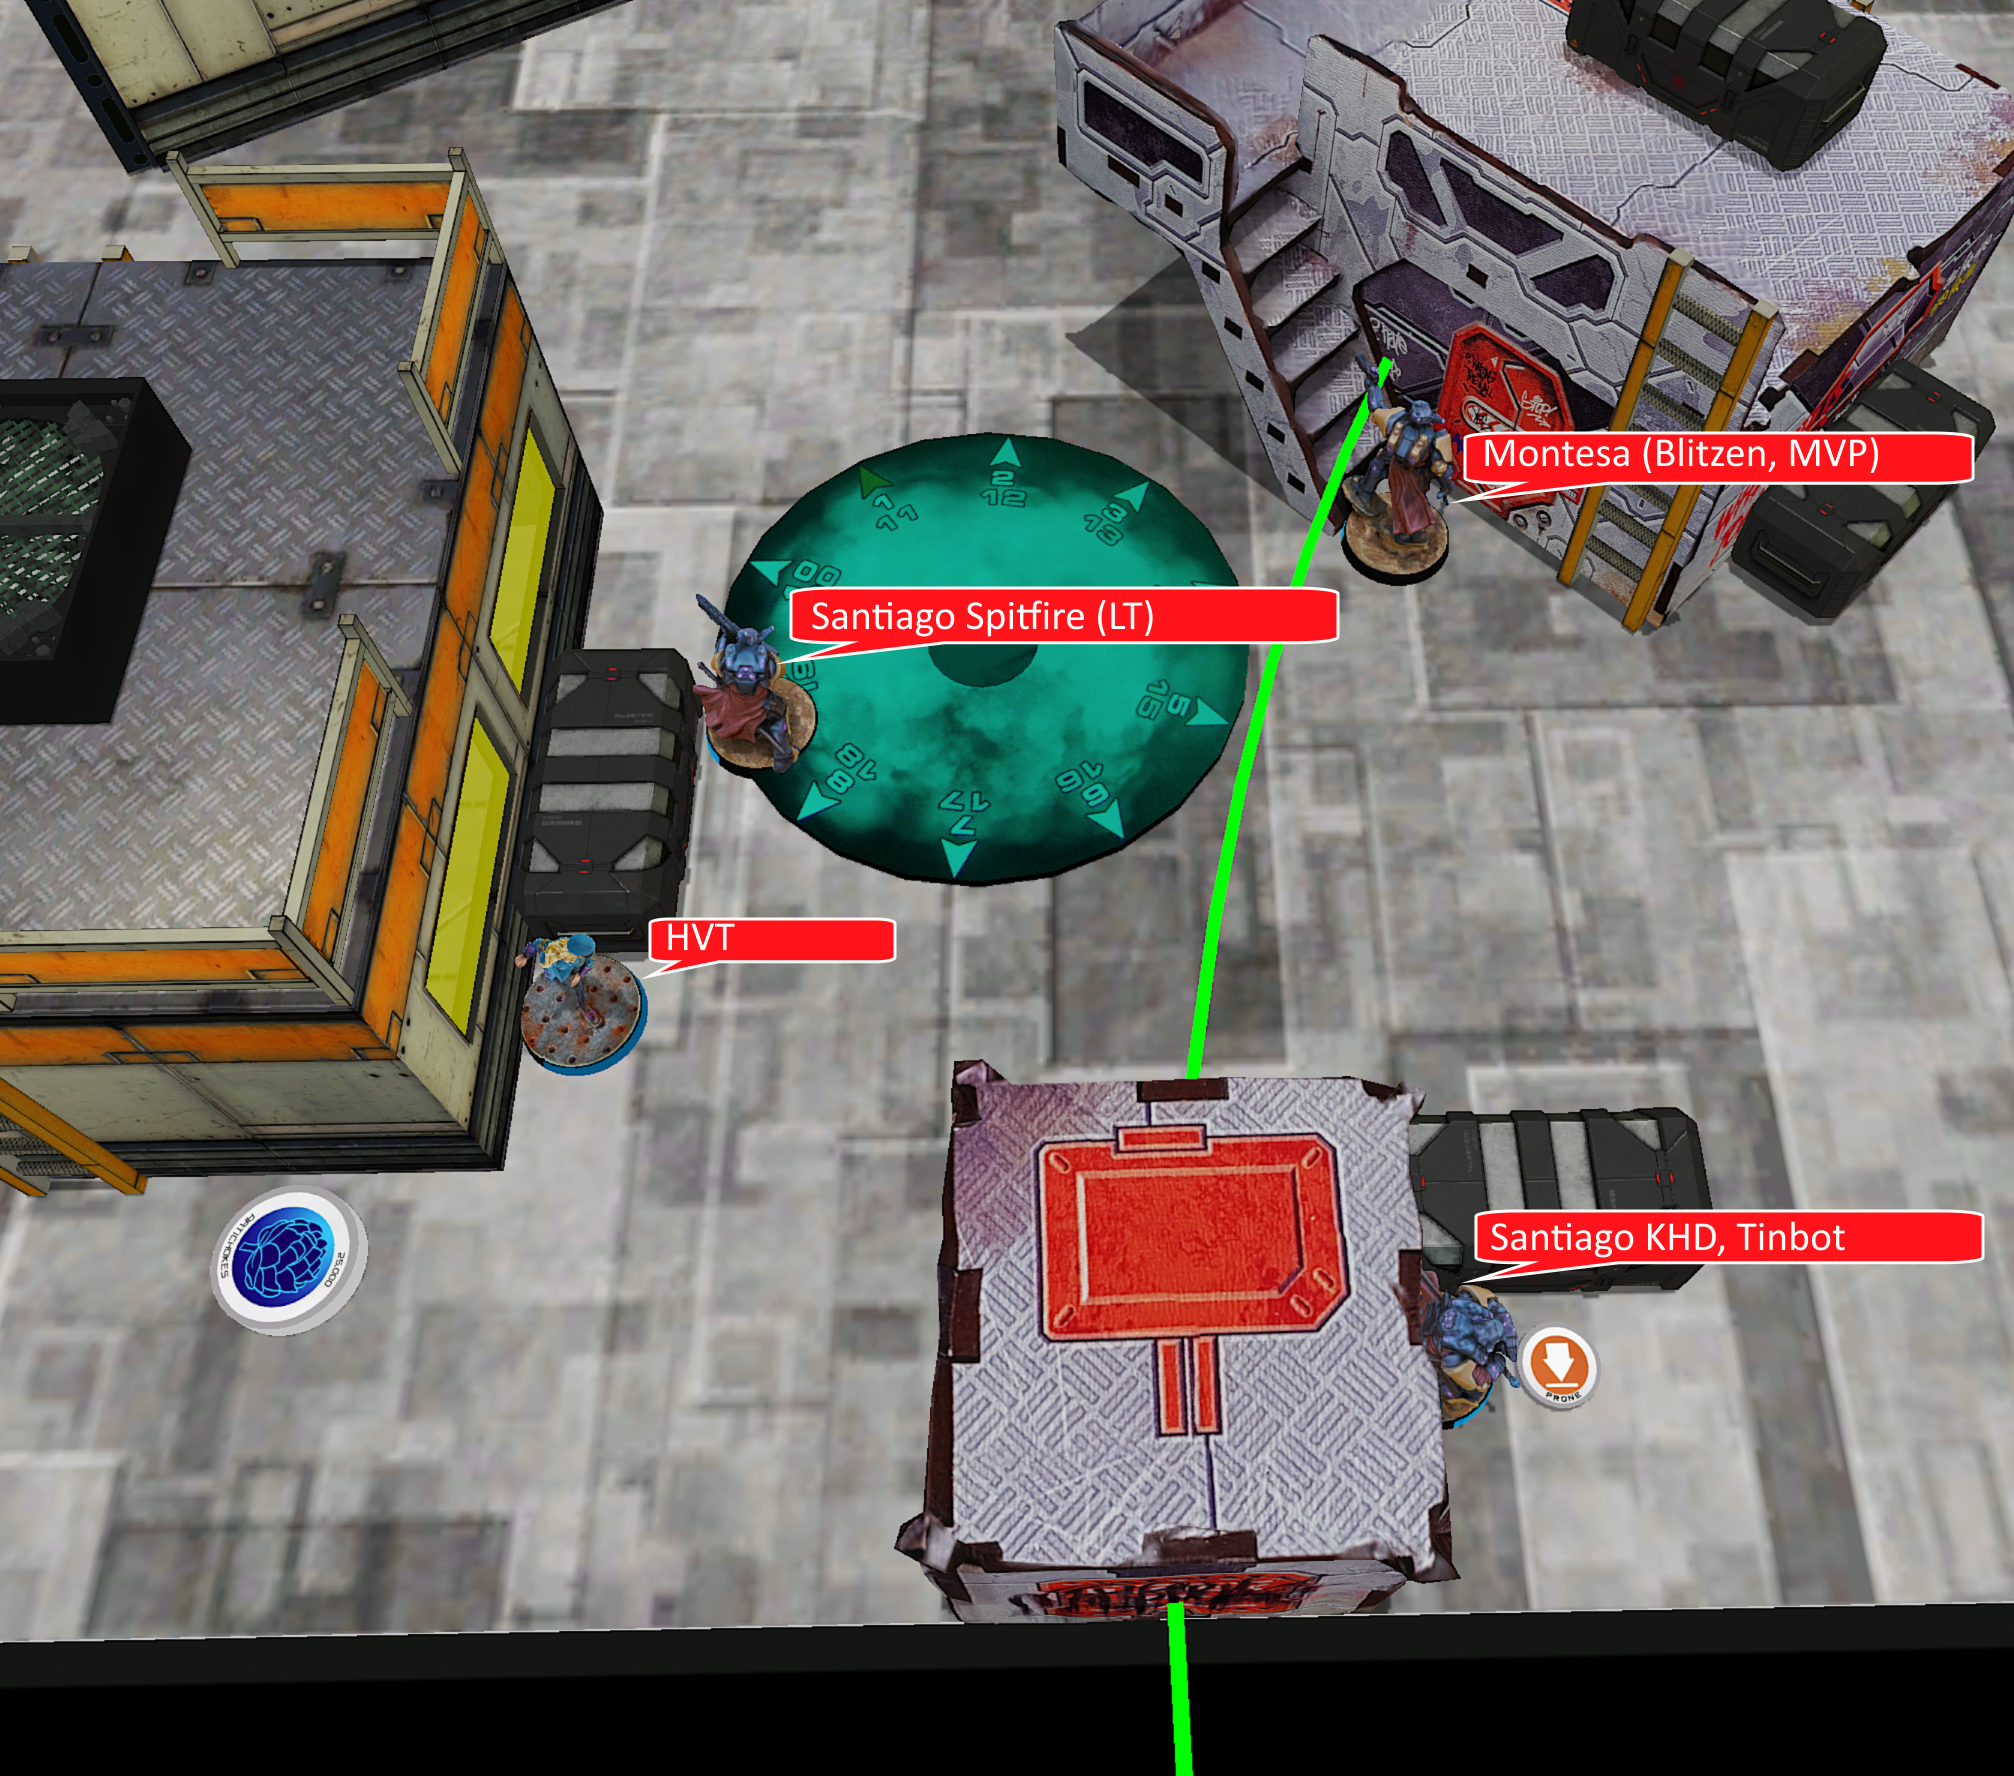
I started my last turn in a precarious position. My Beasthunter could easily outscore his Warcor in a single order for one point. Sacha could easily secure Treasure for another point, and my Karhu paramedic was near the central area. Sneaky was up 3-0 at the time, and this would make it 3-3. But he still controlled the center console and one area even accounting for that.
I needed to take the console away or take the area away from the Montesa to tie, and both to win. So I activated the Karhu feuerbach and shot the Montesa, which dodged in response. The Montesa got hit but made its armor saves, and Gutsed prone out of line of fire. I didn't see any line of fire without spending multiple orders on the Karhu feuerbach to gain a new one, and was worried about orders in doing so.
Wanting more certainty on scoring, I moved my Beasthunter into the nearby zone with its irregular and got Discovered in doing so. Which was fine. I was in the zone and didn't need to do anything further.
That done, I activated the Locust and moved towards the console in Cybermask, but got Discovered. Even moving prone, it could still be seen by the Knight Commander, and I wanted more time to think about what to do. My Beasthunter could flamethrower the Knight Commander, but might easily eat a light shotgun or Pulzar in response and not be able to score that zone, so I was loath to do so. That got put on pause for the moment.

So I pivoted and moved the Karhu paramedic to take the central zone, shooting at the Montesa with a MULTI rifle as I did. But the Montesa nailed me with a Blitzen as I did, so I couldn't proceed further with that plan. And I wasn't in the stupid zone, because I'd moved to engage first rather than engage while scoring.
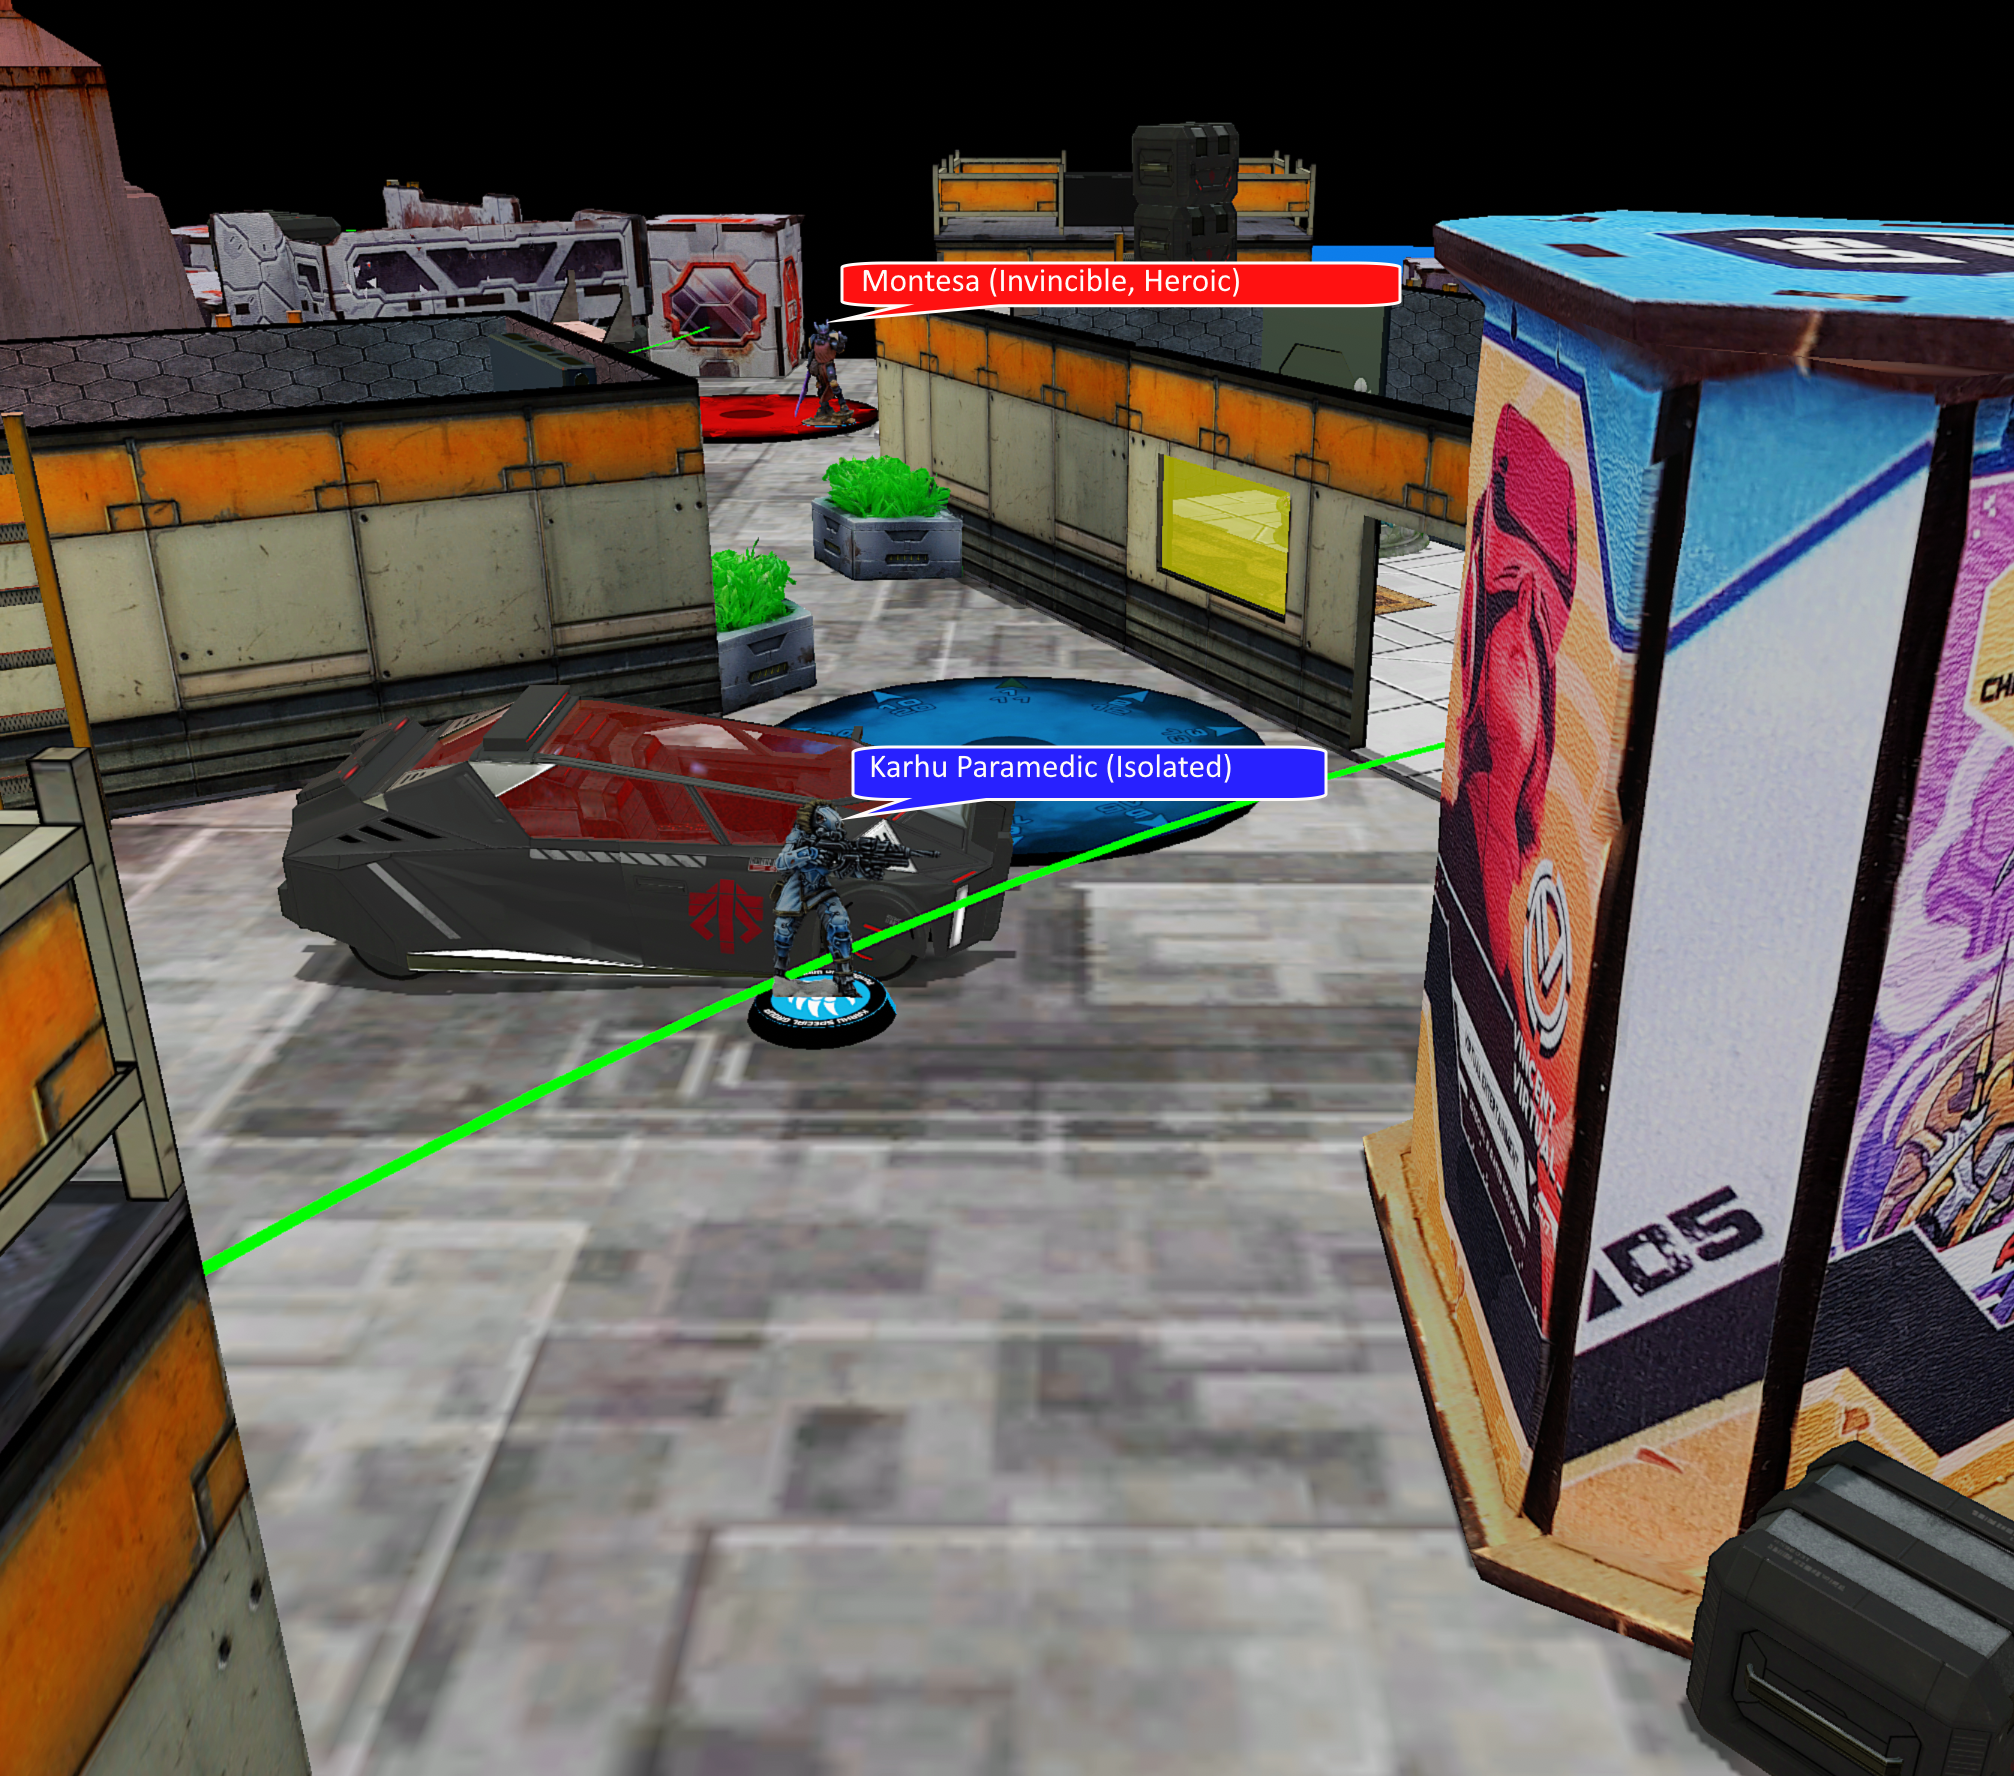
I full order Jumped the Knight of Justice missile launcher down off the roof and spent a couple of additional precious orders moving up to gain line of fire on the Montesa to shoot it with a missile over 24". But, again, the Montesa came through and survived.
I had just one order left in my Group 2 where the Locust was, and a win was now out of reach. That Montesa was a stubborn problem that just wouldn't die. So I moved Sacha up to secure Sneaky's treasure in lieu of my classified objective.
If the game ended here, it would be 3-5. If the Locust managed to push the button, we'd tie. At last out of options to avoid the risk, I activated the Locust with my last order, moved to push the button, and rolled an 18, resulting in a...
5-3 Military Orders Victory
Postmortem
Well, I made a lot of mistakes here. From not looking at the map sufficiently and choosing a deployment zone that made it more difficult to score the areas of interest, to getting my Blade killed to an obvious HD sniper, to not thinking through points counting on my second turn and being unable to stop Sneaky from scoring without putting him into Retreat, it was rough all around.
And I didn't even think to do my classified when walking a Karhu right next to an unconscious Knight of Justice, since we had gone through the whole thing on Retreat and it just slipped my mind. The Karhu is a Veteran Troop. All I'd have to do is roll a 15. So I wasted orders on Sacha on Turn Three to secure a classified that I could've absolutely done on Turn Two. And Coup De Graced the Knight so maybe he couldn't do his Predator. Argh.
And he played well, of course. I'm sure he could name mistakes he made, but I'm not sure of any other than leaving his Santiago very exposed on the first turn and not having models turned around to watch for the Locust that he knew I had on the second turn. And neither of those hurt very badly. The Santiago wasn't going to go anywhere anyway with the link holding down the primary scoring zone, and the Teutons probably would've died to the Locust anyway. B3 on 15s against a dodge on 17s is quite reliable, if less efficient.
With the way the special area was positioned and the well-placed repeater over the console plus my own situation at the start of my second turn, the console was difficult to contest until the end of the game. And the run with Liang Kai, while risky, had huge potential payoff. A Trinitarian sniper shooting on 12s against his dodge on 16s only has a 20% chance to kill Liang Kai, and I judged the reward worthy of the risk.
It's situations like this that make me wish for Shona, though. A 6-2 move would've made the Cautious Move there vastly more effective, probably preventing the Trinitarian from shooting until had already engaged the link, and being shock immune means that Sneaky would have to shoot DA and force me to fail both saves to stop the attack.
My Turn Three was chaotic and disjointed. There are reasons for it, but it was just badly executed in a situation where I needed it to be close to perfect. The Karhu, even unlinked, has extremely good odds of KOing the Montesa. As does the Knight of Justice over 24", which he was. But both of those were things that didn't need to happen when they did.
I should've held off spending the NCO order on the Karhu and focused on spending my Group Two orders with an eye on safety of the Locust to reach the button, rather than moving quickly and exposing myself to a Discover before I'd reached safety behind the button. Spending three orders on the Knight of Justice was a luxury that should've waited in favor of moving the Locust carefully. And moving the Karhu Paramedic safely.
And, to make matters worse, looking after the game confirmed that I could've gained line of fire on the Montesa with the Karhu feuerbach in a single vaulting order. Gotta use your efficient pieces. A feuerbach against HI is much better than a MULTI rifle past 16". I was obviously not playing well here, and that Guts move was brilliant.
Had I done so and hopefully pushed the button, even with Sneaky scoring the zone, we'd tie so long as Sacha (in Group One) could get to the treasure, even with the Montesa scoring the zone. And she'd rolled up 8-4 MOV on Booty, so that was pretty easy to do if it were all I was thinking about. But instead I tried to do everything and accomplished nothing.
All in all, it did meet expectations as a great and tense game. And dice rolls go the way they go. If it results in a game like this, I'm happy to have one anytime.