Background
With an ugly loss in the first round out of the way, I grabbed some lunch from the adjoining room. Lunch was catered on the first day, and I chatted with some folks from the greater Texas meta (including Hackknee, my round one opponent) while eating tacos. I got to meet SneakySnake and some other fun people, and I'd at least scored 1TP from the first round, so the day was going great thus far.
I'll take this moment to mention that I talked to micjevans, the creator of the amazing Infinity Mercenaries framework. One of the people in my local meta is also an author, and I can't recommend the format enough as a fun and different way to play Infinity. It's a blast, especially as your characters gain experience and skills to differentiate themselves from standard Infinity profiles.
Prelude
I was matched up against Falx, who is part of a meta in Bozeman, MT with a few players. I'm always surprised to find out about communities in smaller towns like this, but they made a good showing at the Krug. I think the entire meta came out.
Looking at the board, I didn't like the look of it to run a TAG on. I'm more of a fan of my infantry-based Svalarheima list anyway and, especially on a board without dominant firelanes, running a TAG around in close quarters against Bearpodes or whatever a Kosmoflot list might bring seemed like a poor idea.
The Lists
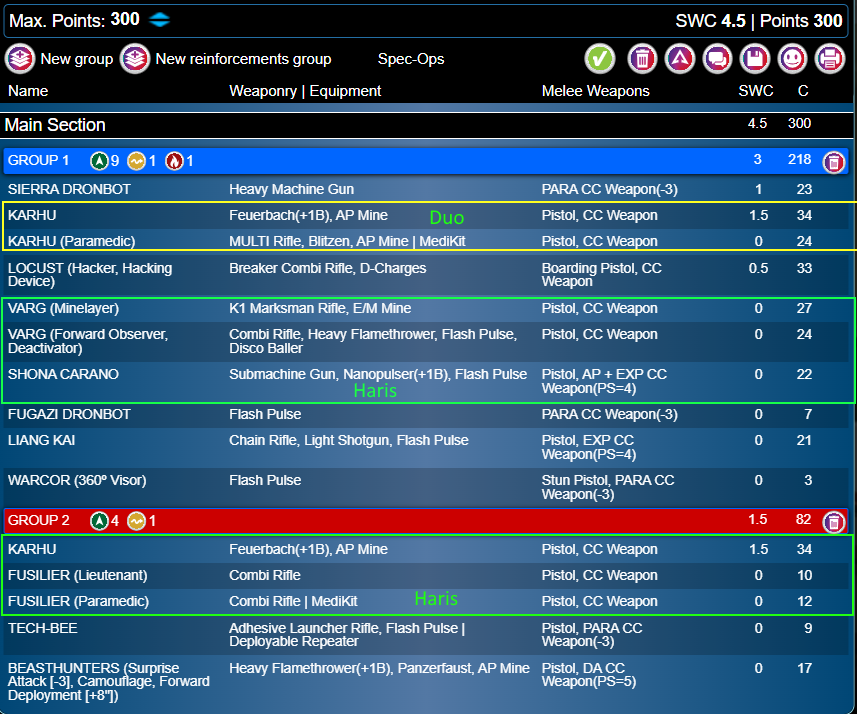 This is my favorite Svalarheima list to run. The Karhu duo in the first group is incredibly efficient under N5's new fireteam rules, and I have a spare feuerbach in the second group to take riskier fights. The Vargs can capably fight anything that the Karhus don't want to fight, and the Locust provides a good mission element for any opportunities that arise.
And without the pressure of a Jotum on the list, I don't feel forced to drag 82pts of value out of anything. Dominant though it might be at times, I prefer to use whatever tool seems appropriate at the time rather than forcing the Jotum into engagements because it warps the list around it to a point. Having enough points for a Sierra is just a nice bonus.
Opponent List
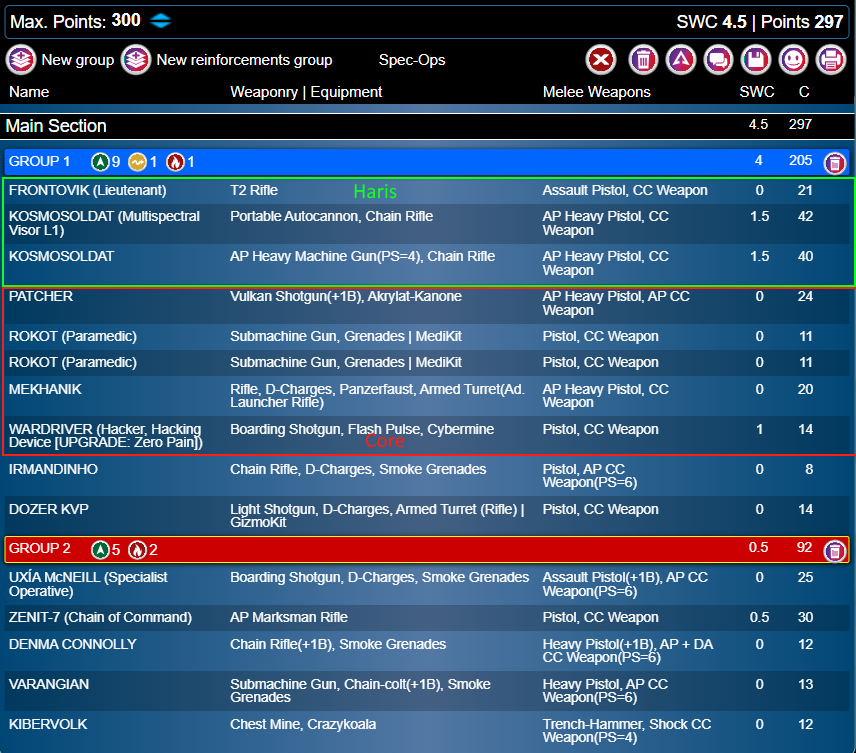 My opponent was running an interesting Kosmoflot list with no Bearpodes, but instead running a beefy double Kosmosoldat haris. I have to admit that I love this list. Kosmosoldats are some of my favorite profiles in the entire sectorial, and I always thought it was a shame that the N4 meta meant that they didn't see much play.
A pure five-member core is an unusual sight in N5, but it covers a lot of bases with a 2W DTW user plus a Warcore with Sixth Sense to deal with any sneaky hackers coming after the Patcher. A BS13 adhesive weapon is a pretty interesting choice. No real vision mods and hopefully it could just be brute forced, but Karhus are fragile and +1SD does increase the risk with no good way to fully degrade the link and remove that.
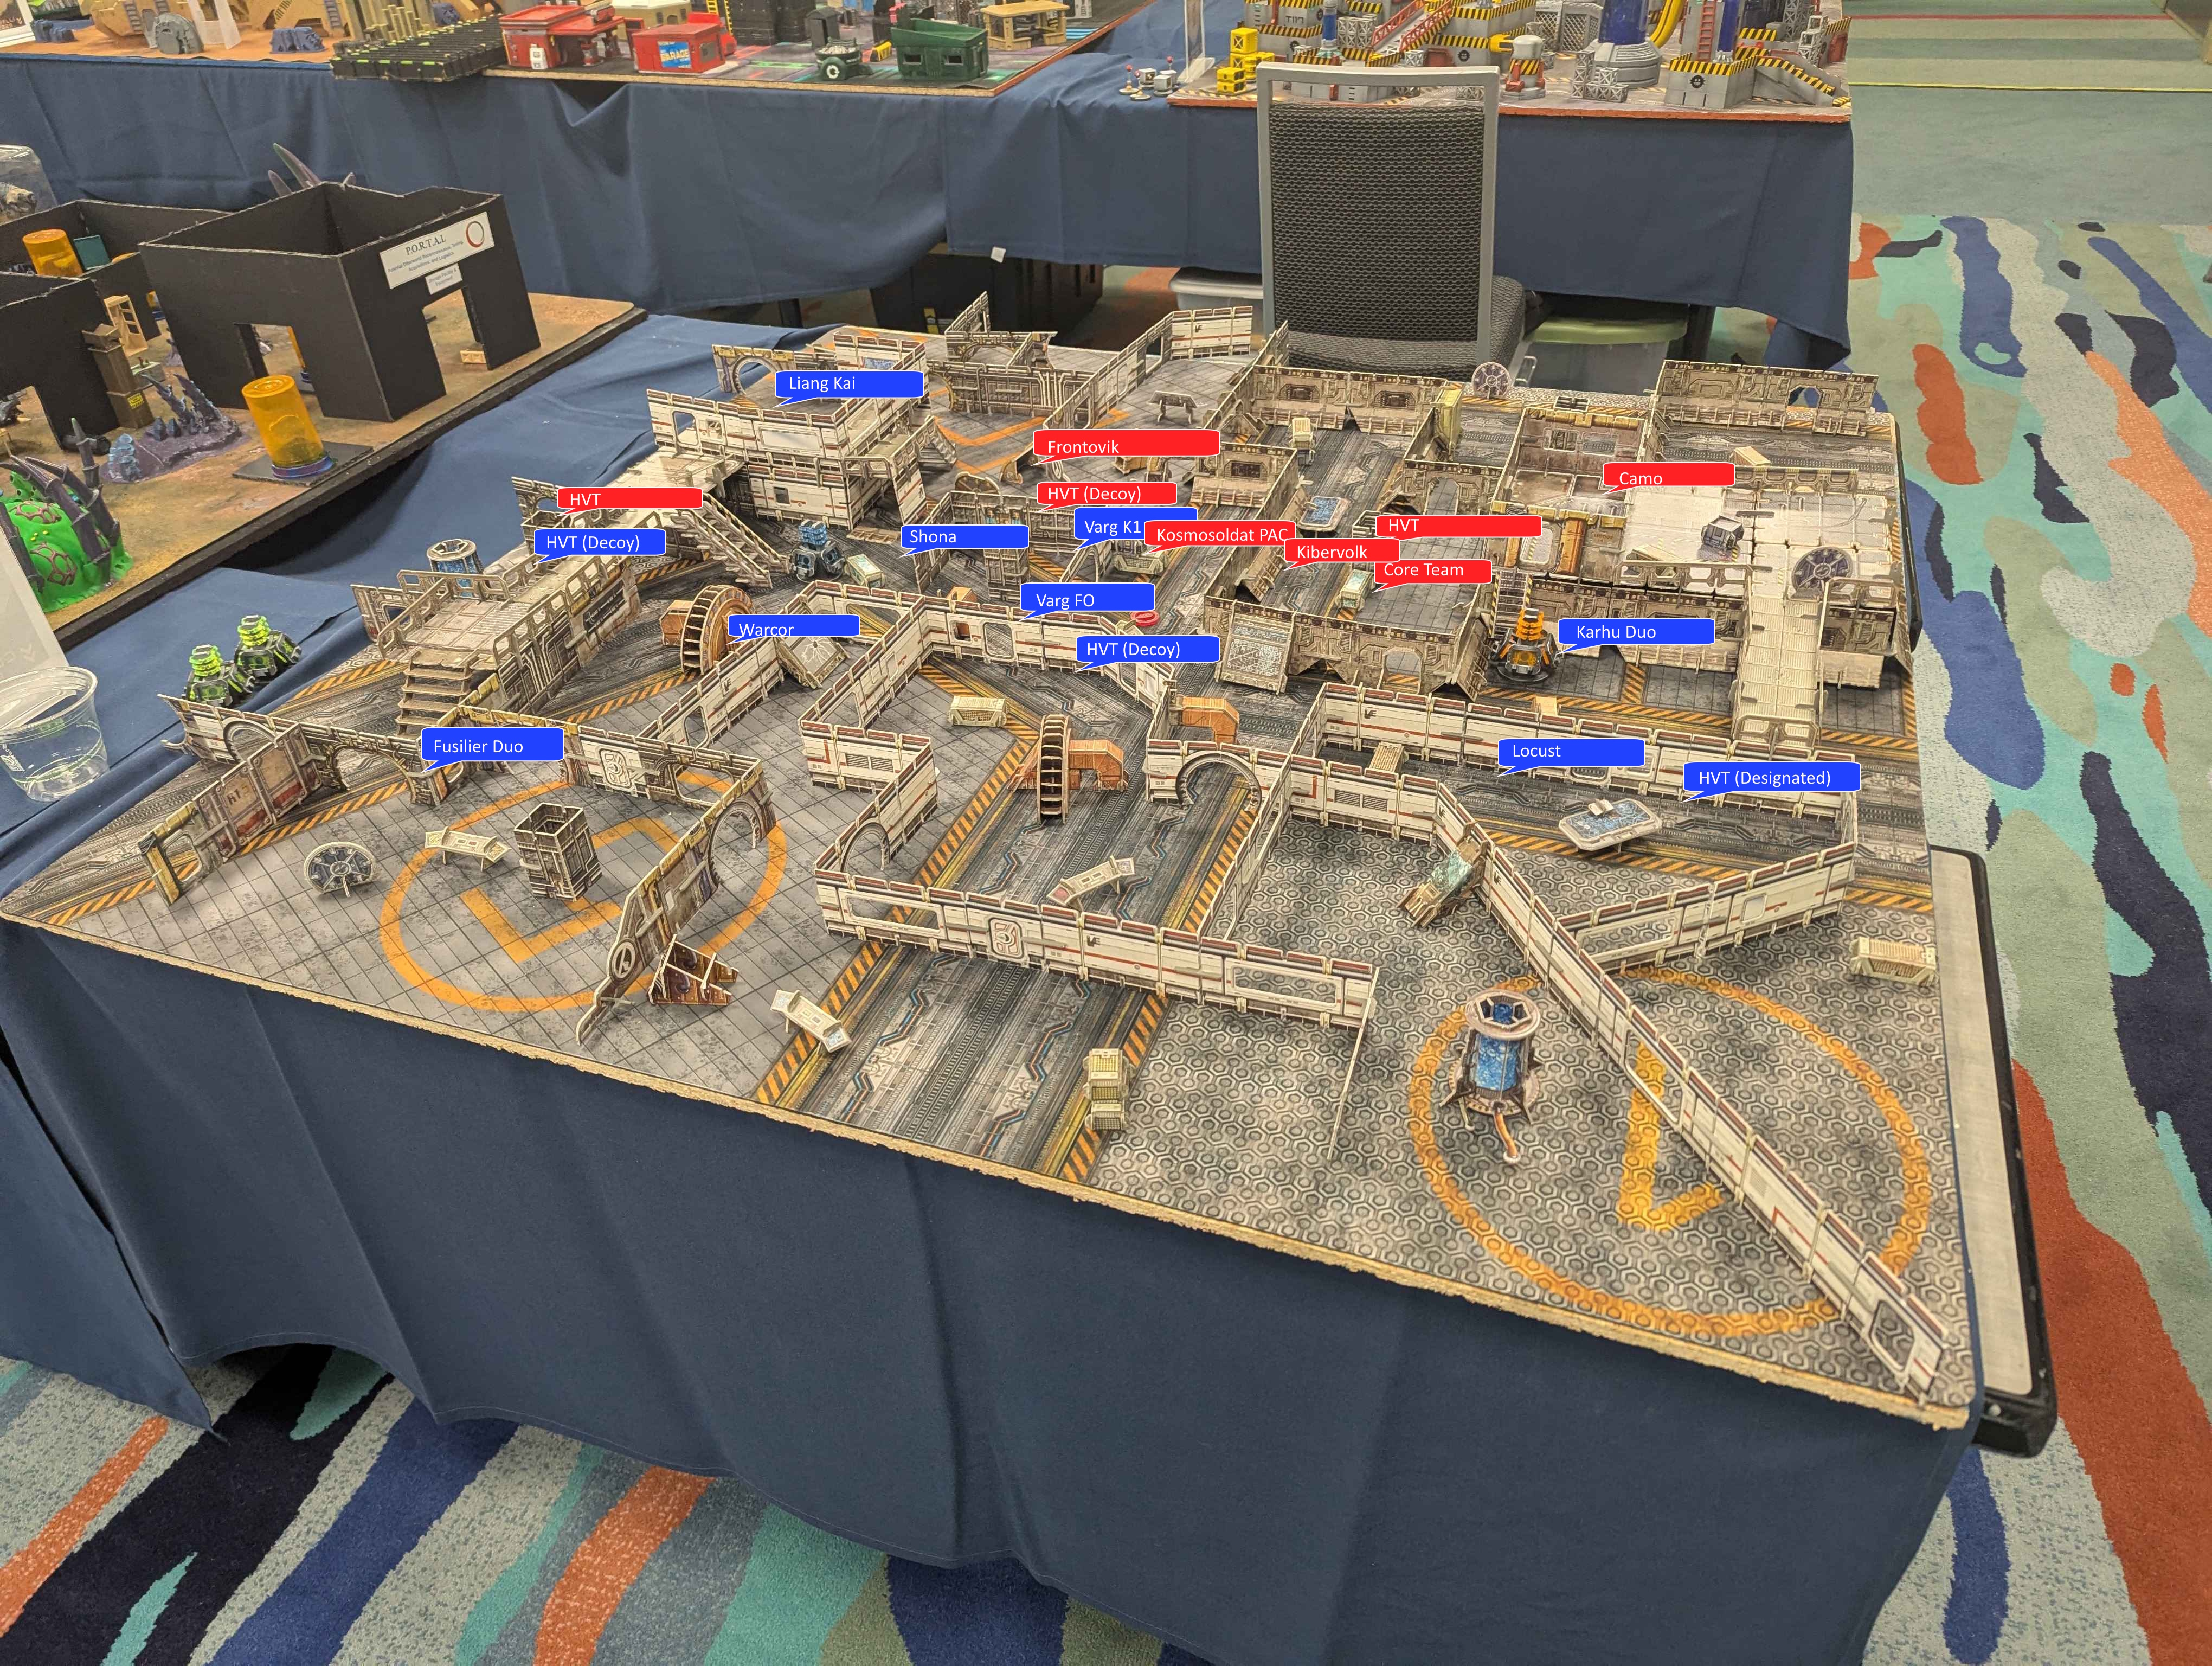
Deployment
I won the LT roll and chose to go first. There's not much advantage to going second on Unmasking and, without knowing what I was looking at on a board that was dense enough to allow for massive chain rifle casualties, I preferred to go first and take out what I could take out in order to limit probable losses. All of the walls other than ones with railings on top were treated as having infinite height, so abusing Super Jump would be hard on this map.
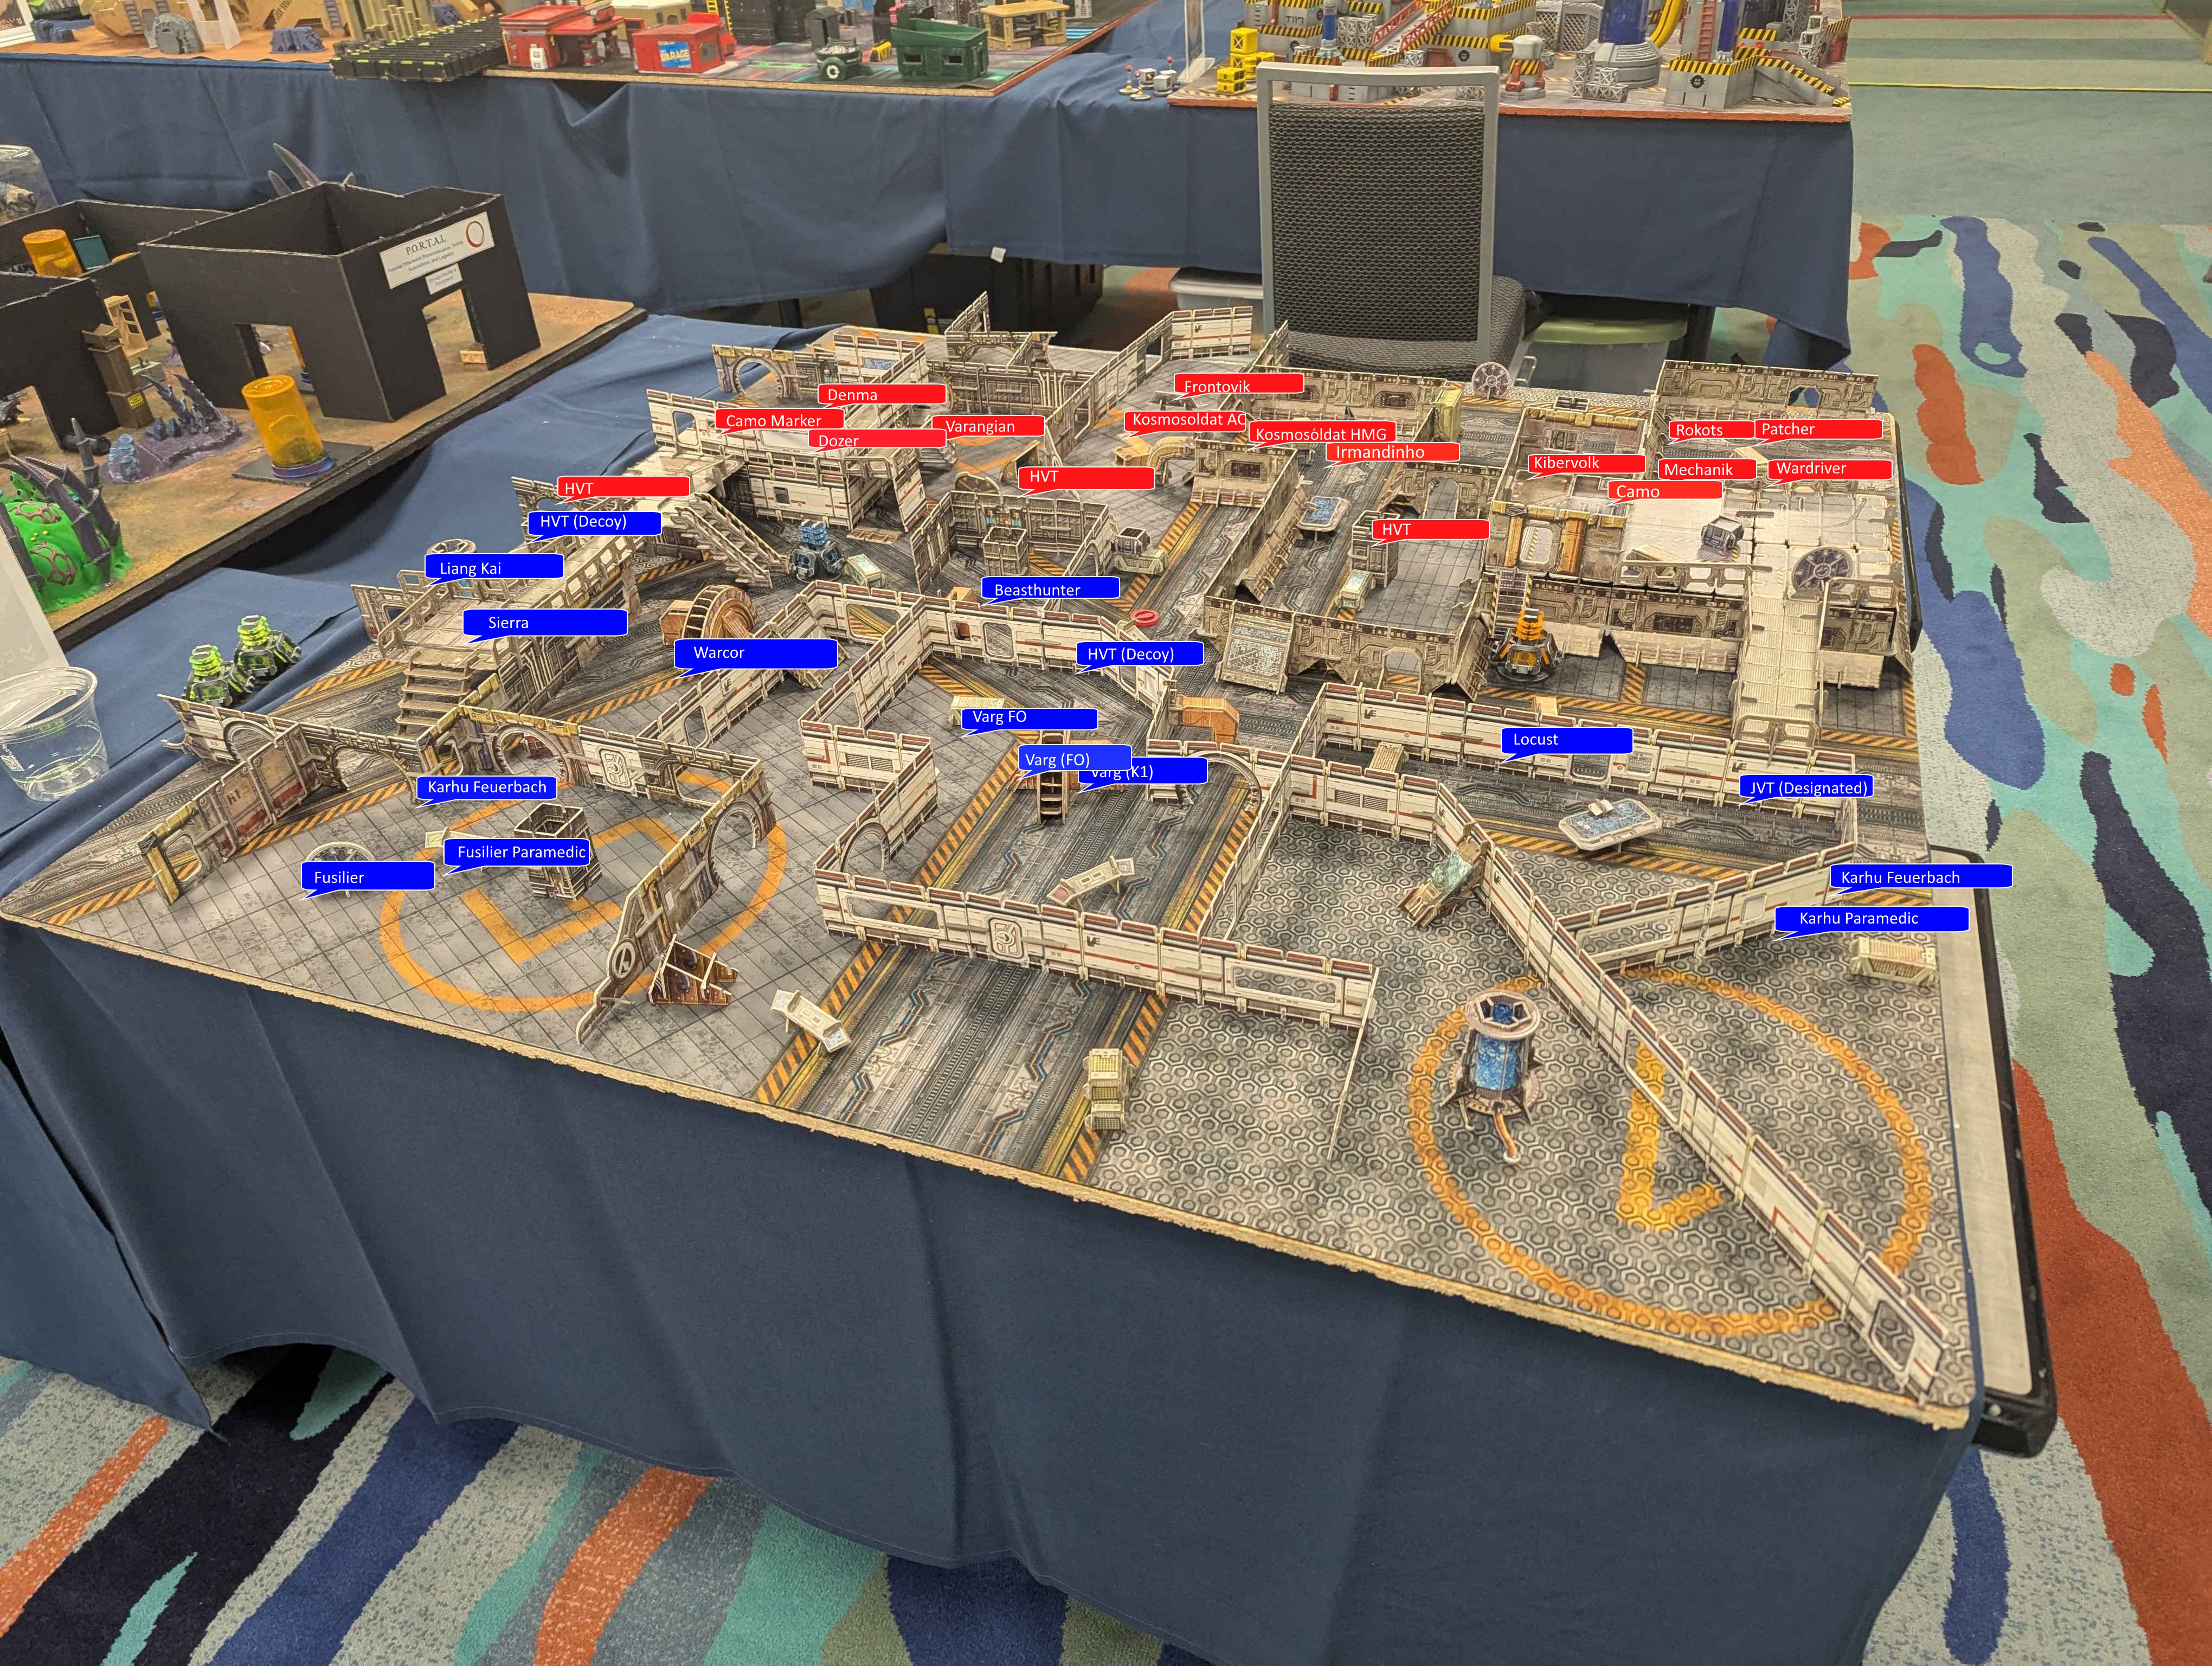
I deployed my Karhu duo and Locust on my right flank, with the Vargs in the center and the other Karhus on the far side of the board where lines of fire were most open. If a long range fight was going to happen, it would be there, and so my Sierra went down there as well. The Beasthunter went in the center in order to adjust to either side as needed, and some Fugazis and my Warcor set up hopefully annoying flash pulse AROs around the board.
I spread my HVTs around in the safest available positions, but there weren't many. Liang Kai stayed in reserve.
Falx deployed his core back in a safe room in one corner and his Kosmosoldats near the center of the board, presumably for the same reasons as me with an eye to using their longer-range weaponry. Denma and the Dozer went down on the other flank, supported by a Varangian.
With so much of his army in links, he basically deployed in a refused flank. His core would have good lines of fire and access to consoles if able to advance, so I marked that off as a priority to deal with.
He placed his HVTs in the safest positions available to him but, again, there weren't many.
Turn One (Svalarheima)
Well, a long range fight was happening. The Kosmosoldat AP HMG was the one standing, which made me think that the Portable Autocannon was the LT and being kept safe. It would've been a riskier ARO for me to take with the MSV but, in the event, the MSV was hidden. I used Liang Kai's impetuous, since it was safe, and started off by spending a couple of orders from Group Two to remove the Kosmosoldat AP HMG with my Karhu there. I left it standing, job mostly done, to delay his remaining Kosmosoldat if and when it advanced.
I spent most of my orders from Group One to move the Karhu duo up on top of some terrain to see his core. The feuerbach knocked the Patcher unconscious after a couple of orders and, coming inside the 16" band, I swapped the team leader to the Karhu paramedic and shot down the Mechanik and a Rokot. The Wardriver Spotlit me. Feeling that the Karhus were exposed there against whatever was under that camo marker -- probably Uxia, I withdrew and dropped a couple of AP mines on my way back.
I spent the Beasthunter's irregular to advance into the protected central room and advanced the Warcor to some further cover using its irregular. It wasn't a lot of damage done, but I figured that I could push a button with the Karhus next turn to reveal a target and hopefully use the Vargs and maybe even the Warcor to do the same.
Turn One (Kosmoflot)
Denma used his impetuous to advance, and Falx spent a couple of orders on the Kosmosoldat and Frontovik to engage the Sierra and Karhu in succession. Hilariously, he crit and hit in both fights on his B2, and I missed. The Sierra and Karhu did not survive rolling seven saves each. Well, that was unexpected, but it's always fun rolling a ton of dice. Even on armor saves.
He advanced his Irmandinho (who had rolled +4ARM with Booty) to push the button underneath the Karhus and guessed that my central HVT was the target, but it was a decoy. He threw smoke to block line of fire from my (still in camo) Locust and shot a pistol at my HVT, but the HVT survived the pistol shots. The Irmandinho decided to withdraw to safety and he passed turn.
Turn Two (Svalarheima)
 I hadn't lost much on the previous turn, although losing both of my long range guns on my left flank hurt. I used Liang Kai's impetuous again, since it was safe to do so, and determined that Denma was too close to my (now unprotected) lieutenant for comfort. And the Irmandinho had to go in order to defend the HVT that had been revealed.
I spent a couple of orders on the Varg haris to gain line of fire to the Irmandinho with the Varg K1 and dispatched it. The Varangian threw smoke when I showed Shona around the corner, which was fine with me. Looking at the board, Liang Kai had a clear run at Denma's back, so that's what I took. Liang Kai moved around the flank for a couple of orders to engage Denma, which granted an ARO to a camo marker and the Dozer. The camo marker revealed to be a Zenit-7 and knocked me into NWI with an AP Marksman shot, and the Dozer dropped a turret. Well, didn't figure on that.
Liang Kai killed Denma and I spent a couple of orders in group 2 to get the Beasthunter into position, then revealed and flamethrowered the Varangian and Dozer. The Zenit-7 also dodged, so the Beasthunter was left standing when the Varangian and Dozer died. The Beasthunter moved to engage the Zenit-7 but couldn't reach base contact, so I traded two more flamethrowers to kill it. Liang Kai jumped to engage the turret and removed it, and I shuffled the Varg team around to be safer for if and when the Kosmosoldat advanced, and Liang Kai moved around the corner so he wouldn't present an easy target.
The Karhu pushed the nearby button with their NCO order and guessed that the central HVT was the designated target, which it was not.
Turn Two (Kosmoflot)
Falx did indeed activate the Frontovik/Kosmosoldat haris and advanced to protect the center console and HVT. He killed a Fugazi on the way and settled into an obnoxious position pinning my Varg haris inside the room with a chain rifle. Well played there with Shona out of position on the other side of the room. He picked up his Patcher and moved the core towards the center room, losing a Rokot to a Varg's heavy flamethrower while the Varg luckily made all its SMG saves. The Varg Gutsed to total cover, not wanting to take this fight again.
He moved up the Kibervolk and dropped a CrazyKoala to cover the Varg team to make things more interesting on the next turn, but thankfully didn't have the orders to press further towards the objectives.
Turn Three (Svalarheima)
 Well, I had one HVT revealed. None killed. But the way was open to get a couple of consoles now, and I had the orders to do so. I used a command token to move the Locust to Group Two and set to work. Liang Kai didn't use his impetuous order, since he was best placed to attack the HVT on the denuded flank.
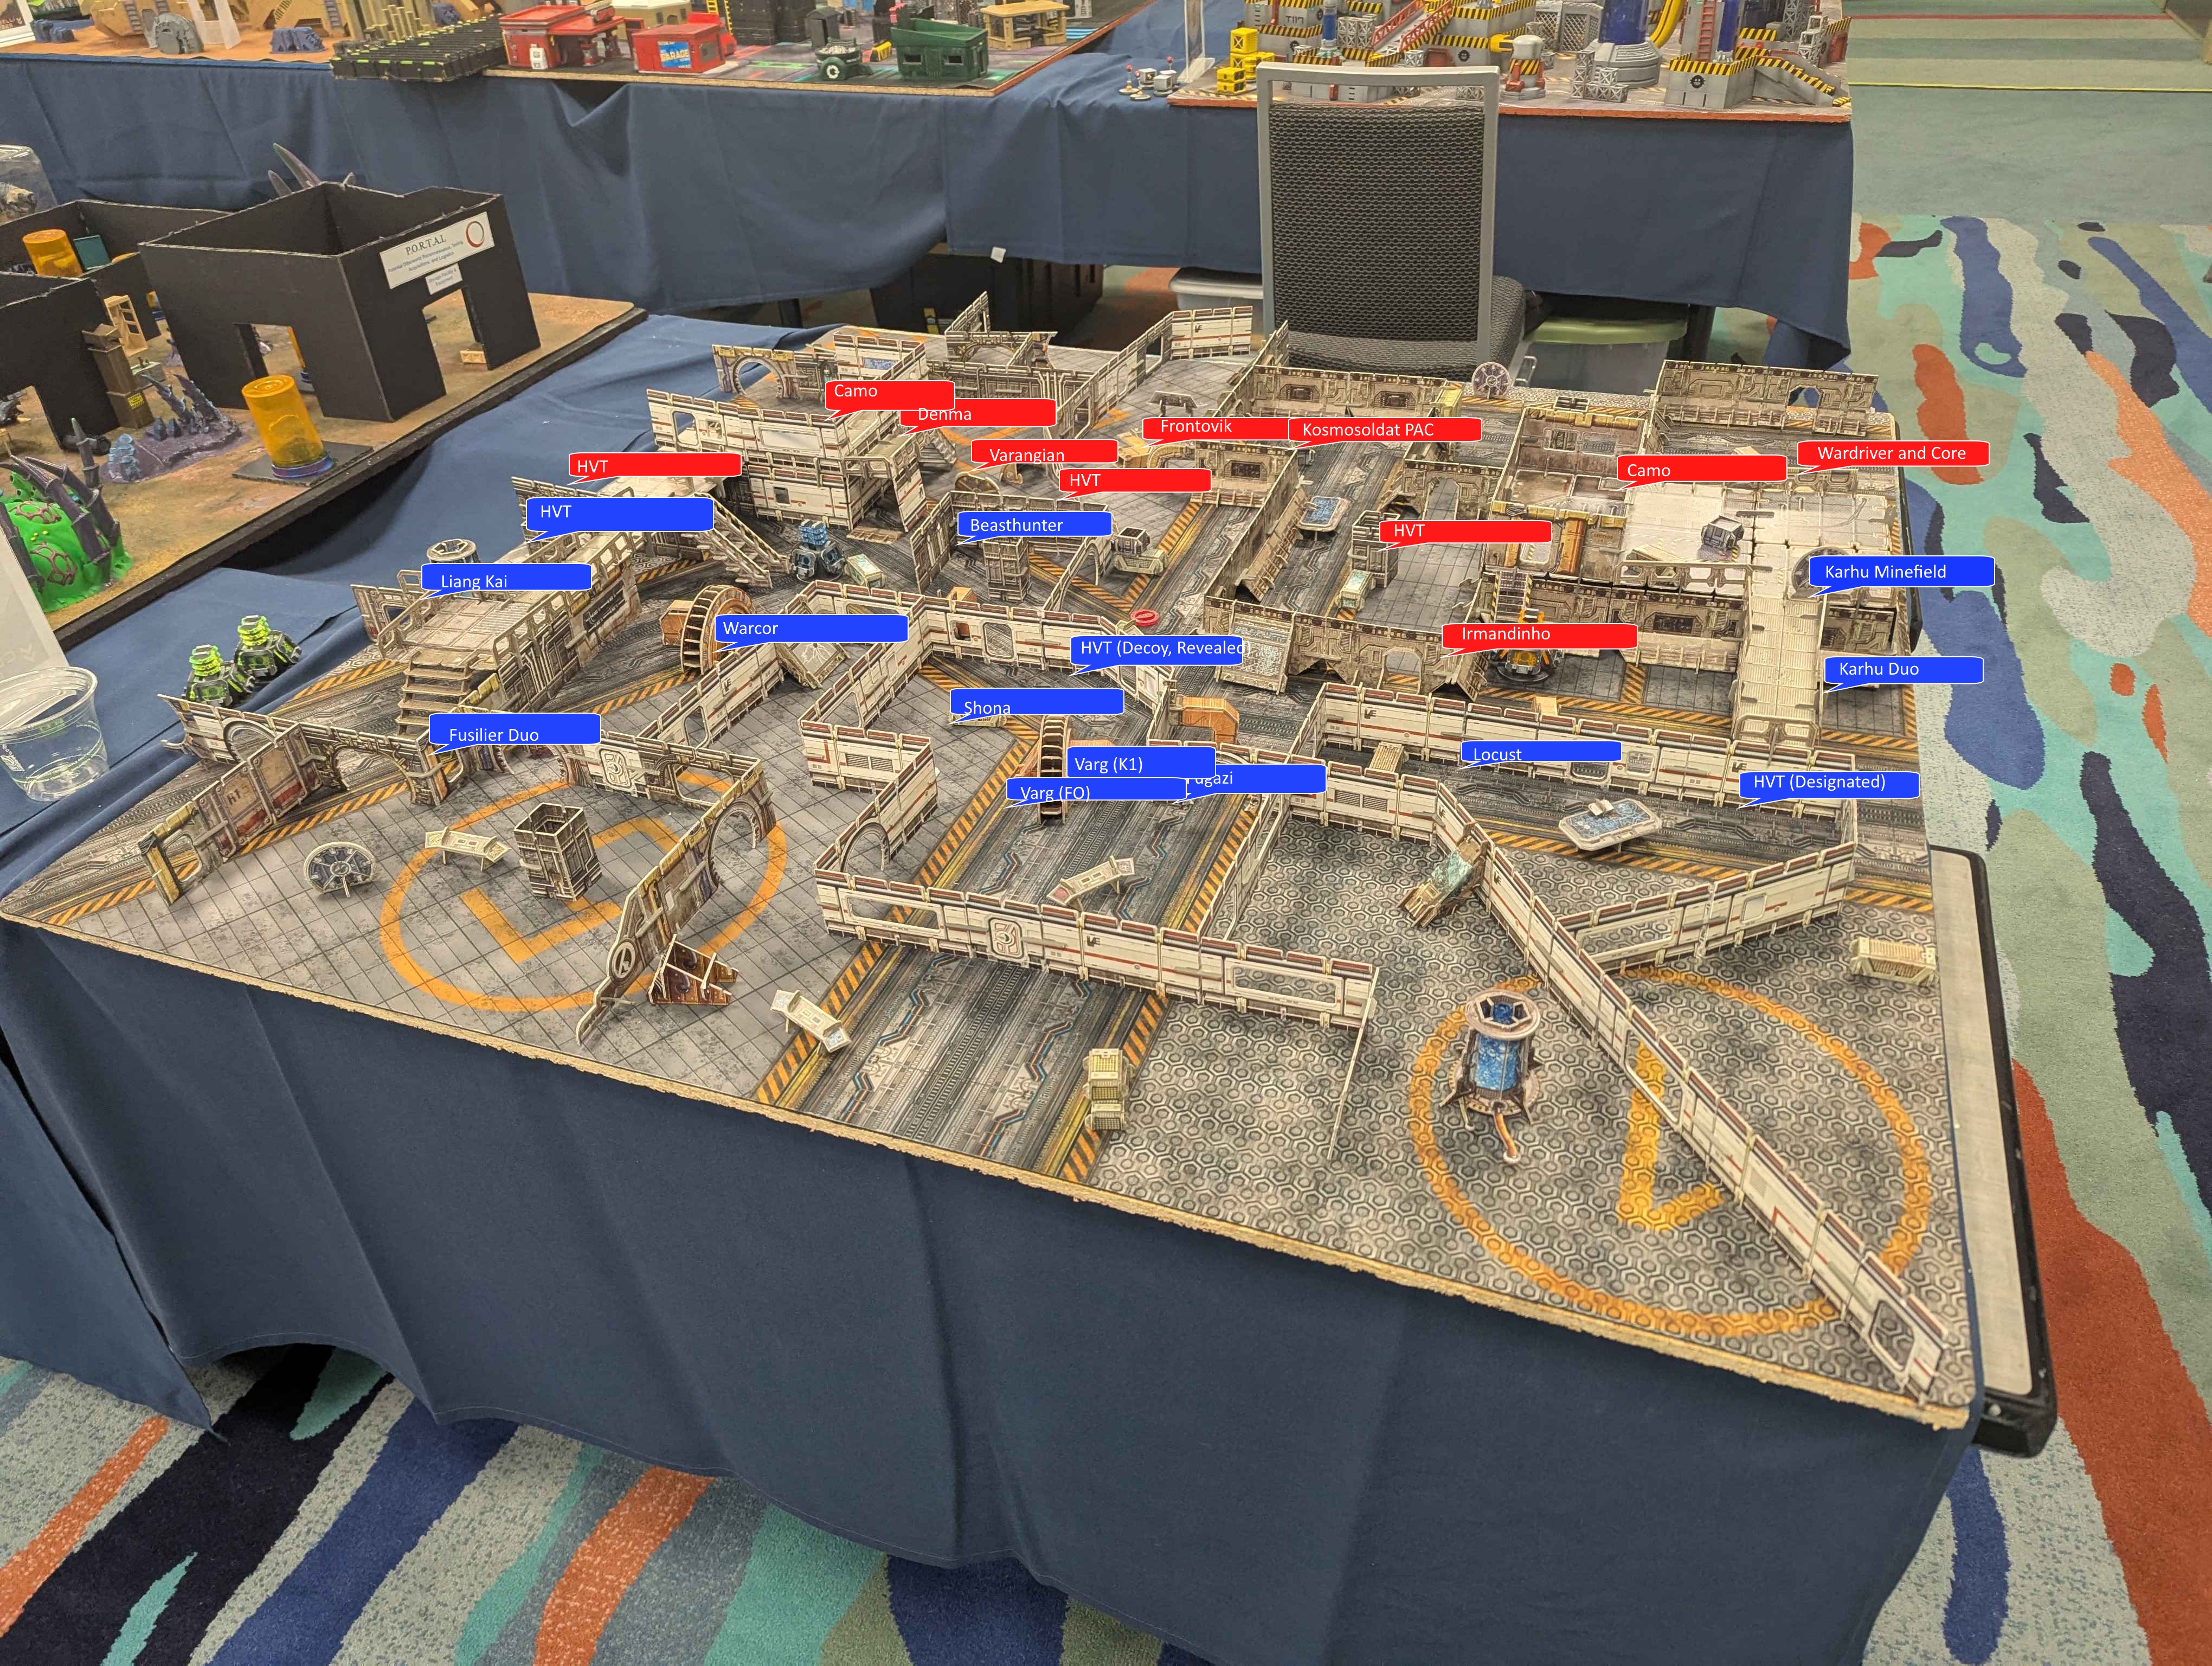
I broke the Varg link and moved Shona to clear the CrazyKoala with a prone movement and dodge, then jumped in CC with the Frontovik watching the center console and killed it in CC. She then jumped into CC with the Kosmosoldat PAC and killed that. With the consoles now open, the Warcor advanced and pushed the nearby button, guessing that the HVT in the room with the core was the Designated Target. Which it was not. Damn.
That meant that the Varg FO was going to have to push a button, so it did. I moved prone to peek and shoot a couple of Discoballs to block line of fire to the core team and then pushed the button, revealing the far HVT as the designated target.
Three HVTs were left alive and I had about three orders left in my Group One, but I was well positioned for it. Liang Kai moved to CC with the Designated Target and killed it, and Shona killed the central HVT in CC. The Locust in Group Two moved past the core team in marker state and Surprise Shot the last HVT in the back.
Turn Three (Kosmoflot)
Falx was unfortunately in Loss of Lieutenant, and couldn't do much on his last turn, so it was...
A 10-0 Svalarheima victory
Postmortem
It's always an interesting thing when you lose the first round of a tournament. Matchups don't usually start to firm up until later rounds, but you can absolutely run into a challenging match early on. This one was more of a challenge than the score let on. The Kosmosoldat in the center took a significant amount of effort to move around and clear, and was pinning my Varg team away from objectives.
The map was well designed to limit abusive movement tools, which I appreciated. And the play to drop a turret and limit my offense in the close quarters brawl on that flank was a wise one. Group Two in this list is designed to pull Group One out of trouble in situations like this, and it did its job well there. But my movement with the Varg haris put me in an awkward situation that necessitated that sort of saving, and Shona should've moved to support the Vargs she accompanies better. I don't need all three of Liang Kai, the Beasthunter, and Shona all engaging the same smallish area.
I don't know if the Karhu minefield prevented (probably) Uxia from moving towards the console they were near, but Kosmoflot doesn't have any 2W camo markers and protecting the Karhus is force of habit at this point. Especially when my real HVT was on a board side with no obvious defenses other than that.
Liang Kai being fast and absurdly lethal made this seem easier than it probably should've been once the Beasthunter flamethrowered the room to remove some obstacles. There aren't many things that want to be in his melee range, and it's pretty long with an 8" berserk.
Killing all the HVTs still came down to the last. Falx defended the two consoles in the center room well and prevented me from going for the HVTs until my own turn 3, which is always an iffy scenario. Well played there, score aside. Had he chosen not to reveal the Zenit-7 or taken a Rokot LT with that big core, he still would've had 6-7 orders on his last turn to kill my revealed HVT or even reveal and reach my own Designated Target.