Background
It had been a pretty good first day at the Krug. Looking at OTM, I was in a better position than I expected to be. I had come here saying that going 3-2 would be a good result, and I stand by that. And I was currently at 2-1 with one close loss. Winning is great, but I really wanted to come and have a good time hanging out with great people and playing the game I love, and that part had been wildly successful.
There was a presentation on Saturday night that was mostly a rehash of stuff shown at Interplanetario, plus some good news (StarCo was coming back!) and some sad news (Spiral Corps and Foreign Company were dead, buried, and not returning), and everyone went their separate ways after a long day of playing and chatting. There would be no catered food on Sunday, but the schedule was shorter since the event wrapped up that day.
Based on the way scores in OTM lined up, I expected to play Kestrel again. But when the pairings were actually announced, I found myself matched up against Morats. This happens sometimes for a variety of reasons -- it may have been that two of the players above had gotten a draw and thus couldn't play again, or whatever. Doesn't matter. Morats it was, and at least it wouldn't be Kestrel for a third time.
Nothing against Kestrel but, at a tournament with ~110 participants, playing against a bit of variety would be nice. Even if Morats are a tough army.
Prelude
I got matched up against a player from the Denver meta with the ITS name of JoshPosh. We've both played in the Infinity Global League for some time, but somehow never matched up with one another. I recognized his name from Discord anyway, although I think he has Bakunin flair on that server. I was surprised to see him playing Morats, but glad again to meet someone that I've run into online over the years.
Looking at the table, I realized right away that it was going to be rough. One side of the deployment zone was about as open as you'll see a deployment zone anywhere. Looking at the buildings, I didn't think the Jotum would be playable at all, depending on which side of the board I got. There wasn't enough room behind tww of the buildings to deploy a TAG, and the remaining building wasn't tall enough to block its silhouette.
The other side of the board had a sparse deployment zone also, but this board had a note indicating that the building interiors were playable. Two of those buildings were decently sized. All had no open windows or doors, and doors were to be treated as "Star Trek" doors, meaning that they'd open and then close immediately as units moved through them. And the center building extended well past the deployment zone, so quadrant scoring on Supremacy could be done with absolute safety.
The table is part of the tournament experience. The "third player", as they say. And it was a table that would ask challenging questions of any game played on it, as all tables do. But I don't mind saying that I absolutely had a preference as to which side of the table I'd play on, especially given that Supremacy has a second player scoring advantage.
We drew classifieds and made our lieutenant roll, and my opponent won the roll. He wisely selected deployment and took the side of the board with the enclosed buildings, so I decided to go first. I don't mind playing Svalarheima in an aggressive fashion, but I felt that extreme aggression would be needed here in order to have a chance at this one.
The Lists
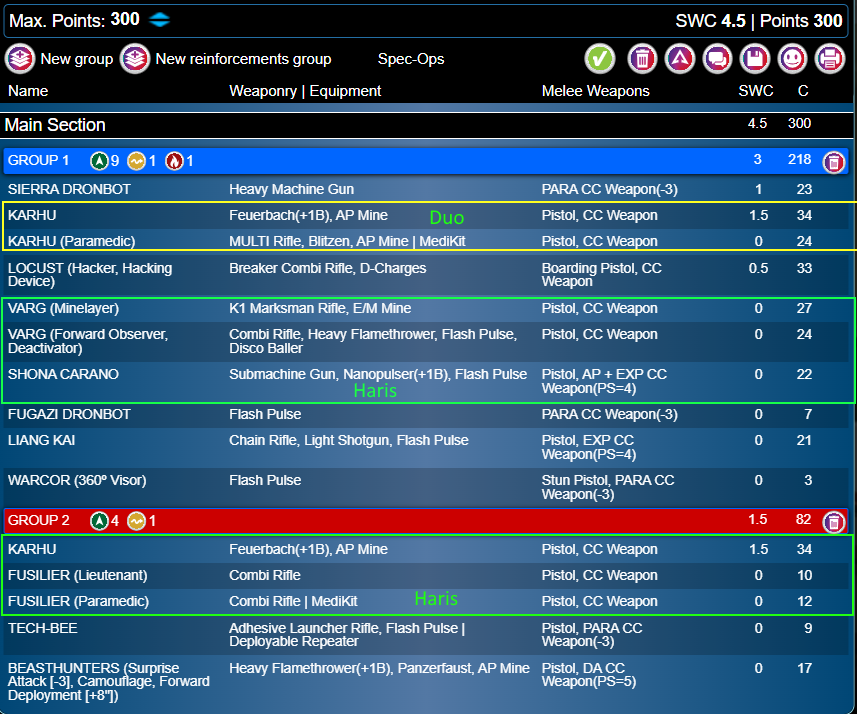 This jumps the script a bit, I guess, since it happens before classifieds and thus the LT roll, but I ended up playing the triple Karhu list that had served me well in the last couple of games. My classified draw had left me with a classified requiring a hacker (both classified options I drew required one), and I didn't think I'd be comfortable anyway playing a Jotum if I got the more open table half, so I elected to use this list again.
I was fairly comfortable with the choice. The list wasn't great at defense, but neither was the Jotum list. And the Karhu list had the potential to pour on damage to anything he left exposed in a way that the Jotum list couldn't do quite as well. I expected Kaitoks, and a B3 SR-1 chain rifle in close quarters is a terrifying thing.
Opponent List
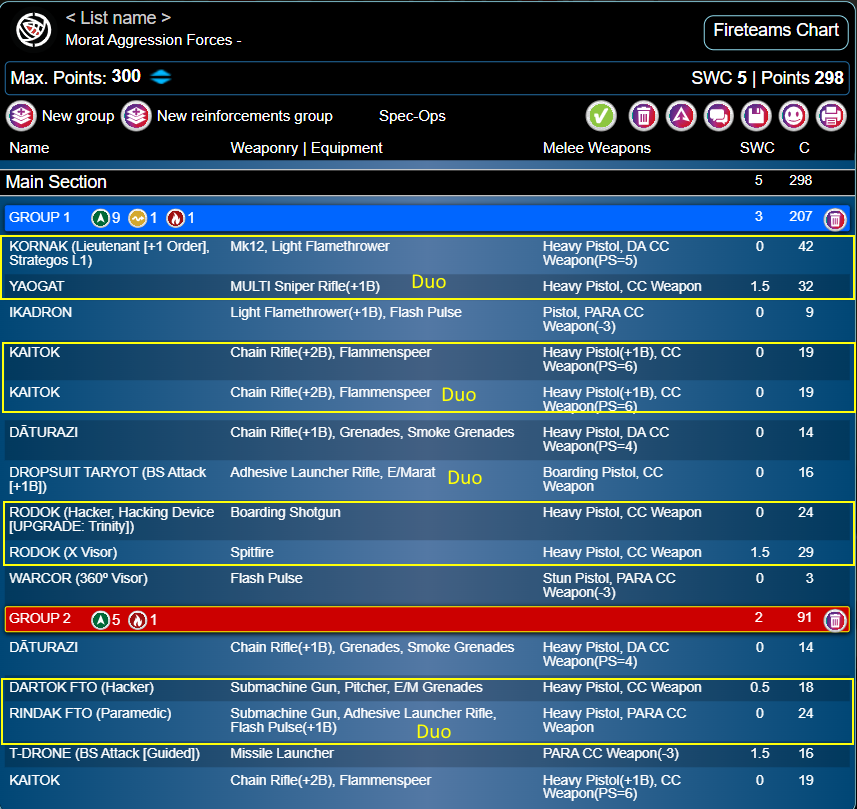 My God, what a list. The great strength of Morats since their rework has been fireteam flexibility, and this leaned hard into that. The duo of Kornak and the Yaogat gained +1SD, as did the Kaitok duo. Which is just amazing. Great hacking, great hacking projection, a lot of bulk in three Kaitoks, a strong shooter in the Yaogat, and Kornak to squeeze out some more order efficiency.
It could project damage with templates, CC, guided missiles, and so on. It's just a great list, and stuff like this is part of why Morats are so strong in N5. There's no one key piece that makes this list work, just a collection of troopers whose sum is more than the whole of the parts. And each one of the parts was a pretty great model in its own right.
Classifieds
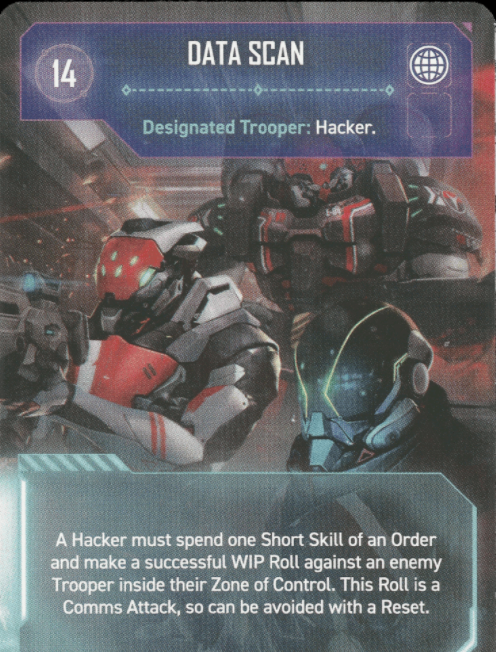 My classified choices were Data Scan or HVT: Designation. Lacking a Forward Observer and preferring the potential ease of scanning an unconscious enemy model over Spotlighting an HVT twice, I opted for Data Scan. Neither one of these options was really great, but Data Scan is a pretty achievable classified in most circumstances, and Secure HVT is always an option should the Locust die before achieving it for whatever reason.
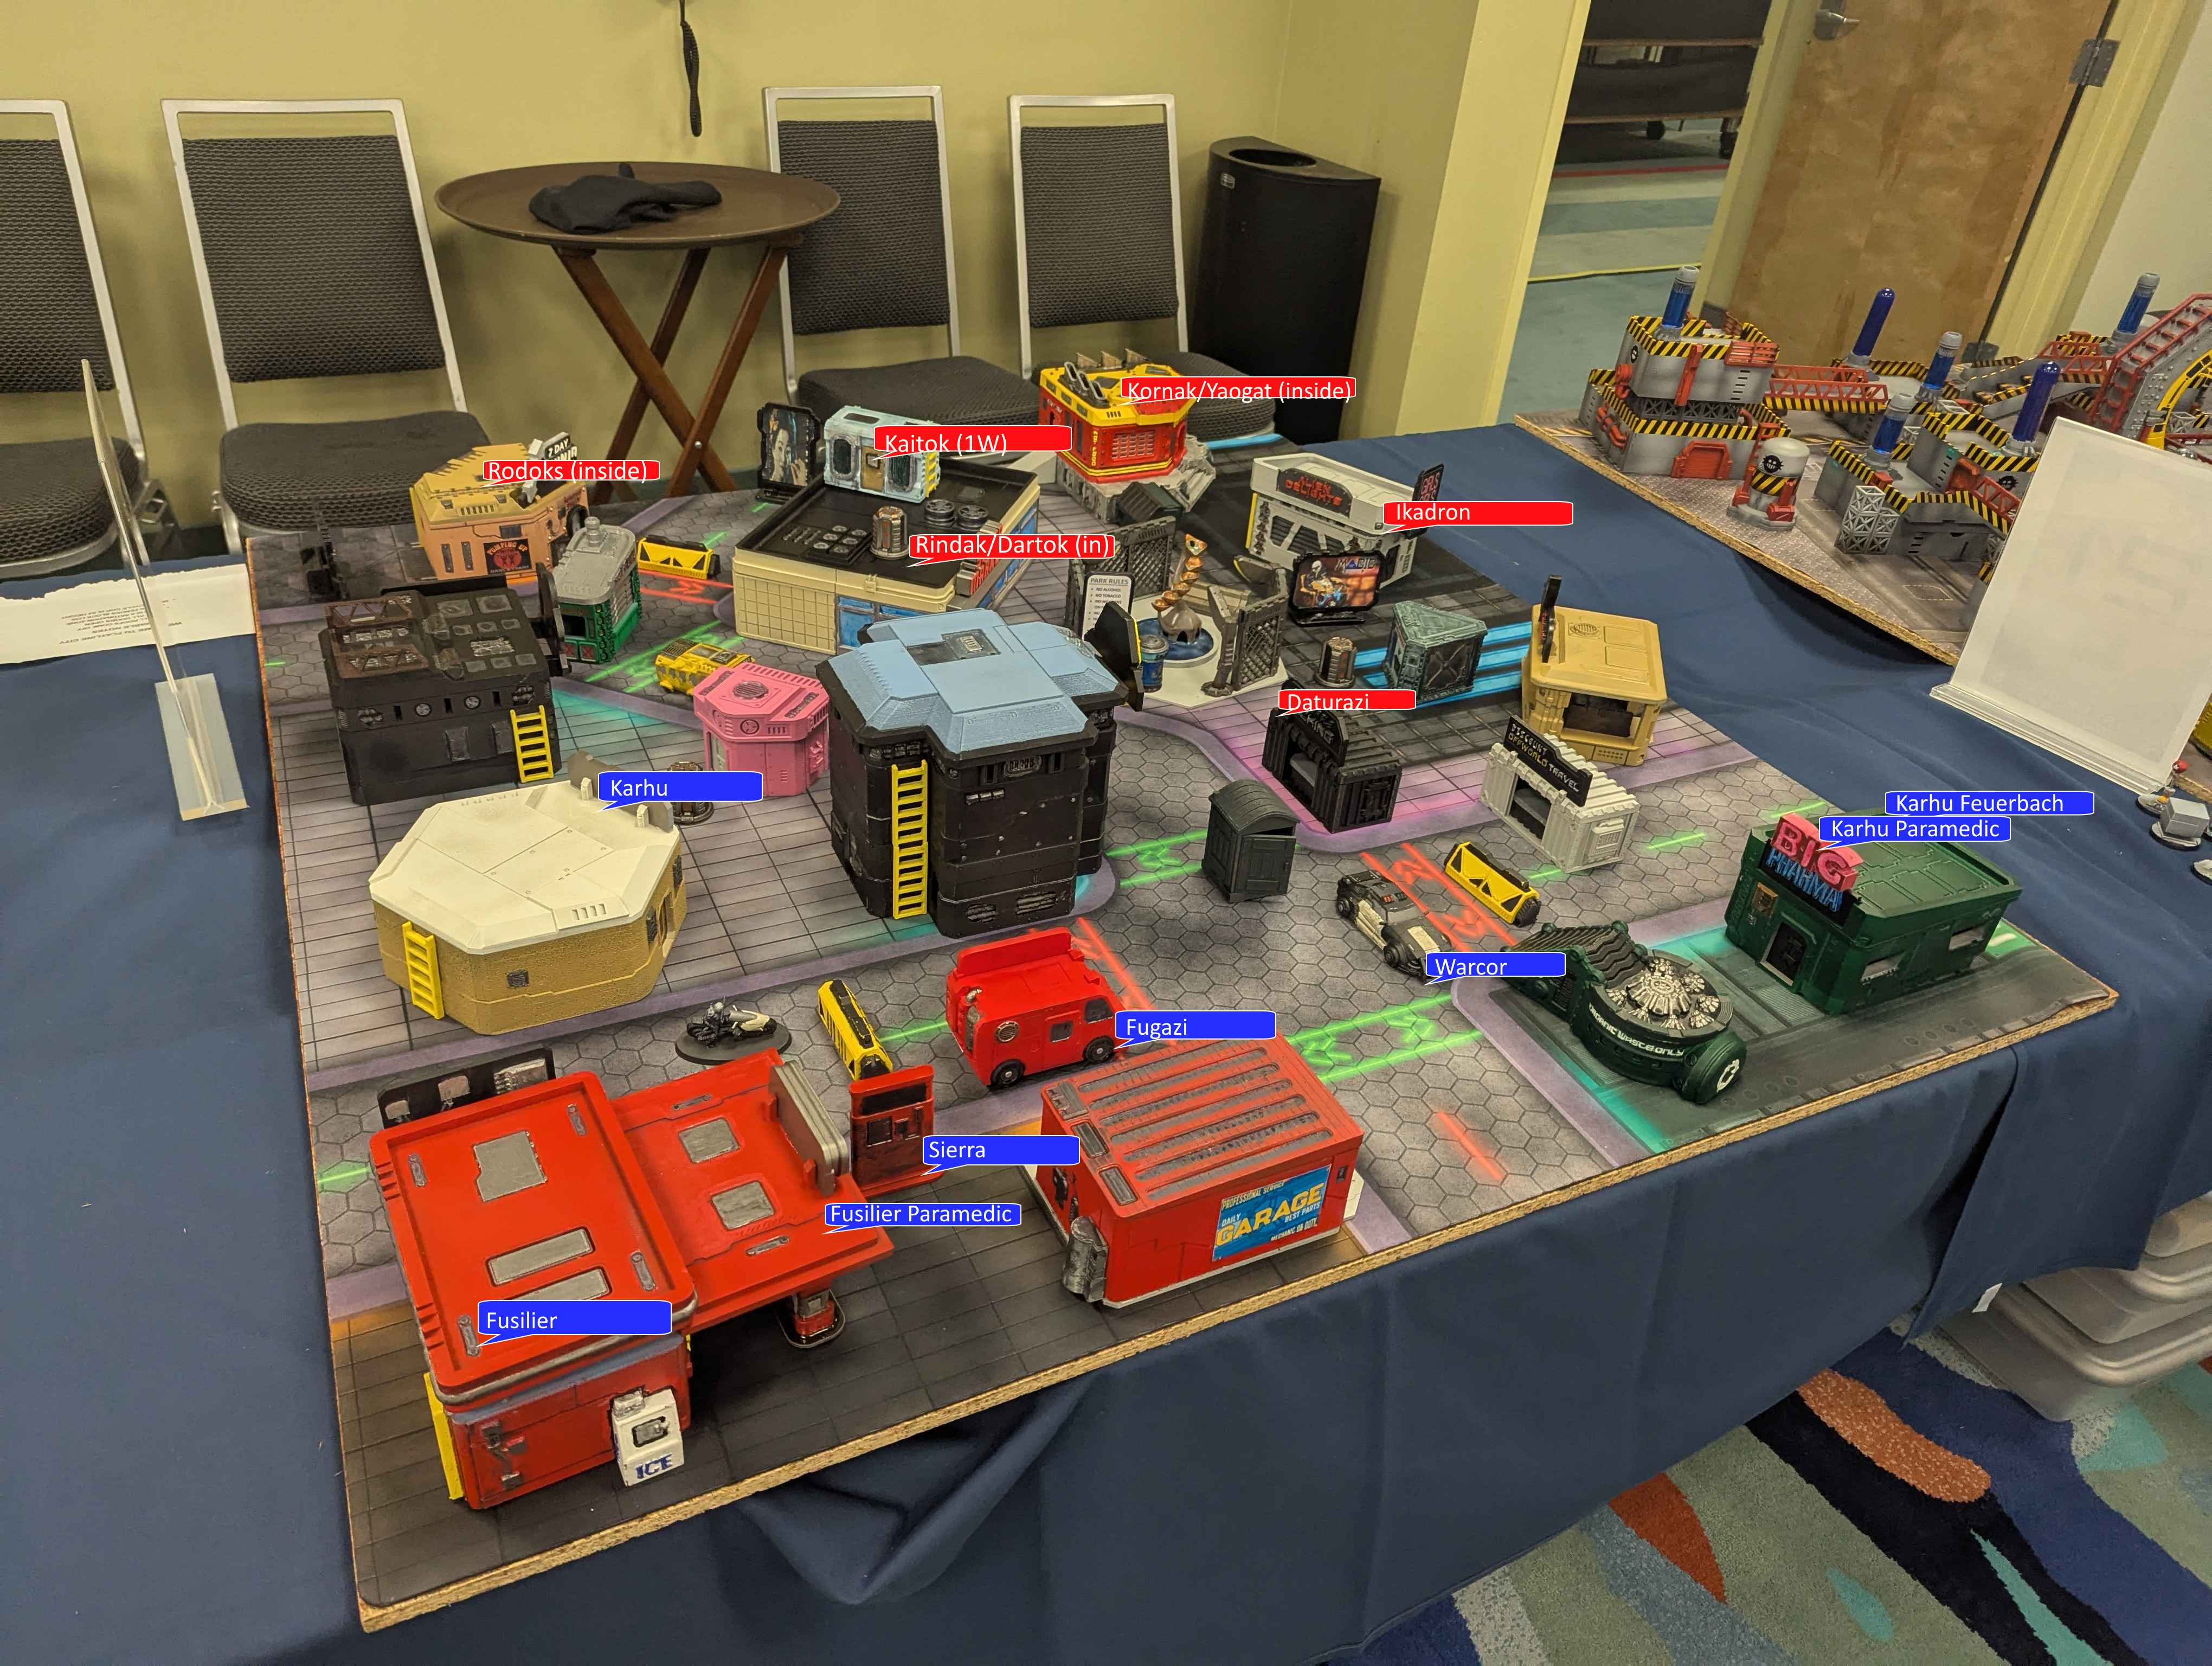
Deployment
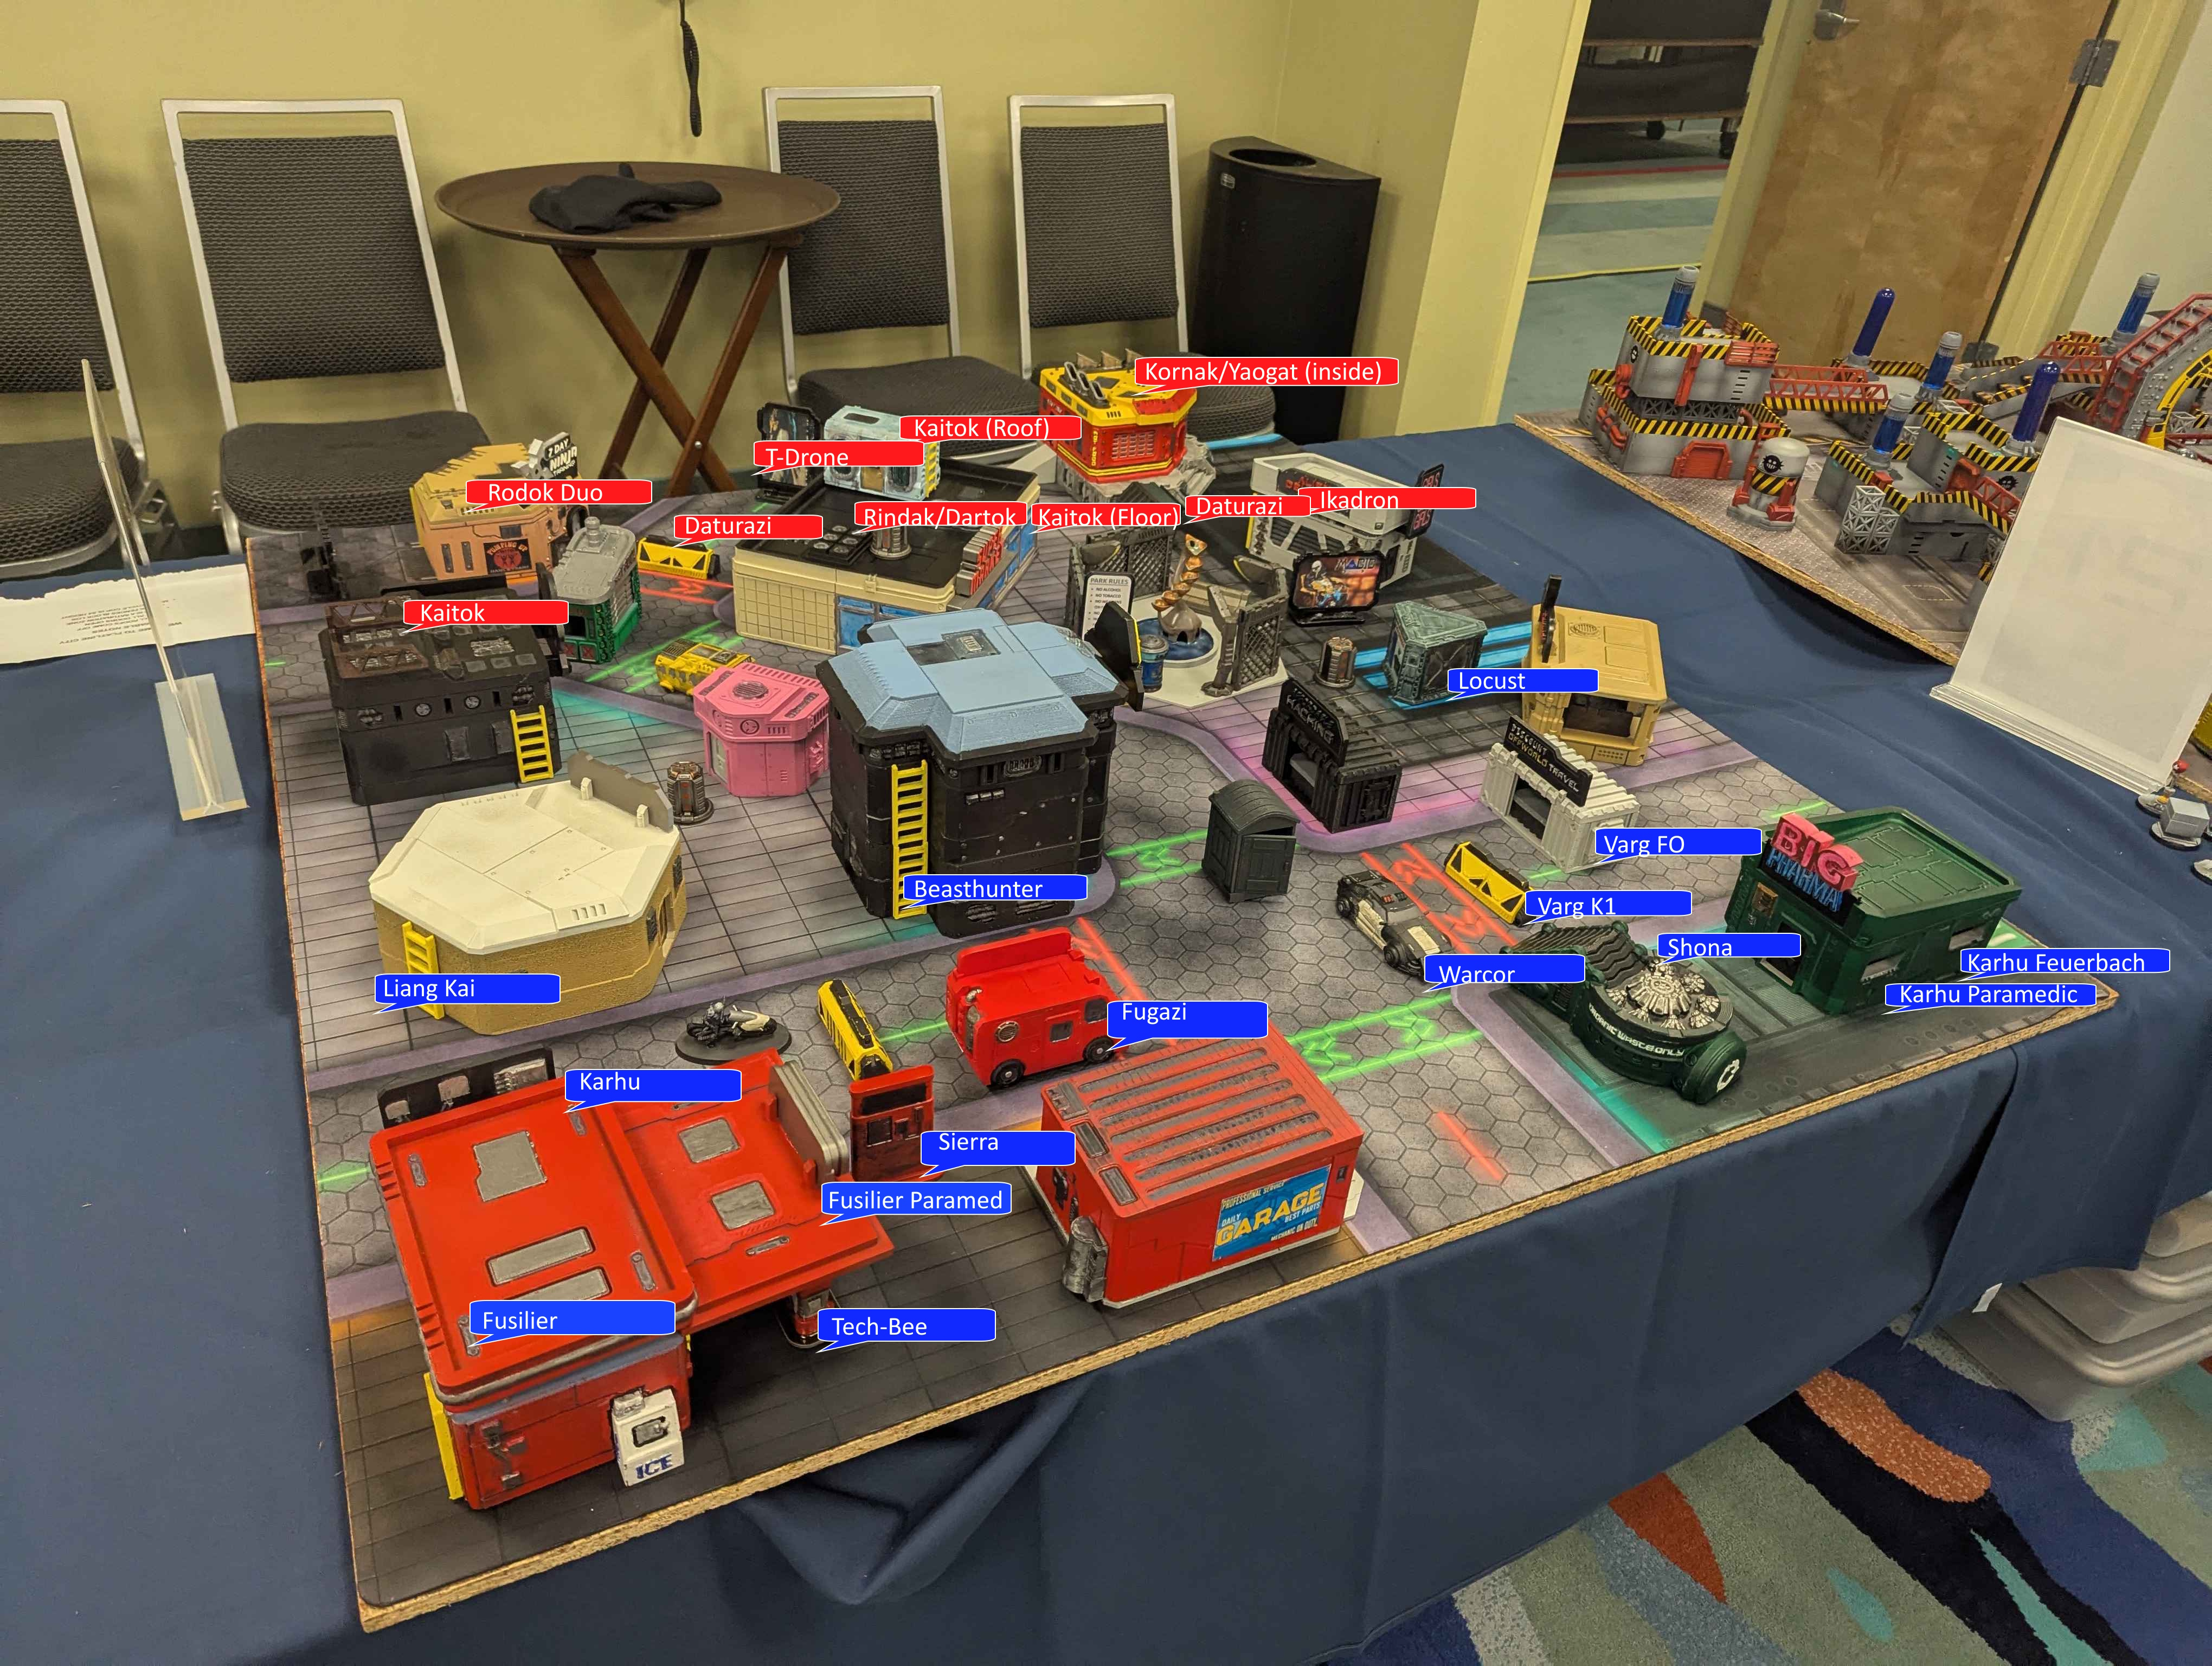
Since I was deploying first on the less protected side of the board, I deployed for aggression. My Karhu duo went down on my right flank, and the Group Two Karhu haris went down on the left flank. The Vargar haris was deployed on the ground in the only real available location and protected my Karhus, with the Beasthunter deployed on the opposite flank in case there was need or opportunity to respond to something.
The Warcor, Fugazi, and Sierra were deployed to cover any gaps in the middle and move forward if a chance arose, although I expected a Yaogat somewhere on his side and watching lines of fire from that Yaogat was going to be critical. Especially with Star Trek doors meaning that I wouldn't be able to attack it or restrict its movement unless it emerged from whatever hidey hole it ended up in. Liang Kai was kept in reserve.
My opponent deployed defensively, which makes sense. His Kaitok duo went on his left flank, facing off against the Karhu duo, and the unlinked Kaitok was placed to guard to the way to a building with this Rodok duo. A T-Drone went near the back of his deployment zone, guarded by a Daturazi. The Rindak/Dartok duo got deployed completely hidden inside the large building in the center, and the other Daturazi and Ikadron guarded the small building on his left flank. He held two in reserve. This meant Kornak, and probably a Yaogat with it.
Seeing no long range guns, I deployed Liang Kai to make a rush at the T-Drone. The Yaogat and Kornak got deployed in the small building as expected.
Turn One (Svalarheima)
My opponent stripped two orders from Group One, which made perfect sense. Looking at the board, the clear priority was clearing out the Kaitoks. Although they were a designed crumple zone, they were also three durable +1SD Flammenspeers watching the board. No good there.
I used Liang Kai's impetuous order to make a move towards one, then used an NCO order on the Group Two Karhus to knock the Kaitok on the ground down to unconscious. An order on the Karhu duo in Group One saw me climb up and inflict 1W to the Kaitok on the roof, who Gutsed to total cover.
The way clear, Liang Kai rushed off to deal with the last Kaitok, and hopefully the T-Drone as well. Removing one of the main dangers of pitcher projection was an achievable goal this turn. He berserked into the Kaitok on my left flank, taking a wound from a chain rifle in response, then worked his way around behind the building to reach the T-Drone. I would've rushed straight in to attack the unprotected Rodoks, but we didn't discuss how the Star Trek doors would work in regards to Super Jump before the game, and I didn't want to ask the question while in an attack position and coerce an answer that might've been different before the game.
Liang Kai knocked down the T-Drone, then shot it twice with a light shotgun while it was unconscious, but it made both saves. Low on orders and not seeing any good use for further orders in Group One, I decided to berserk his Daturazi and hope he'd chain rifle me. It's a pure coin flip of a fight, as both are CC23 and both have MA4. If it worked, I could go eat the Rodoks inside the building. If not, it would be for nothing. Liang Kai lost.
Deciding to double down on mistakes, I moved up my Beasthunter and attempted to flamethrower the Daturazi. It discovered me along the way due to a line of fire I hadn't anticipated, and dodged into CC. So I repositioned my Karhu duo for safety and passed turn.
Turn One (Morats)
The Daturazi killed the Beasthunter in CC easily and moved forward slightly to contest the quadrant there. A Dropsuit Taryot dropped onto the board in ZoC of my Locust, so I revealed and Carbonited it. My opponened attempted to land a pitcher next to my Locust, but failed, and successfully Reset the Taryot, opposed by a Spotlight from the Locust.
Now free, it spent a couple of orders dueling with the Locust, taking a fight out of cover so that it could deny me cover of my own. Eventually it just dropped a boarding pistol template on me, so I templated it with my boarding pistol and it went dogged. This was probably a mistake on my part, but I made a lot of them in my first turn here.
The Locust dispatched, the Taryot moved along to engage my Varg FO, which shot it with a combi while the Taryot dropped two boarding pistol templates on me. The Varg lost the fight and went unconscious, and the Taryot made its save. The Taryot then jumped up to E/Marat my Karhu duo. Both dodged, and Shona was able to hit the Taryot with a nanopulser.
My opponent moved the Ikadron up to claim a quadrant, and scored 2OP for controlling more quadrants.
Turn Two (Svalarheima)
 Well, that could've been worse. The Taryot removed my ability to do a classified, but killing both Daturazi seemed a realistic possibility and, if that went well, I could pretty easily reach Kornak and the Yaogat with Shona and seal the deal.
I spent an NCO order to have the Karhu duo shoot down the visible Daturazi, which went smoothly. I then called a Speedball to revive my Varg FO, figuring on pushing a couple of buttons on my way up the field. A Vitapack dropped in front of Shona and I used it to pick up my Varg, reform the fireteam, and head up the board.
Here it all fell apart. My Varg FO failed to push a button four times on WIP13, delaying the fireteam's move up the board. So I gained 0OP for my efforts. PanO doesn't have great WIP in general, but Vargar are pretty smart at WIP13. I lost a bit of forward momentum here, but I still had four orders to shoot the Daturazi and get to Kornak and the Yaogat if lucky.
So I shot at the Daturazi with the K1 Marksman, and the Daturazi threw smoke in response. First order, both high rolls were a 12 and nothing happened. Next order, both high rolls were 11 and nothing happened. Next order, he crit his smoke throw and that was that. I withdrew the Vargar to a staging position, though not nearly as safe as one would like with an angry Daturazi sitting inside smoke and waiting to come out, and finally succeeded at pushing a button.
With nothing to shoot in my Group 2, I Jumped the Karhu forward to contest a quadrant, and went prone there. No sense getting shot by a Yaogat.
Turn Two (Morats)
My opponent spent virtually all of his second turn on the Daturazi that had lived. He threw smoke and moved to CC the Varg FO from inside smoke. The Varg managed to crit, and Shona dodged in to join the fray. The Daturazi spent two more orders in CC before Shona died, beating her both times on B2 versus my B3, then killed the Varg FO and moved to the other side of smoke to engage and kill my Varg K1 in CC as well.
There weren't any orders to do anything else, but that was sufficient. He dominated two quadrants again and went up 4-0 (consoles don't score until the end of the game).
Turn Three (Svalarheima)
 Well, this was turning out to be an unmitigated disaster. My opponent had very strong board control and could easily dominate quadrants, while I was low on active pieces and orders both. All I could really do here was scrape out what OP I could.
I consolidated what I could into Group One and spent an NCO order to shoot down the Daturazi with my Karhu duo, then climbed down the building and advanced into the building. WIP12 succeeded where WIP13 had not, and the Karhu paramedic succeeded in pushing a button, but I didn't have enough orders to advance further and threaten anything else, so I settled for dropping a couple of mines and passing turn.
Turn Three (Morats)
His Yaogat peeked out of the building and spent a few orders shooting my Karhu duo while out of cover, eventually dropping the feuerbach. The paramedic was behind total cover, and he moved out his Dartok/Rindak duo to finish it off, pushed two buttons, and scored Secure HVT, resulting in a...
9-2 Morats Victory
Postmortem
Yeesh, what an ugly game. I'm not sure to what I should attribute my turn one mistakes, but we'll start there. One of Svalarheima's weaker points is defense, and that doesn't help build good habits for playing defense well. Especially not into something as well-rounded as Morats, that can CC and shoot nearly as well as Sval can while projecting threat in other ways.
The attack with Liang Kai that killed the Kaitok and T-Drone was fine. There was no need to go any further, spend any orders trying to take the T-Drone off the board, and certainly not to attack the Daturazi in CC knowing that it was a 50/50 chance on who would live and who would die. There was especially no need to double down and send the Beasthunter to his death in the same situation, when I could've just stayed in camo state and made a move next turn if desired. Liang Kai and the Beasthunter remaining on board in threatening positions would've given be good opportunities later in the game that I shorted myself on by gambling.
The Dropsuit Taryot was unexpected, and Carboniting it was probably the right play. Templating back with a boarding pistol rather than dodging, however, was not. The Locust has a 70% chance to live if I had just kept dodging, and taking a chance to send it to Dogged, and only Dogged, didn't do anything. The intent of AROs is to waste orders, and I forgot in the moment that the thing has Dogged. What an incredible piece of tech. Warhorse as an entire army ability is ridiculously good, so it was easy for it to Reset out. Had I remembered that it was also Dogged, I like to think I would've dodged.
My Turn 2 plan with the Vargar looked good on paper. It still does. One of the harder parts about Infinity is that it's a high-variance game with very little way to account for that. The odds of failing four dice rolls on 65% are low. A Daturazi only has a 20% chance to throw smoke against the Vargar, but those are high enough odds to consider. It would've been smarter to move Shona up and threaten a double nanopulser so it was a pure dodge. The odds for killing the Daturazi go down, but a dodging Daturazi against a DTW isn't throwing smoke.
I'm honestly unsure if I should've spent the time trying to push buttons at all. Spending time doubling back to push buttons meant that the team couldn't Super Jump, which is probably their strongest ability. Using valuable time hanging around and pushing buttons on a zone control mission is a double-edged sword. On the one hand, it forces the opponent to spend time pushing the buttons to score OP themselves. On the other, spending the orders to remove the Yaogat, Daturazi, and Kornak would've put my opponent on the back foot in a serious way.
Perhaps the Rindak and Dartok would've emerged to contest zones, but at least then they could be attacked and I could hopefully stop the bleeding and scrape out a 6-4 victory by pushing some buttons, dominating in the third turn, scoring Secure HVT. Or at least force a draw or more competitive turn 3. The Vargar's strongest defensive tech is E/M mines, and Morats just don't care about E/M.
Or perhaps I would've been better served by leaning on the Karhu duo to advance, deny the ability of the Daturazi to throw smoke at all, and plant AP mines to slow things down. Had I decided in the first place not to push buttons, that would've been the likely play. The Karhu are just better killers than the Vargar are, and the Vargar would be more likely to survive a push from the Yaogat by virtue of having Albedo.
I don't know. But, to me, my own Turn 2 is where it all fell apart. I didn't have a coherent plan in mind for what to do if nothing worked and, in the end, nothing worked. The Daturazi chewing through the fireteam in his turn two, regardless of the odds of a Daturazi beating Shona in CC with +1B from another combatant, are beside the point.
The long and short of it is that I really need to craft a list that I trust defensively for situations like this.