Background
I was pretty excited to attend the Krug in Denver this August. There were a lot of people I'd talked to online for years that I'd never met in person, and it was a good time for a vacation anyway. My wife decided to come with to have some time out in the sun in Denver, and our daughter was happy to spend some time with Grandma and Grandpa. Work kept me busy up until the morning we flew out, so I decided to run with Svalarheima's Winter Force, which I have been playing for most of ITS16, and to use two lists that I was familiar with. Although I was less comfortable with the Jotum list than I probably should've been.
Prelude
I had an arranged challenge for the first round with Hackknee, a Warcor out of Dallas. We'd talked for years on Discord and it was a good time to meet online friends in the flesh. Knowing that the first round was B-Pong and since it was an arranged challenge, I decided ahead of time to run my Jotum list into the game.
I'm not a particular fan of the Jotum, but Hackknee was playing Kestrel and TAG versus TAG action seemed like a good way to open the tournament. I've been trying to get myself used to playing with the Jotum anyway, but the list has some defined weaknesses - it's greedy by taking a Jotum plus a full Varg haris and a Karhu, and that doesn't leave room for a lot of flexibility. Not that Svalarheima plays the midfield anyway, but this list lives and dies on the Jotum being able to do its job.
The Lists
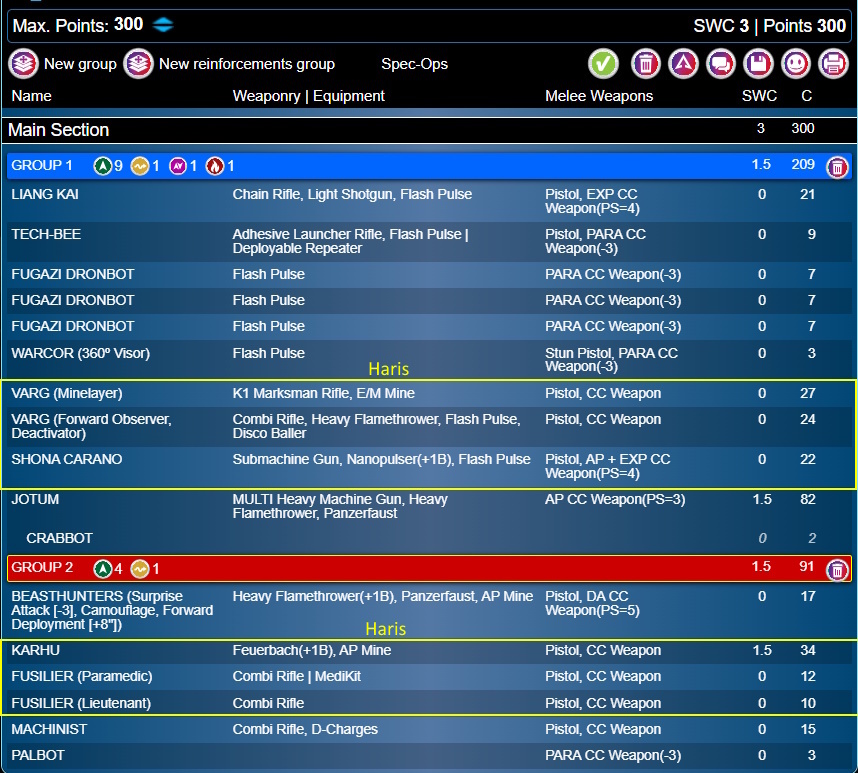
The theory behind the Jotum list I use is to apply huge pressure with the Jotum as early and as often as possible, using the Karhu in the second group to shoot targets of opportunity. The Beasthunter in group 2 will often go on a high-risk, high-reward attack on the first turn, since opponents will not often present a lot of targets against a PanO list at full power. The Jotum can do an incredible amount of work with a full order pool, and in case some dangerous target (Miranda Ashcroft or similar) is up, the list can shift sideways into powering Liang Kai or the Vargs forward.
In practice it works pretty well, although it does favor very aggressive play due to the thin defense. But that's also just generally part of how Svalarheima plays. The sectorial has no access to AD and poor access to marker state in general, and playing an honest game means honestly punching people in the face as hard as you can and as often as you can, with the idea that you can score OP later in the game once you've hamstrung your opponent.
Opponent List
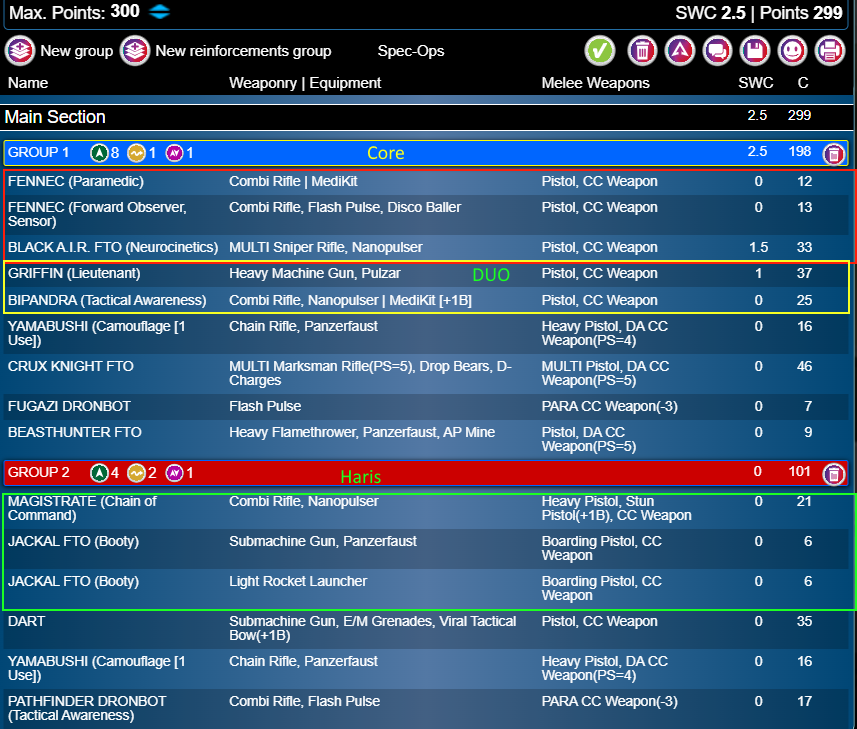
Hackknee took a pretty standard Kestrel list with some personal flair. I really love this about Kestrel -- there are just so many options to take that you can take all of the good stuff (two Yamabushi, the Black AIR, Jackals and Magistrate) and have a lot of room to flex into almost anything you want. It's hard to predict what will come down in reserve when playing against Kestrel. It could be a Crux, Hetkari, Redeye, or even Maximus or a Tikbalang.
Hackknee decided to take a pretty neat pure duo of Bipandra and a Griffin with flex pieces of Dart and a Crux. Dart recently got buffed to be a specialist, and I haven't played against her since, so I respect the choice. She was always an incredible assassin and had fallen out of favor a bit in N5, but giving her Specialist Operative feels like a huge buff for her and makes her very worthy of consideration.
His list was going to be quite difficult to control playing B-Pong, since he had enough markers to contest the beacon or consoles easily with limited orders even if I inflicted major damage.
Classifieds
B-Pong has two classifieds, so I drew two sets of two cards. I ended up selecting the following two:

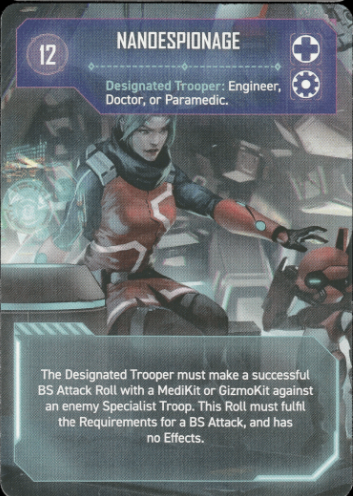
The other two classifieds I had were worse, and I at least had an engineer on the board. If I couldn't complete one of the two, I'd go for Secure HVT. But having a card that could be accomplished with a Palbot was good, and I figured there was a chance to score Nanoespionage with the Fusilier paramedic or the Machinist on some unconscious body.
Deployment
Hackknee kept deployment and I chose to go first. B-Pong favors the second player for scoring, but my hope was that I could inflict enough damage to make it difficult for him to score. Without having any idea what his list looked like, I was worried about a Redeye or a Tikbalang LT with a massive order pool behind it inflicting serious damage. Kestrel in general doesn't do great against high armor TAGs like the Jotum, but the rest of my list was pretty fragile and the potential was there to take serious losses that would let him control the board and score at will.
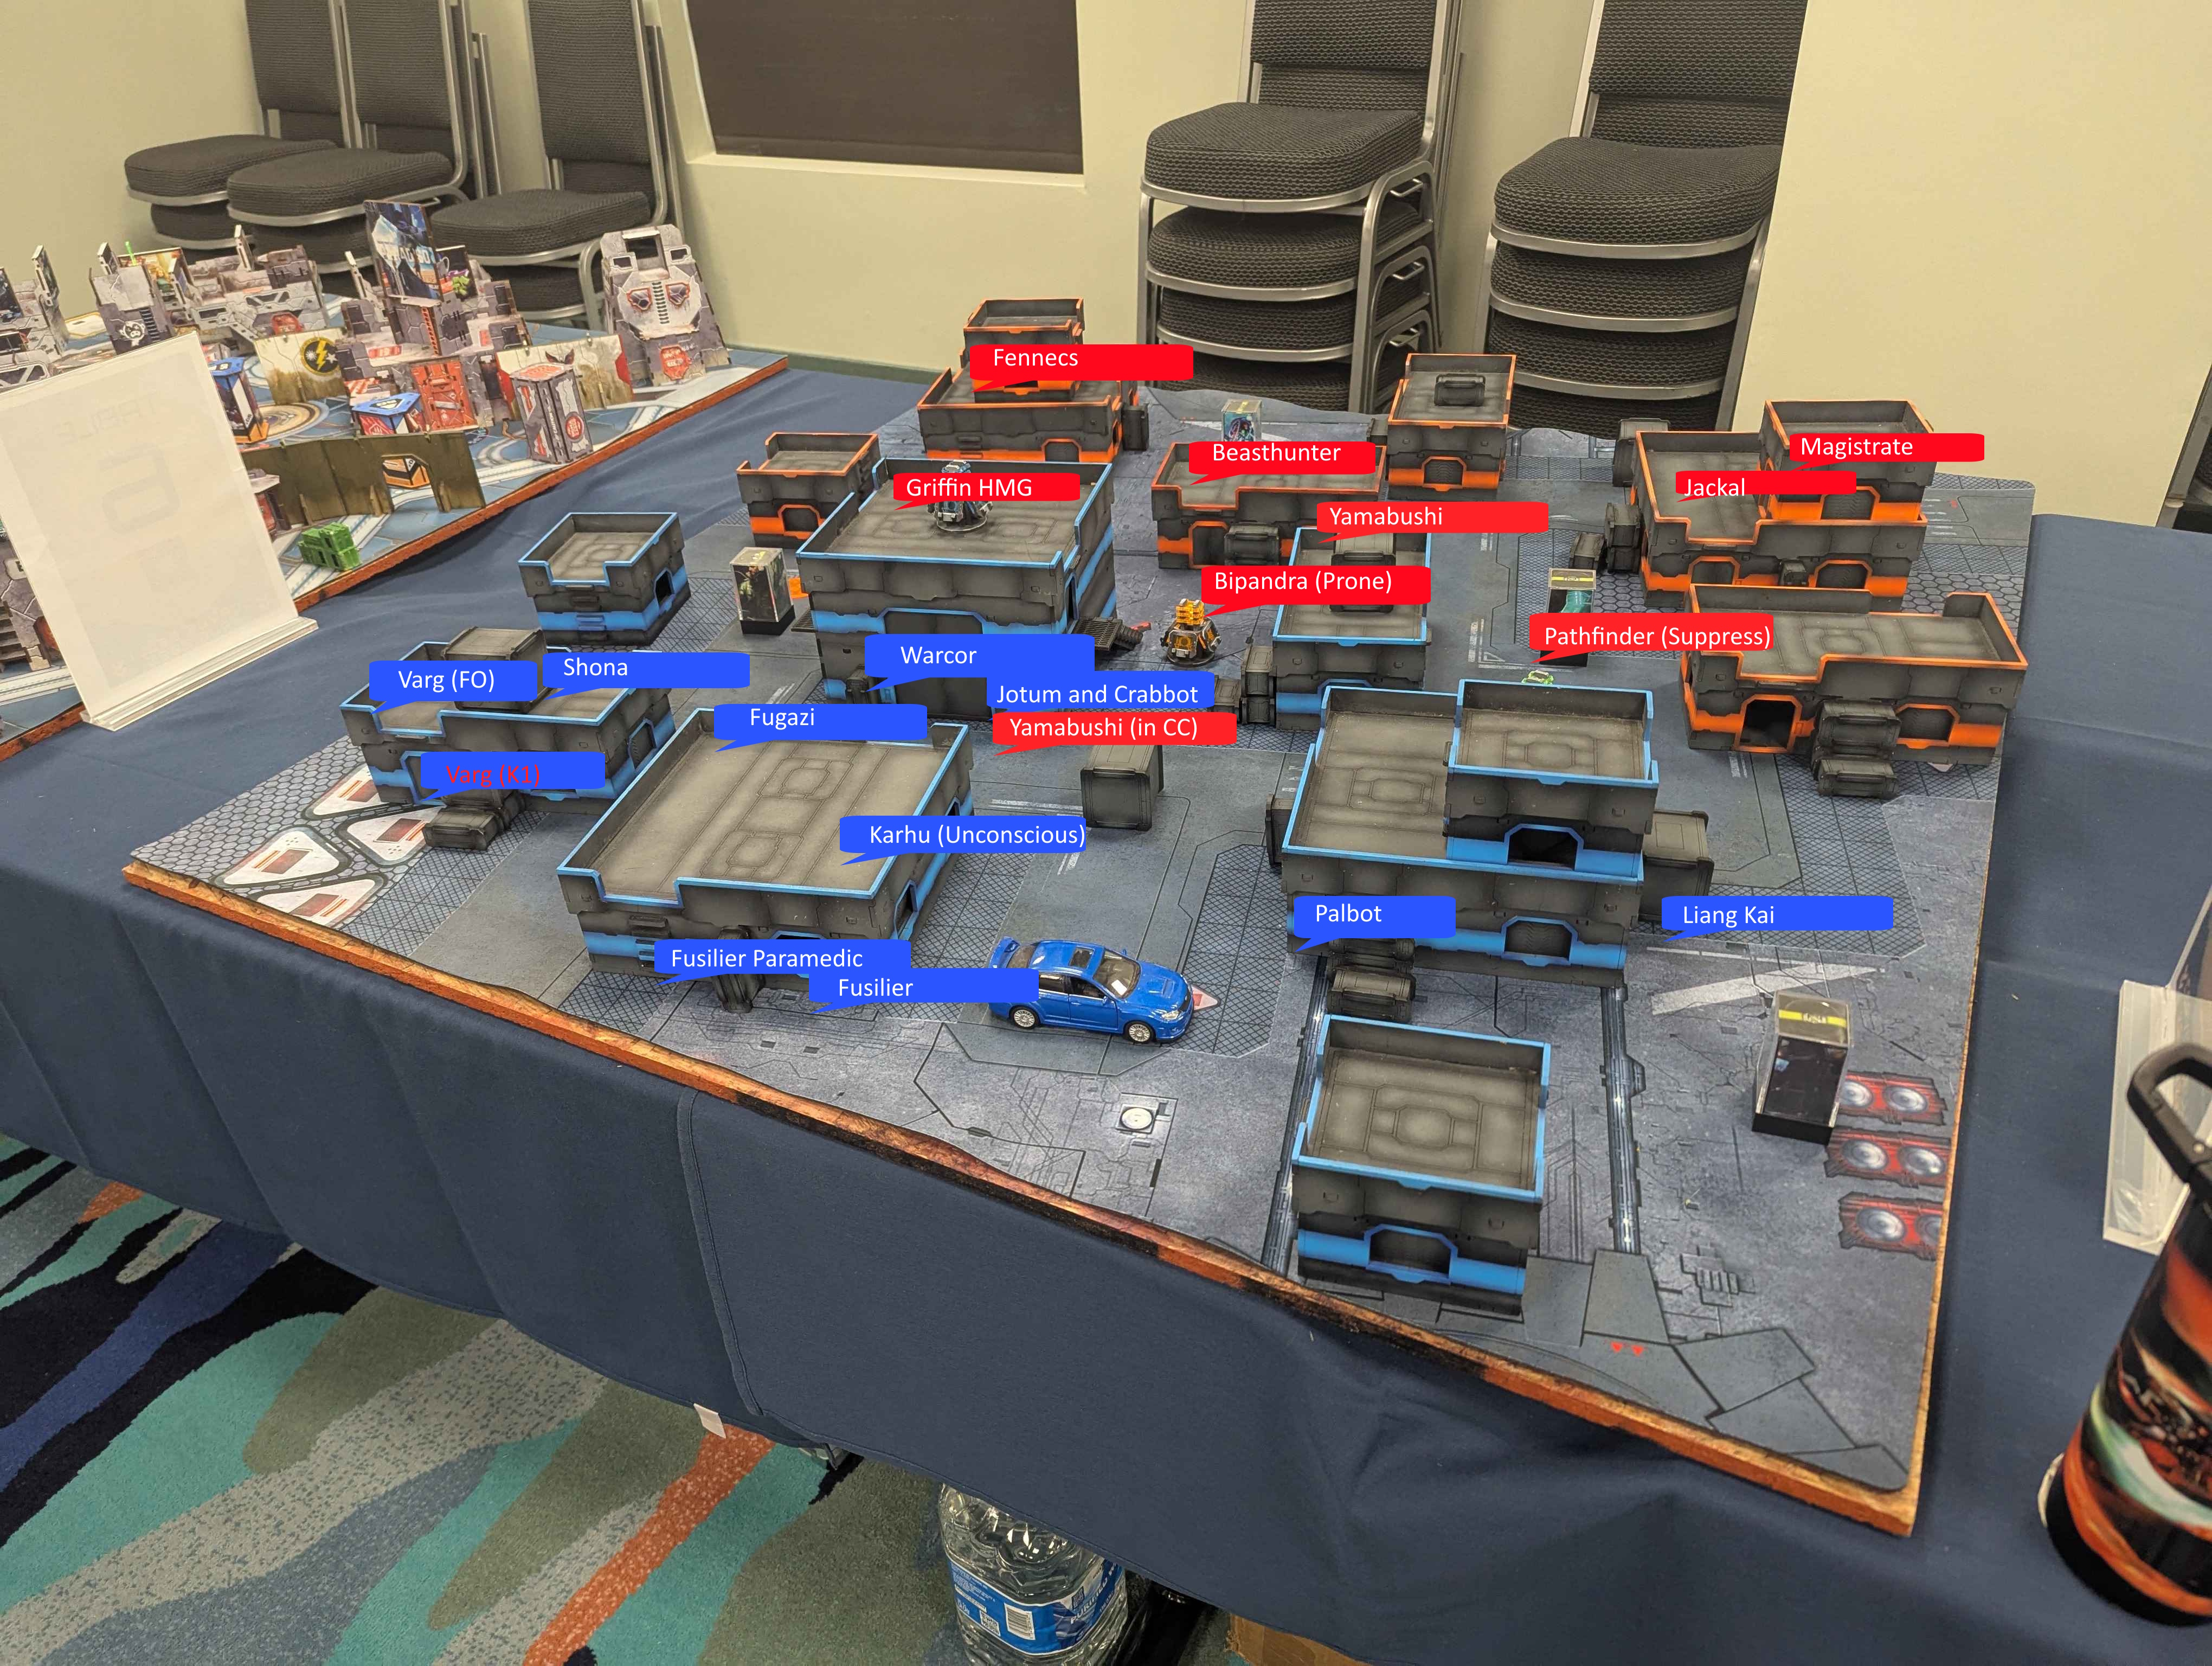
I decided to deploy the Karhu link on a central building with good lines of fire to the board, but hopefully not visible to where his expected Black AIR would be. The Vargs clustered up on my left flank ready to leap towards an objective if the chance arose, and my other flank was anchored by Liang Kai and the Beasthunter, along with my HVT. I reserved my Jotum.
He deployed the a Fennec/Black AIR link watching a huge portion of the board, with a Magistrate/Jackal link on the other side that had a few long range weapons to slow down Liang Kai. A Griffin/Bipandra duo was positioned near the center of his DZ, presumably to make a rush for the beacon, and a few camo markers were scattered around.
He initially debated placing his HVT on the other side of the building from mine, but decided to move it. His reserve was a Crux.
He had a tactical support card to give a unit a Blitzen, which went to the Crux. Damn. I had one to make one unit a specialist, which I put on Liang Kai. A WIP14 specialist might be handy.
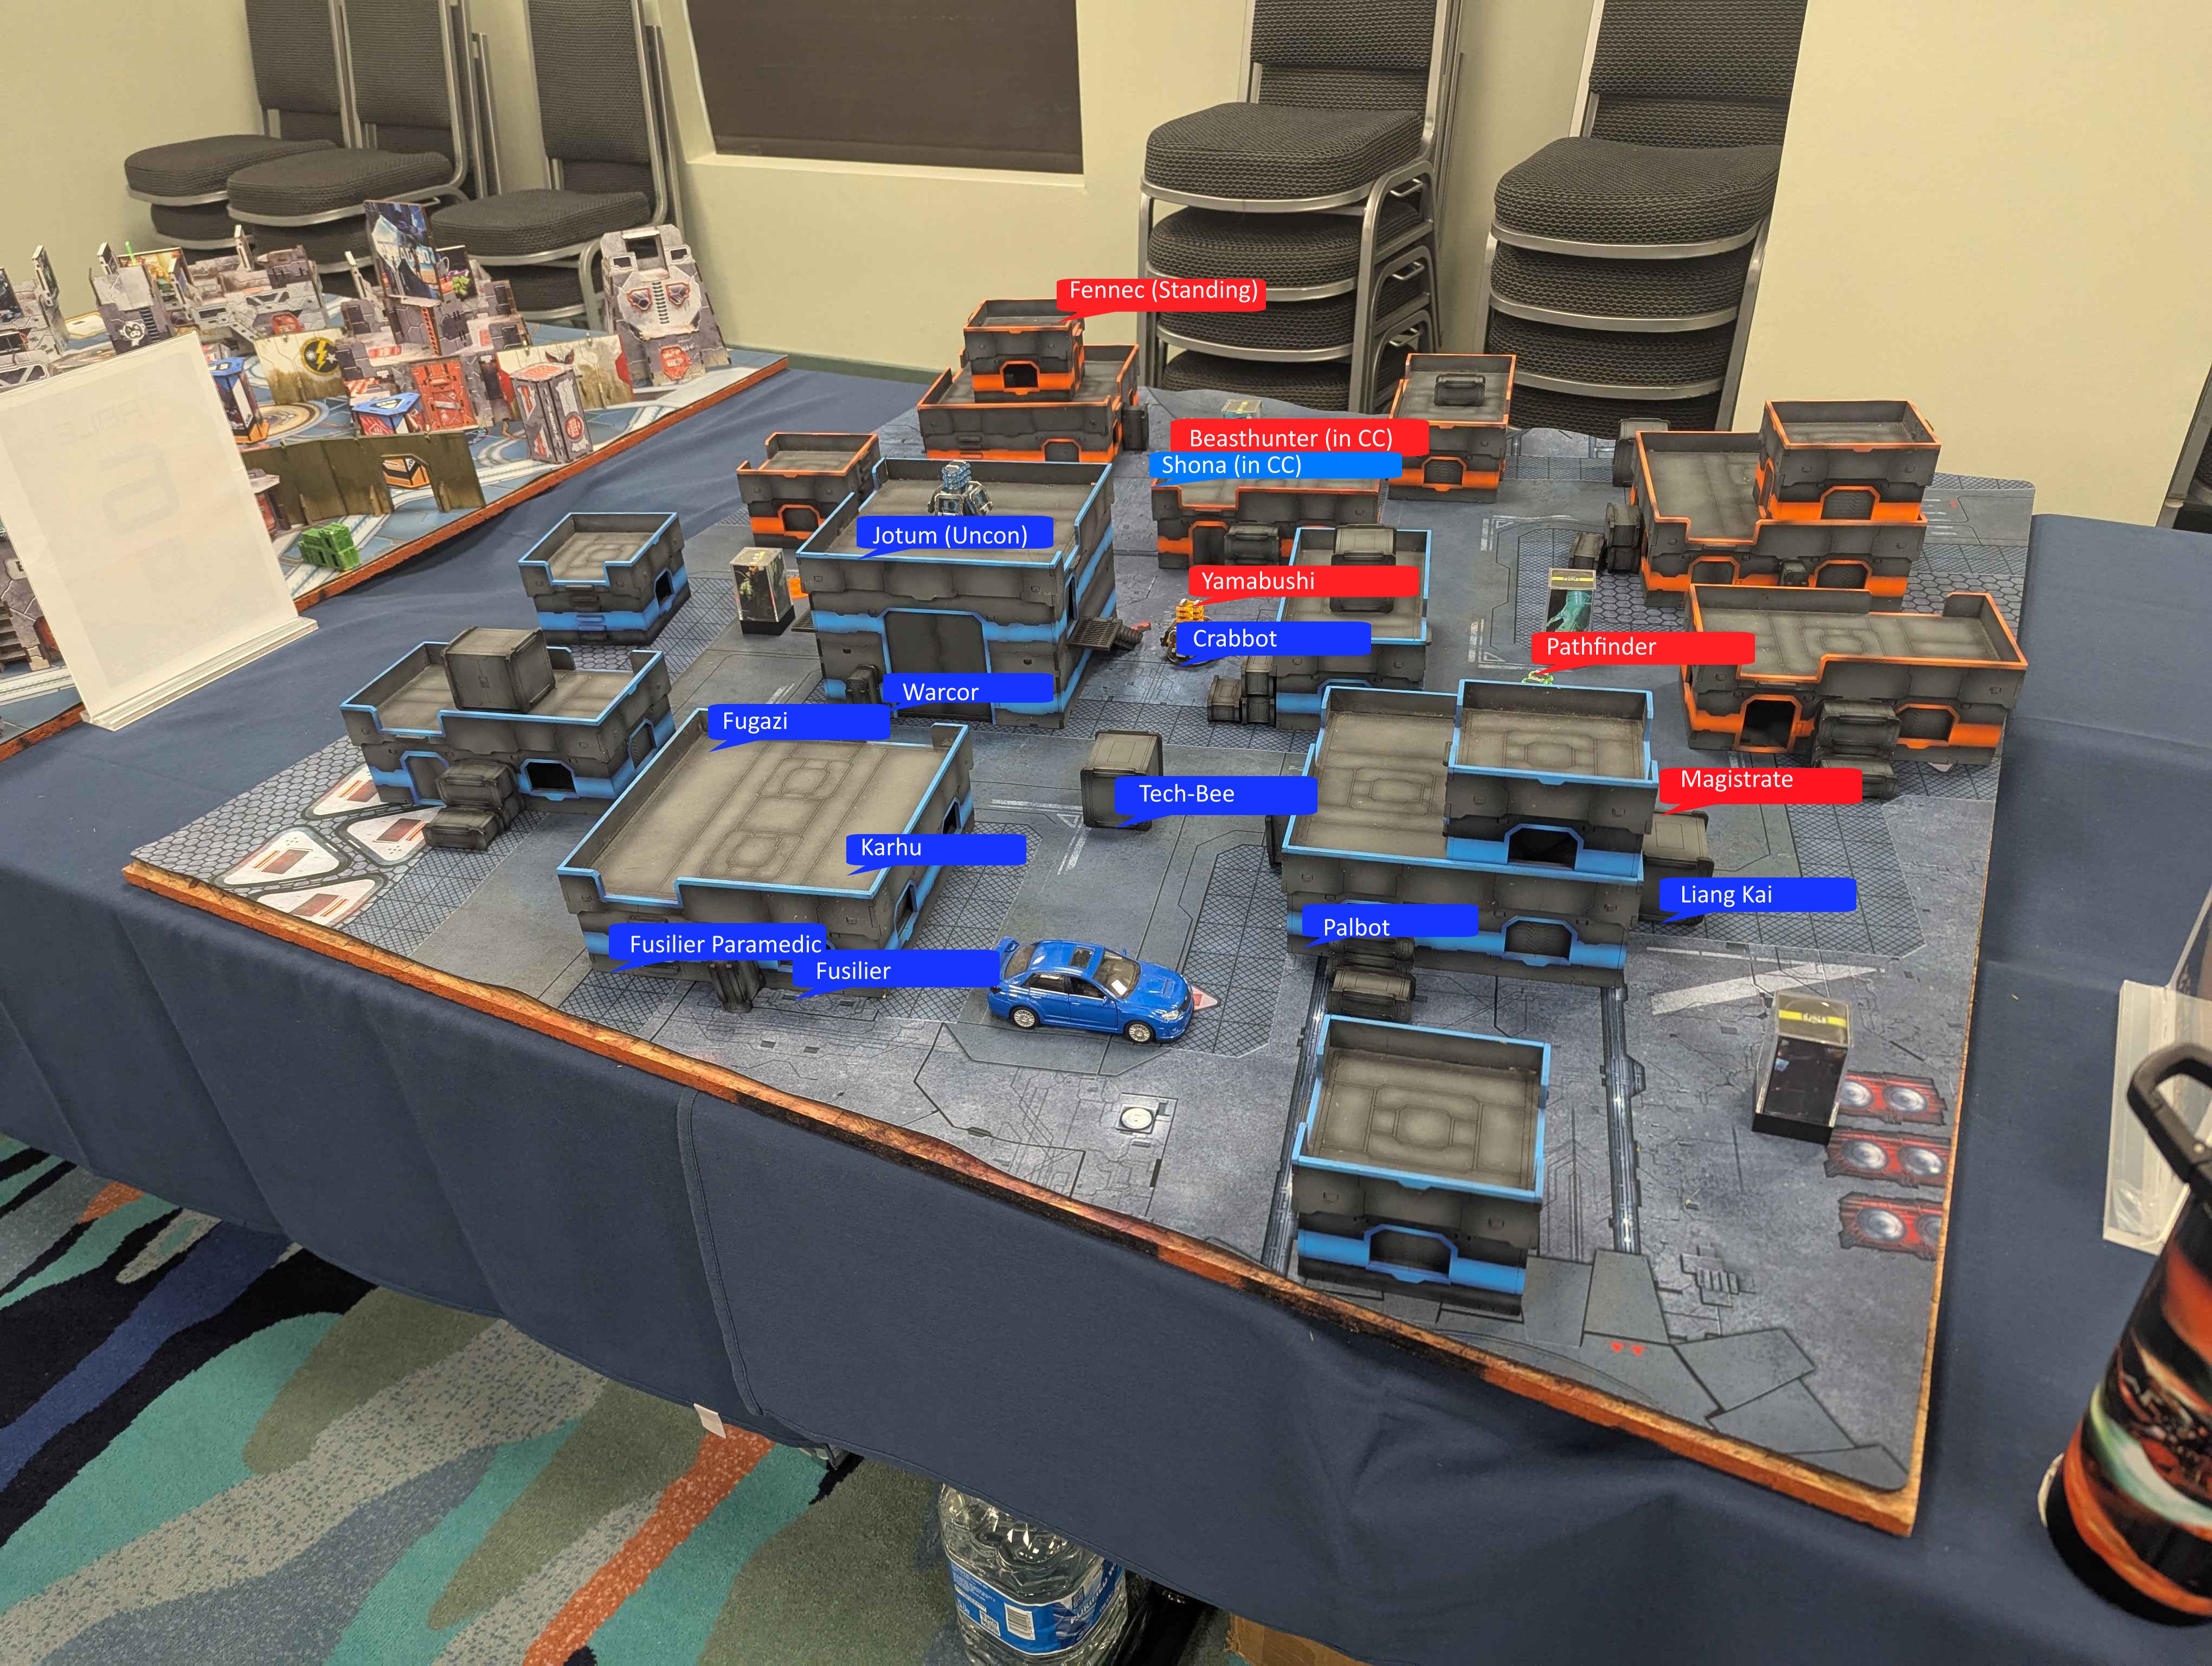
The board looked roughly like this (I didn't get many pictures during the event, so this is from memory).

Turn One (Svalarheima)
He stripped two orders from my first group, which made sense, and we were off. I opened the game by spending an NCO order to have my Karhu blast a panzerfaust Jackal that was looking at my Jotum, since I'd deployed out of cover with the intent of fighting the Black AIR efficiently. That one, the Jotum moved sideways and dropped the Black AIR with a shock round from its HMG. Liang Kai could move now, but the Crux was still watching a lot of board and had a combination of equipment and skills (thanks to the free Blitzen) that made him threatening out to 32" against all of my guns.
This was something that I had to solve for in order to move towards objectives, so I spent my full Group 2 order pool to position my Beasthunter behind the Crux and unload two heavy flamethrowers. The Crux dodged successfully, which was no real surprise, but elected to dodge into CC with the Beasthunter. That one I didn't expect, and I gladly moved the Jotum up to shoot into the close combat on 12s, popping out my Crabbot as I moved (the Crux had broken cover to engage the Beasthunter). The Crux went unconscious and the Beasthunter died, so I shot the Crux's unconscious body to prevent a Speedball.
Seeing a camo marker nearby and expecting it to be a Yamabushi, I intuitive attacked it with the Jotum's heavy flamethrower. I expected this to be a Yamabushi, but it was Dart. Whoops. Didn't expect that. In the event, she luckily chose to dodge rather than throwing an E/M grenade at my face on 16s. In the event, she rolled an 18, failed her dodge, and burned to death.
I wasn't planning to attempt to score on the first turn since I figured some weakening of the Kestrel force needed to be done, so I pulled the Jotum back to the starting line along with the Crabbot and passed turn. I'd killed a lot of his most dangerous pieces, but I figured on scoring on the second and third turn.
Turn One (Kestrel)
Hackknee immediately advanced out with the Griffin/Bipandra link towards the beacon. He knocked my a Fugazi and my Karhu unconscious along the way and left Bipandra touching the beacon prone, then moved the Griffin back to a position about 30" away from the building with the Vargs and stood their watching.
He moved up the Pathfinder to touch the console on its side and dropped it into Suppressive Fire, then moved a Yamabushi up and around to engage the Jotum in CC. He spend one order fighting and I made both armor saves, then he passed turn and left the models engaged.
Moving across the board like that takes a lot of orders, but Kestrel has good access to tacaware and marker state, and he was able to do so without any real opposition by going prone at appropriate times. The console he chose to touch was well protected from view on my side, and a Pathfinder in suppressive would be an irritating obstacle for Liang Kai. Or so I thought. He scored two points and went up 2-0.
Turn Two (Svalarheima)
 Well, down 2-0 at the end of turn one was about what I expected. I hadn't taken any major losses, and felt comfortable doing what I thought I needed to do this turn.
I declined to use Liang Kai's impetuous, which was a mistake in retrospect. I thought the Pathfinder had better odds here, but Liang Kai's mimetism and dodge bonus actually would have made it rather safe had I gone for it.
Ah, well. Something to remember for another time.
I spent two orders from Group 2 shooting the Yamabushi engaging the Jotum, sending it to Dogged and then killing it. The Jotum took 1W from friendly fire, which would be pertinent later this turn. I spent one more order picking up the Karhu with a Medikit and reformed the fireteam.
The Jotum now free, I moved it to the side and engaged the Griffin for 3-4 orders of shooting, eventually doing a wound and forcing it prone. This freed up the Vargs, and I figured Shona had really good odds to finish off the Griffin in CC while the Vargs could shoot Bipandra off the beacon.
So I proceeded with that plan. Here I made a critical mistake and dragged the Varg FO up with the team rather than leaving it behind to touch a console. I'm not even sure why I did this other than bloodlust, but it was a stupid mistake that would cost me a crucial objective point. The Varg K1 shot Bipandra dead, but the Griffin dodged standing as a result. The team now exposed to a Pulzar due to being foolishly stacked up behind a car, I shot the Griffin with the Jotum again to no effect.
This stupid Griffin just wouldn't die, and I was running short of orders. I activated the team and had Shona engage the Griffin in CC. It Pulzared in response, and both Vargs went unconscious while Shona went into NWI. Damn. Horrible series of mistakes led to this point. The Griffin did indeed die, but that let a Beasthunter around the corner dodge into LoF of my Jotum and Shona.
WIth just a couple of orders left, I thought I saw a chance to seal the deal. I activated the Jotum, moving the Crabbot into base contact with the beacon to score. He revealed his other Yamabushi, and I shot a burst of HMG fire at the Yamabushi on 12s. I missed them all, got hit by a panzerfaust, and failed 2/3 saves, sending me unconscious.
Well, that was no good. This meant I wasn't scoring this turn either. His Yamabushi could easily touch the beacon and the Pathfinder was still touching a console, so it would be 4-0. Not where one wants to be, no matter how depleted his forces.
With the Vargs dead, I didn't have many other active pieces in that order group on which to spend orders, so I jumped Shona over to engage the Beasthunter, which flamethrowered. So I dodged into CC and left it there. His remaining Fennec dodged standing in response. That... I didn't expect. That would make the next turn more difficult.
Turn Two (Kestrel)
With the Jotum down, but very little remaining in his list in terms of active pieces, he spent his orders moving his living Yamabushi into base contact with the beacon and moving his Magistrate down the side of the board to complete a classified. No resources were left for fighting or anything face to face, but he did score the classified, so went up 5-0.
Turn Three (Svalaheima)
 I spent my last command token to move a model into my Group 2 and get an extra order for the repair work. Here another critical mistake happens -- I didn't double-check the location of the HVT, and moved the Palbot towards the original location of his HVT, which was now empty. This denied me the opportunity to score another classified here. My thought was simple enough -- move the beacon to his side (2OP), touch a console and the beacon (1OP each), do one classified and secure HVT and I'd win 6-5. Everything would have to go right, but there was a chance to do it.
I used Liang Kai's impetuous order and meleed down the Magistrate, and elected to use Shona's impetuous (from Frenzy) to melee the Beasthunter. The Fennec shot into CC and Shona took a wound, going into NWI. So Shona jumped up and shot at it with an SMG, but missed, then spent one more order to kill it in CC.
I then spent an NCO order to kill the Pathfinder. I couldn't move the beacon while the Yamabushi was touching it, and I couldn't let him score again. With that done, the Machinist moved up the board to the Jotum, moving the Palbot over to his old HVT location.
I repaired the Jotum successfully and used it to shoot down the Yamabushi, then used Liang Kai's neat specialist status to Super Jump and move the beacon with my last G1 order. I had one order left in G2, and could already see the problem -- I wouldn't be able to reach the beacon in one order, and the Crabbot (now active again) had no orders left to spend to chase it. So scored 4OP (Secure HVT, beacon in enemy table half, touching a console) and passed turn.
Turn Three (Kestrel)
Hackknee considered moving a Fugazi up to touch a console, but I warned him that he might not have enough movement to reach it and would grant a dodge to my Machinist, who could reasonably touch the beacon if I passed my dodge. He was already winning, and no point risking the win by doing so. So the game ended here, in a...
5-4 Kestrel victory, with 18VP to my 218VP
Postmortem
My God, I made a lot of mistakes. Stupid, sloppy mistakes. The Jotum did exactly what it needed to do, and I can't fault the TAG for its performance despite eating a panzerfaust. It has been doing the main body of my work all game and it dying had little to do with my not winning, other than an insanely aggressive plan. I missed too many easy OP to blame the Jotum for this.
I didn't plan or expect to score on my first turn. It's very hard to defend static objectives in Infinity, especially on the first turn when the opponent has access to all or most of their resources. I was quite happy with my first turn and the number of effective tools and orders I was able to remove. So losing 2OP there is no bother. So the decisions later in the game that sealed it are what I'll dwell on.
The problem comes down to my Turn 2, with a bit on Turn 3. Having looked at the odds, moving Liang Kai up to touch a console would've been smart. He might've died to the Magistrate on the next turn and not been able to push a button the next turn, and I don't mind being cautious on this.
Leaving the Varg FO behind and touching the console on the other side would have solved for this entirely. I did want one Varg to move up with Shona so that I could shoot Bipandra, but that doesn't need both of them. I really didn't even consider it in the moment, and I'm not sure why. It scores OP and puts me in position to push the console next turn, and I just... didn't do it.
Spending my impetuous order on Shona to kill the Beasthunter was one thing, but I didn't expect to have to spend two more to kill the Fennec, with it surviving my SMG while dodging to avoid a double nanopulser. It's not unlikely (the Fennec only has a 55% chance to die here), but it had to be done to for the Machinist to advance safely to the Jotum and have a chance at scoring my other classified.
Writ large, most of my T2 was a mistake. The Griffin needed not to be watching the console approach, but didn't need to be dead. It probably would've been wiser in retrospect to move the Jotum in a wide arc in the other direction, killing the Pathfinder and approaching the Griffin from an angle that wouldn't allow cover. I often underestimate the speed of TAGs but, even that aside, it would've freed up Liang Kai and denied 1OP for touching a console, leaving me in a position where the Beasthunter couldn't come near the engagement at all and force ugly choices.
Starting my T3 in the position I was in was a bad one. Previous mistakes had compounded here and I had to kill the Yamabushi in order to move the beacon, hadn't dealt with the Pathfinder on the previous turn and thus had to spend a precious order on that, and didn't double-check the HVT location, so my Palbot was horribly out of position. Even if it couldn't have reached the HVT, the Palbot moving in from its close position would absolutely have been able to reach the beacon that the Machinist could not and we at least would've drawn.
I felt that Shona had to deal with the Beasthunter so that she could kill the Fennec and allow my Machinist to move. The Palbot had no path to the Jotum without crossing the Yamabushi's line of fire, so the Fennec had to go. Not an ideal situation in which to find oneself, and the decisions that led here were made on previous turns. It was well played on Hackknee's part to dodge the Fennec standing, and I found myself very much wishing that I'd held back the Varg K1 by the first console to deal with this.
In the event, though, the most crucial mistake on my T3 was that I didn't move the Crabbot when the Jotum shot the Yamabushi. Again, not thinking. The Crabbot was controlling the beacon as soon as the Yamabushi died, but the beacon was going to move. Moving the Crabbot to where the beacon was going to land would've saved this and turned it into a draw as well. If the Yamabushi chain rifled the Crabbot, well... the Crabbot might make its save. But it wasn't scoring anything where it was anyway.
It was a well-played game by my opponent. He played to every out he saw on the board, and I didn't take the time to consider my path to actual victory rather than just more kills.