Background
After a brutal Round Four, we broke for lunch. It wasn't catered today and we had a couple of hours for it, so my wife and I had lunch at a local New York style pizza place on the 16th Street Mall with some folks from the Texas meta.
Hackknee, my first round opponent, was still 4-0 and thus had a chance to win the whole shebang, and Sneaky Snake, a devoted Military Orders player, was representing his sectorial well at 3-1. Everyone was having a good time at the tournament which, despite its massive size, was organized about as well as an Infinity tournament that size could ever be.
As it happened, Hackknee was playing on the table next to mine for Round Five, against (spoiler) against Sectator (Cutter on Discord), the eventual second place winner.
Prelude
Walking up to the board, I found that my opponent was a pleasant fellow with the ITS name of BG. Yes, just BG. He'd already taken the liberty of removing the roofs of some buildings in the center to make it more playable and told me he was playing Tohaa. He asked that we treat the center building as a room of infinite height and, looking at the board, I quickly agreed.
The board was in a classic bowl shape, with buildings in the deployment zone higher than the center. As a PanO player, this favored me. But it wouldn't make for a very competitive game unless the dice went horribly wrong. PanO can outshoot most things on a wide open board like that, so I quickly agreed.
Knowing that he was playing Tohaa, I decided upfront to play my Jotum list. It had only gotten played in the first round and, besides, Tohaa does not play well into TAGs due to their relative lack of hacking.
Classifieds
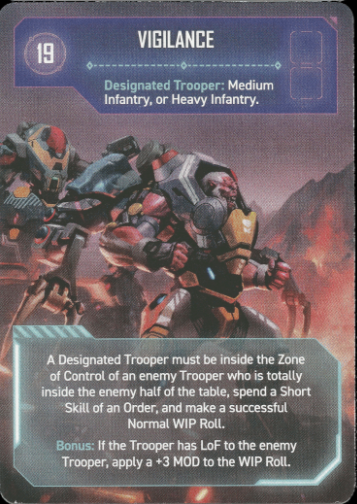
Provisioning only has a single classified objective, and I happily selected Vigilance when it came up. With Karhu's recent promotion to MI and a Varg team likely to be doing a lot of work thanks to the mission's Forward Observer bonus, this seemed a classified that was easy to accomplish.
The Lists
Disclaimer: Tohaa unit names are difficult to remember for me and, despite them being around for as long as I've played, they're uncommon enough in the meta that I likely have some units wrong.
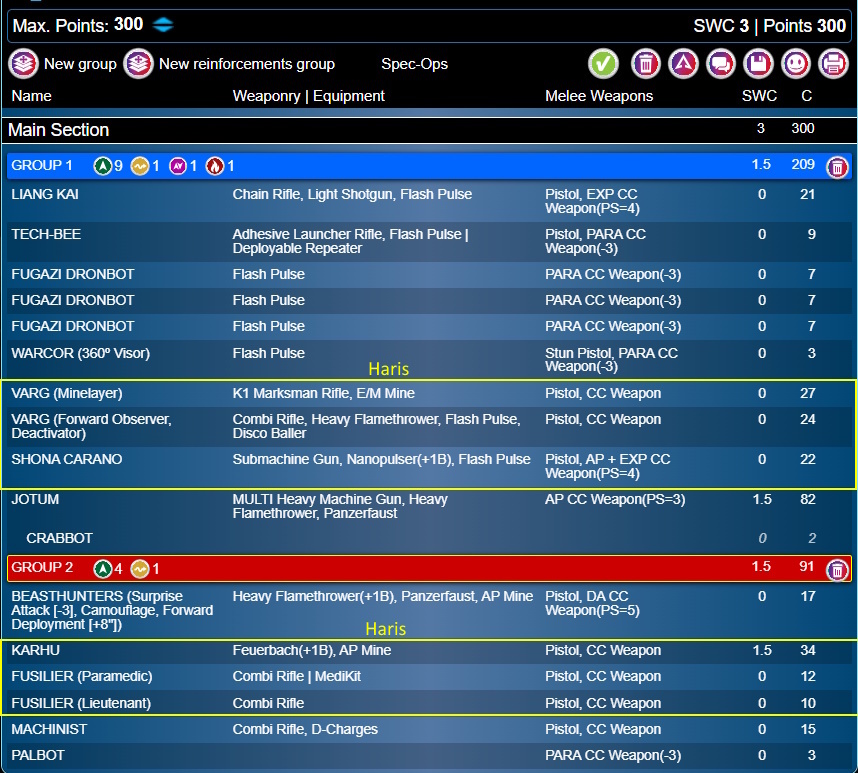 I ran the Jotum list from the first round again. TAGs are always a strong play into Tohaa due to lack of hackers or strong E/M shooters, and a 6-4 Crabbot would be a great tool to snag a box or two while accomplishing the mission.
Additionally, being able to send an STR specialist inside the central room without worrying about Pheroware seemed like a huge boon.
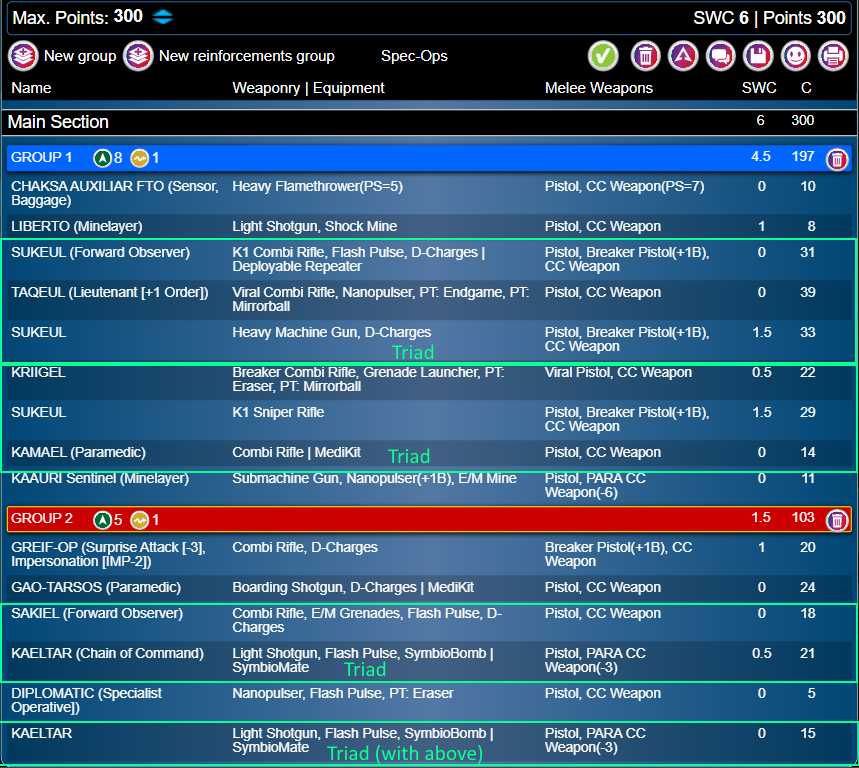 My opponent brought a list loaded with Sukeuls and Pheroware, which is about what one expects when playing Tohaa. I was surprised not to see a Sukeul missile launcher, though, since that profile is even now considered a pretty strong hard ARO.
A couple of capable links and some Pheroware to mess with units going after the center console were great selections. No Makauls was a small benefit for me. Eclipse on 13s with +1SD is still quite reliable, and capable CC combatants with flamethrowers would put quite an obstacle in the way in close-quarters fights.
Deployment
Provisioning forces some interesting board states for deployment, especially in a five round event that's otherwise set up for conventional deployment zones.
I won the LT roll and elected to go first, since Provisioning has a pretty strong first turn advantage due to how difficult it is to extract boxes from an opponent's safe area.
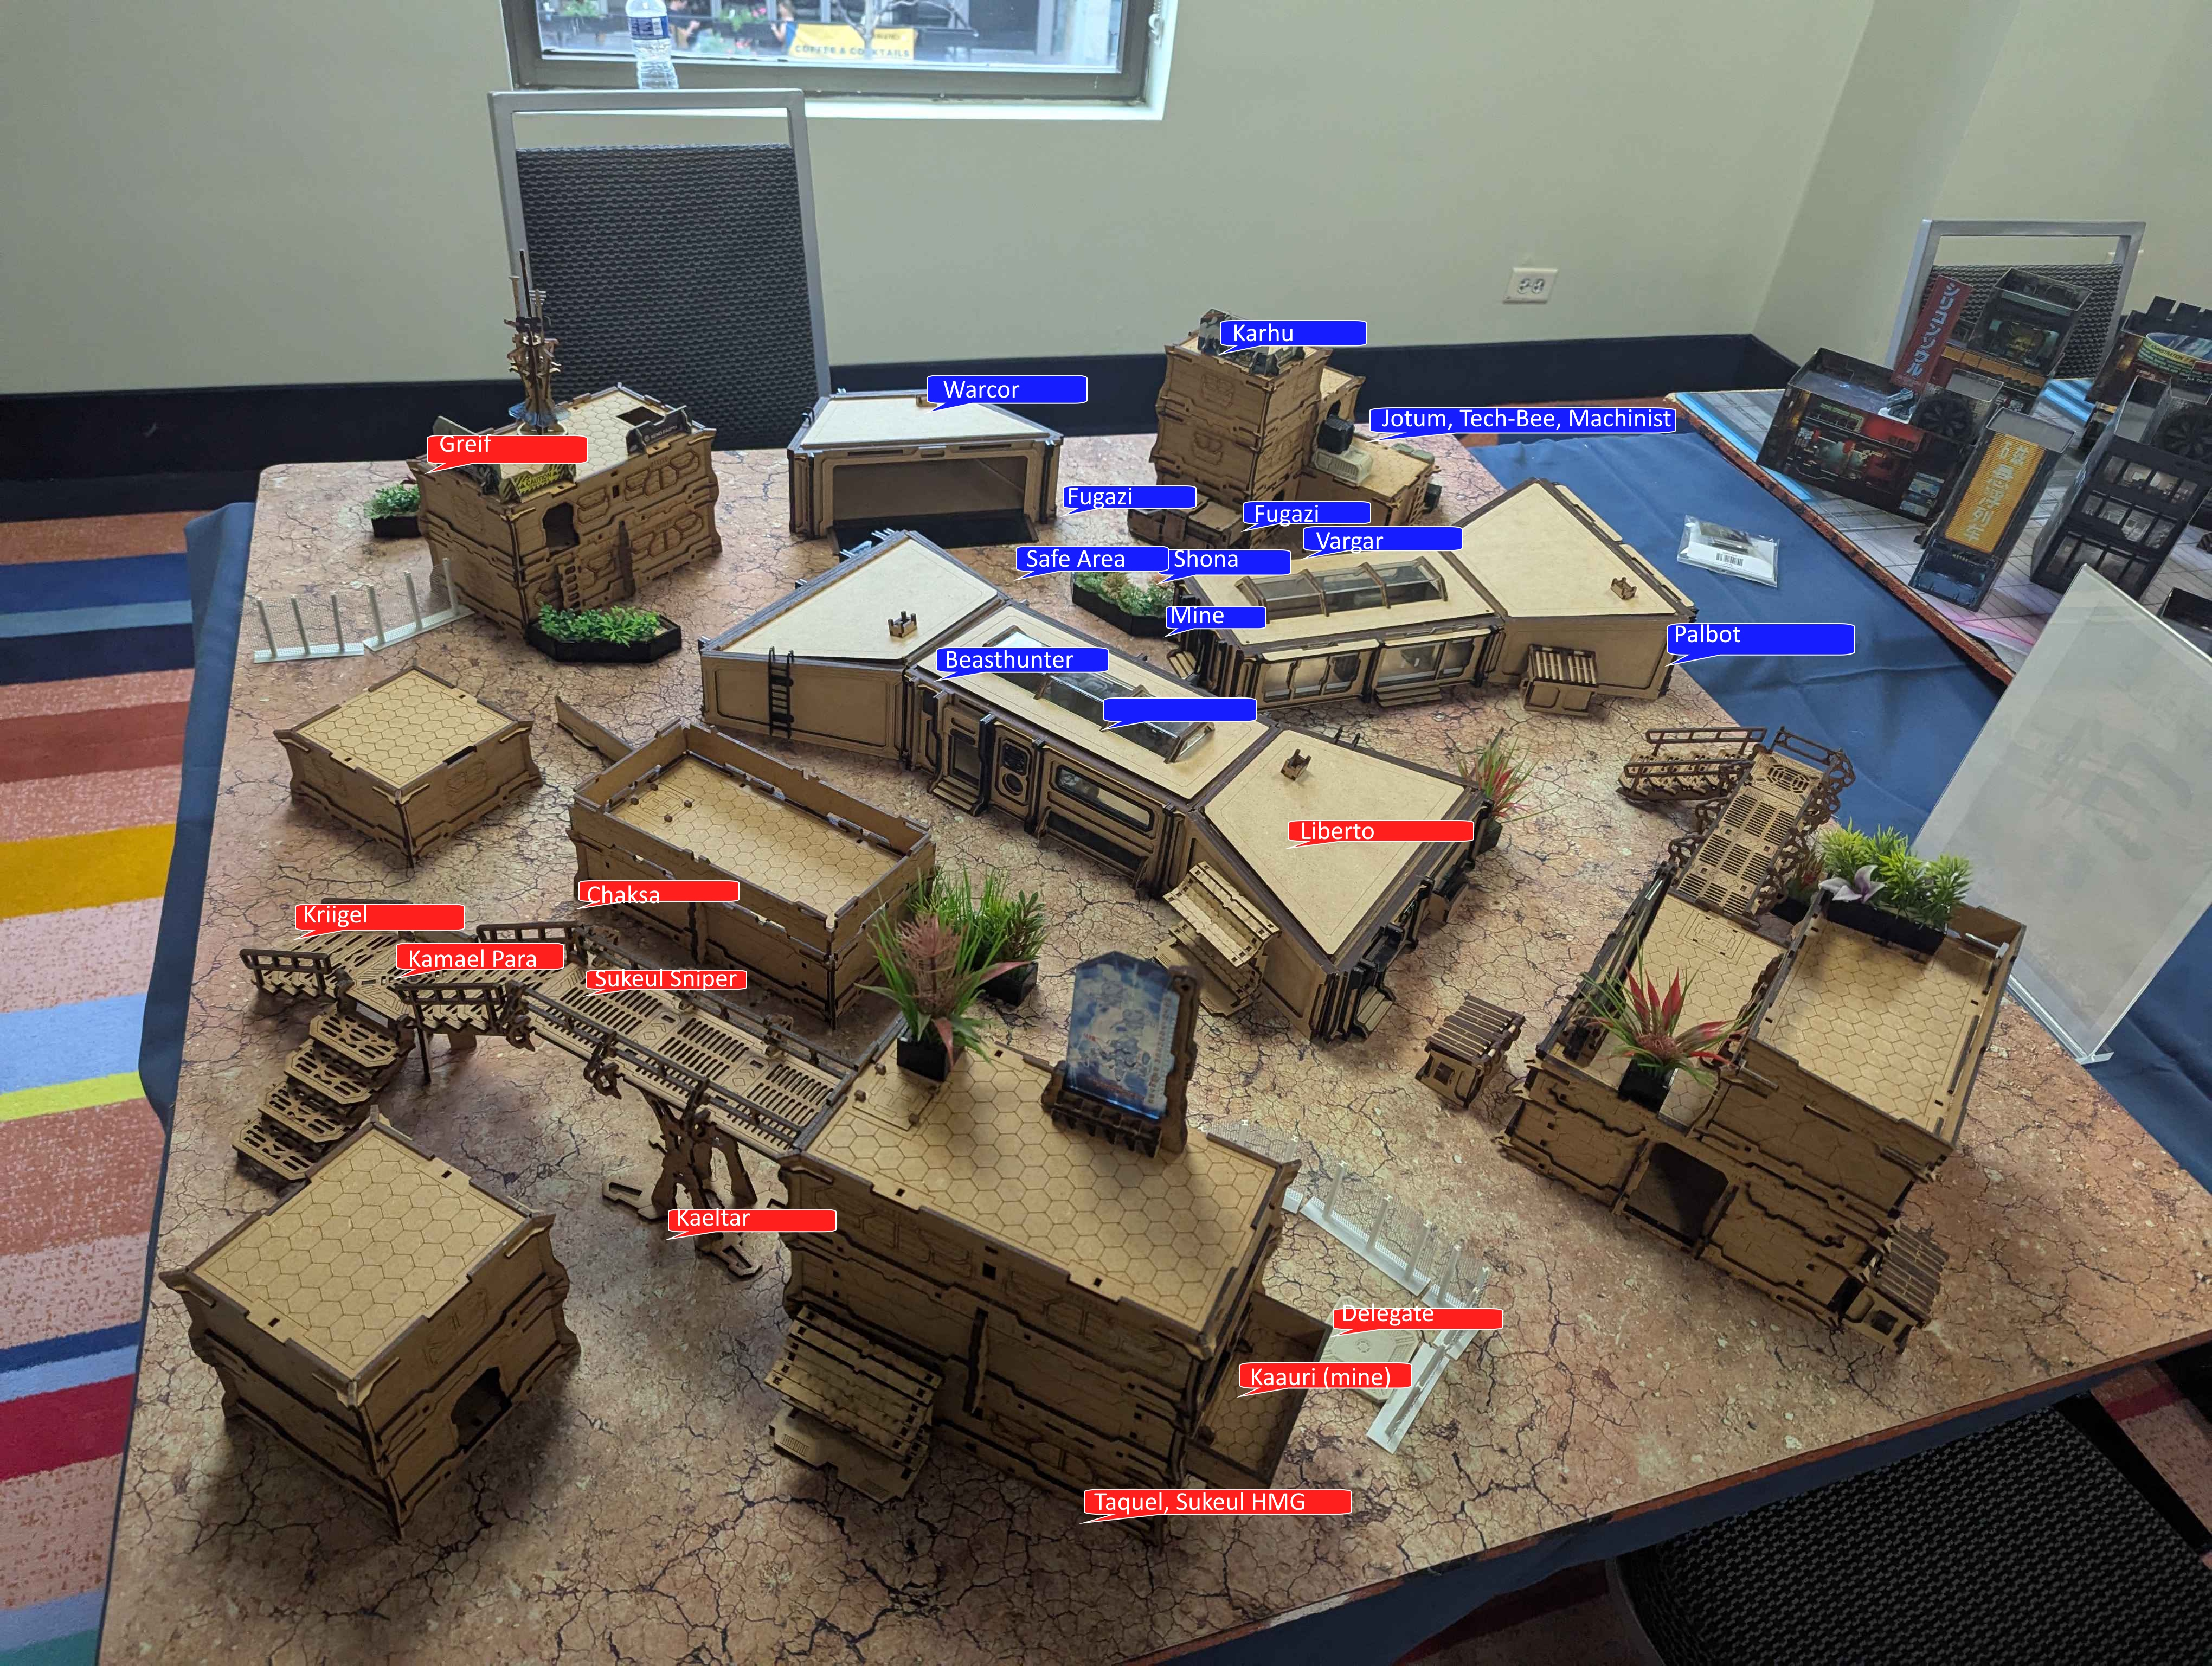
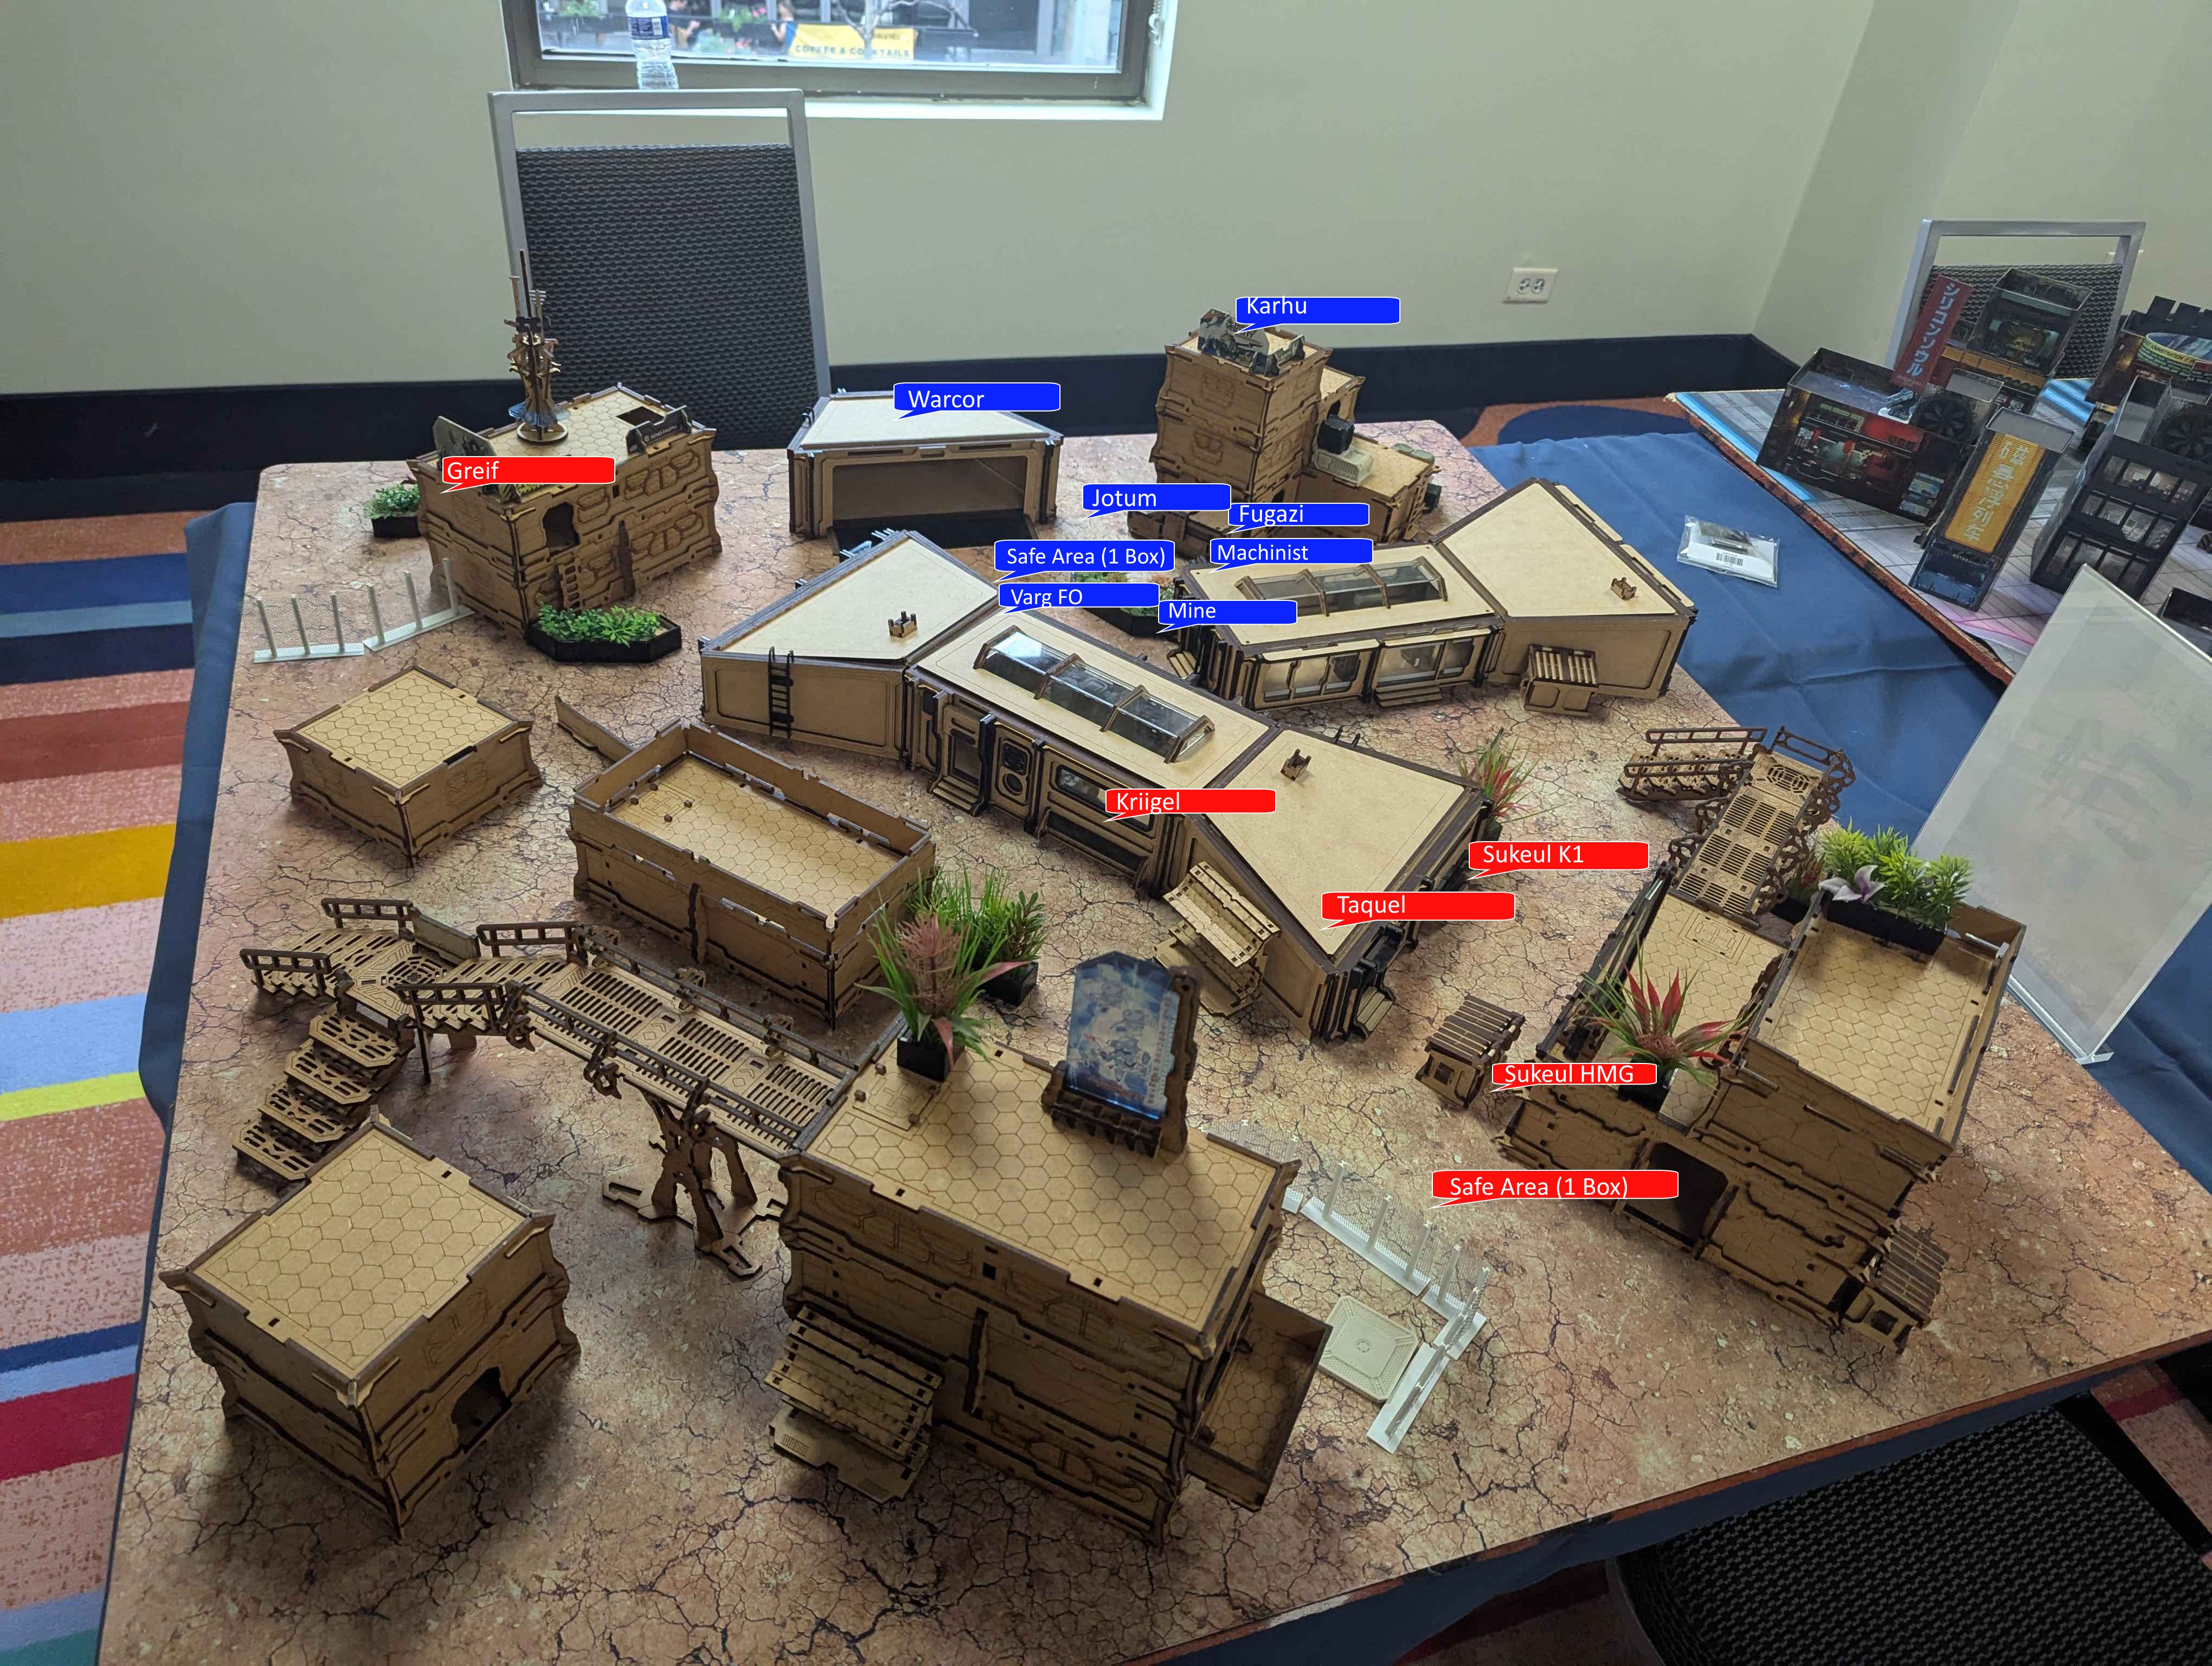
The Karhu link went up high where they would, as it turns out, do nothing all game. The Vargar haris deployed near my safe area, tucked right in front of my deployment zone with an E/M mine covering it. Fugazis were scattered around, and my Warcor covered one flank to the best of its ability.
A Palbot was placed on the other flank to bar the way and support the Jotum should it go in that direction, and the Jotum and Machinist were placed centrally in the back of my deployment zone. The Beasthunter was deployed aggressively to attack on the first turn, and Liang Kai was held in reserve.
My opponent deployed a link with a Sukeul backbone and SymbioBomb/Mate support on the long bridge on his side of the deployment zone, with another link tucked behind a building inside his DZ. A Kaeltar (probably Chain of Command) hid under a bridge pillar, and a Diplomatic Delegate was positioned to protect the Taquel link with Pheroware. An E/M mine was positioned similarly. This was followed by a camouflaged Liberto inside the room along with the usual mine.
In reserve, I dropped Liang Kai just outside the room. He deployed an IMP-2 marker in a far corner. No SymbioBomb/Mate, so probably not Jaan.
Turn One (Svalarheima)
My opponent docked me two orders from Group One, and we were off. Provisioning is, as mentioned, a mission that's similar to Supplies but different in that you have a Safe Area from which it's pretty difficult to retrieve boxes once dropped, so there was an incentive both to do damage and attempt to score.
I started off by using Liang Kai's impetuous order to jump and clear the Liberto's mine, in order to clear the Beasthunter's way. Surprisingly, he decided to reveal the Liberto and drop another mine. It was a good tactic to delay -- the longer Liang Kai spent in this room, the less orders I'd have to attack, and the longer the Beasthunter would be trapped. I spent another order to leap into CC and dodge and, in response, he dropped yet another mine. I spent an order to kill the Liberto, and still another to dodge the third mine.
This ended up being significantly more costly in orders than I expected to make it past a Liberto but, with the building shaped as it was, Pheroware attacks could be made fully across the room. I'd had enough experience with Pheroware, especially Eraser, that I decided to go for broke and moved Liang Kai to engage the Diplomatic Delegate and kill it. Liang Kai got isolated from the E/M mine in the process, but that was something I was prepared to accept in order to remove one source of Pheroware from the board.
With the way clear, the Beasthunter moved out to engage the Sukeul team on the wall. Interestingly, the Sukeuls themselves didn't have SymbioMates attached, which is a departure from what I usually see. When the Beasthunter came into view, the Sukeul sniper elected to Discover, with the rest being prone. The Beasthunter's jump had finished in a position where I would be in Total Cover at the end of the move, so I just flamethowered the Chaksa in the back. I then spent another order to recamo, jumped up to see the Sukeul and Kamael, who both dodged. The Kriigel was outside of template range and shot. Both the Sukeul and Kamael failed their dodges and burned to death thanks to Surprise Shot, and the Beasthunter went unconscious.
I spent a couple of orders in Group One moving the Vargar team up towards the center console, but didn't have enough orders to reach it, and passed turn.
Turn One (Tohaa)
My opponent decided to spend his Group Two orders dropping in his Gao-Tarsos to grab a box from the console nearest his Safe Area and deposit it there. He then came around the corner, shot Liang Kai with the Taquel, and dropped two Overkill Speedballs. He picked them up, and moved up to use Pheroware against the Vargar and Shona after Jumping the Kaeltar minelayer off its perch to approach the center room.
Overkill is a neat choice here, since it would let him use Pheroware: Endgame quite a few times as desired, and he proceeded to do so. Shona critically reset against the first attempt, took 1W from the second, and the third attempt failed. Endgame uses expended and Shona luckily alive, he moved up the Kriigel and reformed the link around it, and passed turn.
Turn Two (Svalarheima)
 Well, it was a sticky start to my Turn 2. Pheroware is a nasty thing when you need to reach an objective near a Pheroware user, but STR units are thankfully immune, so I decided to swing the Jotum around the far side of the building to shoot off the Pheroware users and grab a supply box on the way.
The Kaeltar (probable Chain of Command) and other Kaeltar died with no trouble, but the Kriigel managed to throw up Mirrorball as an ARO, and the Taquel ducked around the corner after making armor saves against the Jotum's HMG. The Crabbot grabbed a supply box from the console on the far side, leaving two boxes in the center of the map that would determine the fate of the game.
With nothing to shoot with the Karhu, I spent my Group Two orders moving the Machinist up to make a run at the center console on turn three, and passed turn.
Turn Two(Tohaa)
With the Kriigel still alive but his order pool depleted, my opponent spent a couple of orders isolating Shona with Pheroware: Eraser. But isolated isn't dead and Shona was still in dodge range of the console thanks to her 4" dodge, so he didn't feel safe moving into the room to grab a box yet.
He sent the Kriigel into the room and peeked out to kill Shona and the Varg K1 in succession, but ran out of orders at that point. Moving the link to safety with the Taquel inside the room to contest any attempts at the box, he passed the turn back.
Turn Three (Svalarheima)
 Only mission-relevant units listed
Well, it all came down to this. We were tied at the moment, but I had the advantage of turn order to pull from the box, I had specialists nearby, and all I had to do was clear out a Kriigel and Taquel in order to seal the win. Probably. Given the difficulty of extracting boxes from a safe area and how strong my defenses around it were, I felt good about keeping what I might manage to extract at this point.
And thankfully the Jotum could fit inside the building. So I did. It moved up and shot the Kriigel through the doorway, easily killing it. The Taquel was still watching the path to the console from the door near my side, so the Jotum moved up and flamethrowered it to take off a wound, then entered CC to block line of fire. But ended up killing the Taquel in the one order we spent engaged.
With the way clear, the Varg FO easily extracted a box and brought it back to my safe area, completing Vigilance on the way. The Machinist had barely enough orders to do so and succeeded only thanks to a Tactical Support card that granted automatic success. So I passed turn with three boxes controlled and in my safe area.
Turn Three (Tohaa)
With no real path to victory, since any boxes dropped inside a Safe Area, even by a trooper being killed, still count as being controlled by dint of being in a safe area. So he moved up his Greif and killed my Fugazi, dying to the Karhu in ARO. He then completed his classified and used the Sukeul K1 combi for a couple of orders to shoot the Jotum in the back and kill it, resulting in a...
7-2 Svalarheima Victory
Postmortem
Provisioning is certainly a different mission. While I appreciate the willingness of CB to change things up with the circular corner deployment zones and putting a twist on Supplies with a Safe Area, the rules for controlling boxes are madness.
I've played the mission a fair few times, and it has an unfortunate combination of strong first-player mission advantage due to a lack of exclusion zones, the difficulty of extracting boxes from an enemy Safe Area, the Forward Observer bonus only applying to extracting from a console and not a Safe Area. But most of all the weird thing where you can "deposit a box" in your safe area to secure it or just... stand there and die for the same effect, so late game box rushes by one player are very difficult to interact with. Forcing a short skill to deposit a box in such a way that it would force a WIP-3 malus would be better than a Machinist dying while standing there and accomplishing the same.
That said, as usual, some mistakes were made. The Beasthunter was very effective, but the Jotum less so. I didn't even consider whether the Jotum could move through the center room until the last turn, and it would've been incredibly strong to move through it on my second turn to clear the way. Plus I could've cleared out the center console at that point and made it safe for the Varg FO to do its job. Can't Mirrorball against a heavy flamethrower.
Other than that, the game went really well. Decision fatigue sets in a bit at the end of a long event like this, for all of us. Everyone I talked to had a great time at the Krug, and I got a chance to help clean up before I had to leave to the airport. I've got work to do on a better, more defensive Jotum list.
Full postmortem follows in another post.